Introduction
VMware Avi Load Balancer is a fully software-defined, multi-cloud application services platform that delivers advanced load balancing, intelligent web application firewall (iWAF), and Kubernetes-native ingress capabilities.
In VMware Cloud Foundation 9 (VCF 9), load balancing is a foundational service for both platform and application teams. By distributing traffic across multiple backend services, load balancers improve application availability, scalability, and performance—capabilities that are essential for modern, cloud-native workloads.
With the introduction of the Supervisor and vSphere Kubernetes Service (VKS), VCF 9 provides a powerful platform for running Kubernetes workloads directly on vSphere. As these environments grow in complexity, GitOps-based operational models become increasingly important.
Argo CD complements this architecture by enabling declarative, Git-driven continuous delivery for Kubernetes running on the Supervisor and VKS clusters. When used together, Argo CD and VMware Avi Load Balancer allow teams to manage application deployments, ingress, and networking configuration in a consistent, automated, and auditable way across the VCF 9 stack.
The goal of this blog
This blog post explains how to install and configure ArgoCD on a vSphere Supervisor and how to use it to manage deployments to vSphere Kubernetes Service (VKS) clusters.
The walkthrough covers installing ArgoCD on the Supervisor and deploying a simple application to a VKS cluster namespace using a GitOps workflow with ArgoCD.
This blog post does not cover the installation of Avi. Avi is already deployed in the environment, and the virtual services will be created on Avi. You can read my previous blogs on how to install Ako (blog post)
What is the use case?
Use Case: GitOps Operations for VCF
Modern private clouds can’t scale with manual, UI-driven operations. They need automation, consistency, and built-in governance.
This use case highlights a GitOps operating model for VCF using Avi and ArgoCD. All configurations are defined in Git as the single source of truth and delivered through CI/CD pipelines; no CLI, no UI.
What I am using
For my setup, I am using the following:
VCF 9.0.2
vCenter 9.0.2
NSX 9.0.2
ESXi 9.0.2
Avi 31.1.2 / AKO 2.1.2
Getting started
This blog is building on my previous blog.
All the configuration and yaml files can be found on my Codeberg.
Avi Integration
In my environment, I have installed Avi. In the deployment I am doing, I am using Ingress and GatewayAPI. This is only possible if you have an Ingress controller. If you are just using L4, it is not possible to use Ingress, but you need to use type: LoadBalancer.
Because I am using Avi, I can also use WAF (Web Application Firewall). I will explain this in the end sections.
Upgrading Supervisor
Note: At the time of writing, Supervisor upgrades are still tied to vCenter upgrades. In a future release, Supervisor upgrades are expected to be decoupled from vCenter and will instead rely on a Content Library–based upgrade mechanism, as described here.
To run ArgoCD, we need to upgrade the Supervisor. (see Supervisor Upgrade)
Minimum needed: Supervisor release 9.0.0.0100, which includes support for Supervisor version 1.30.10
I am running: v1.31.6+vmware.3-fips-vsc9.0.1.0-24953340
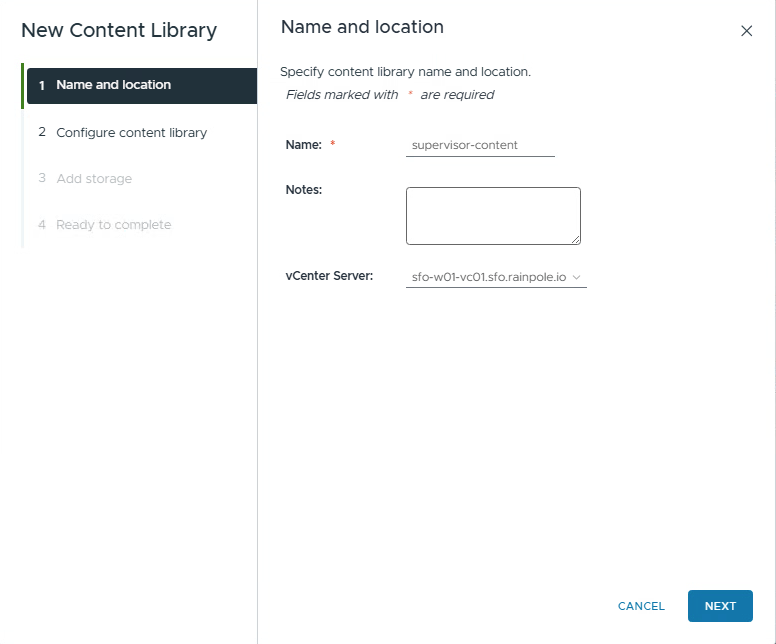
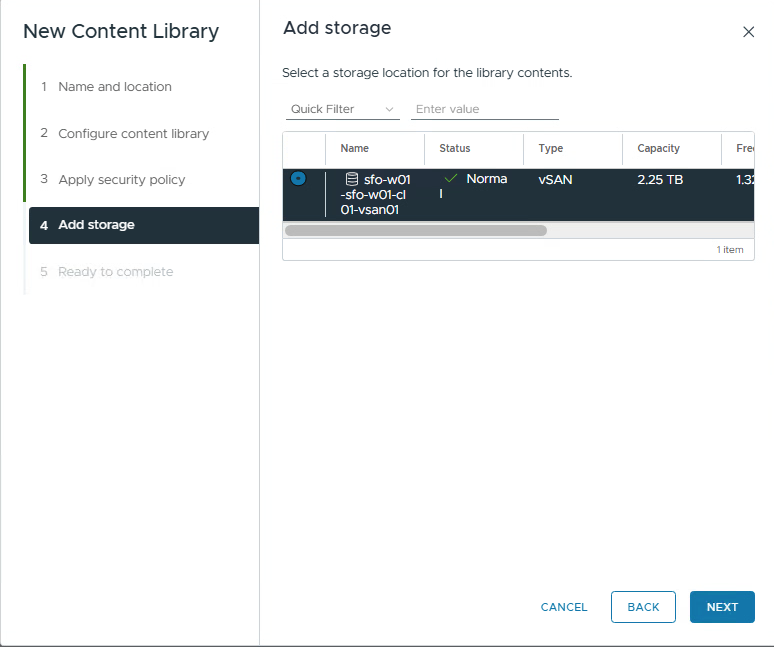
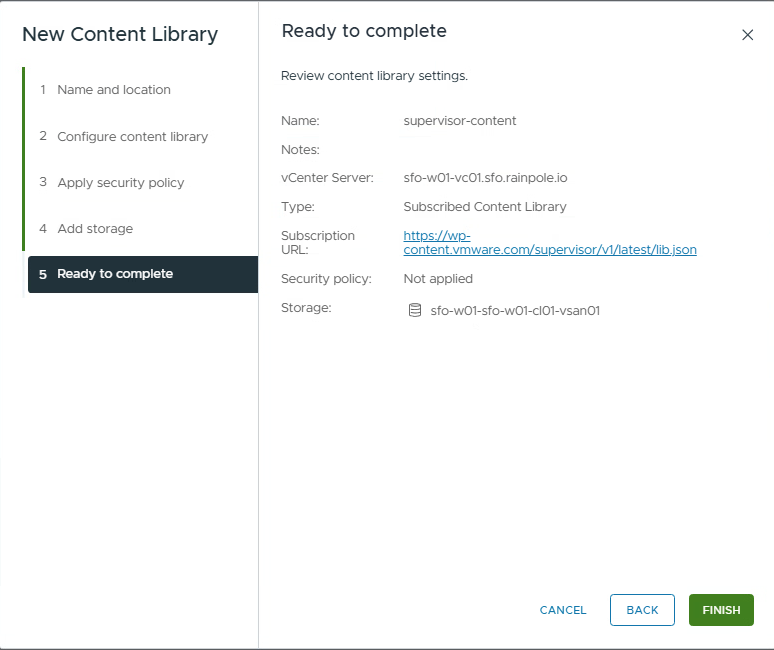
- Create a new content library that subscribes to the supervisor updates.
Go to the vSphere client, Content Libraries, and press Create.
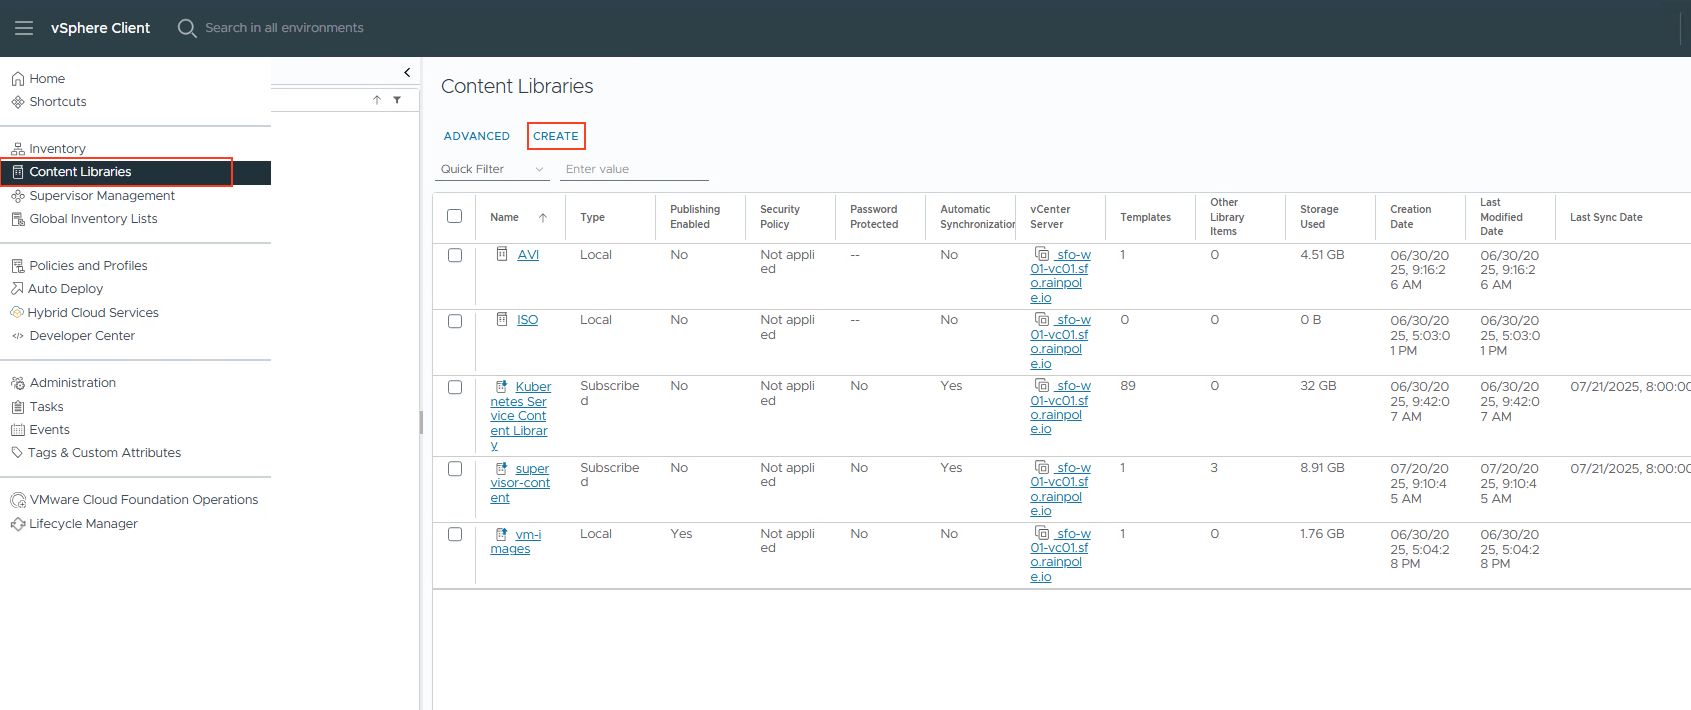
2. The Subscription URL you need to use: https://wp-content.vmware.com/supervisor/v1/latest/lib.json
I have the Download content on “When needed”. This will only download the binaries when needed.
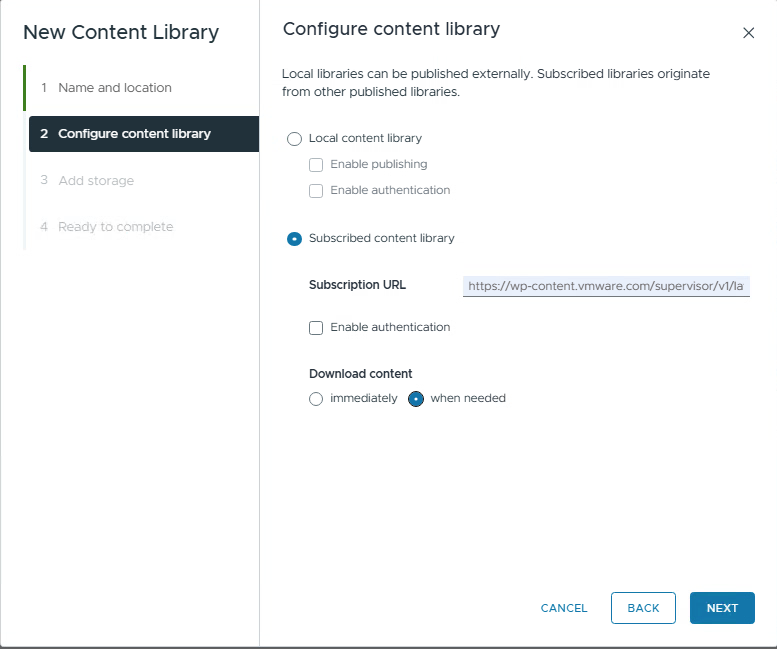
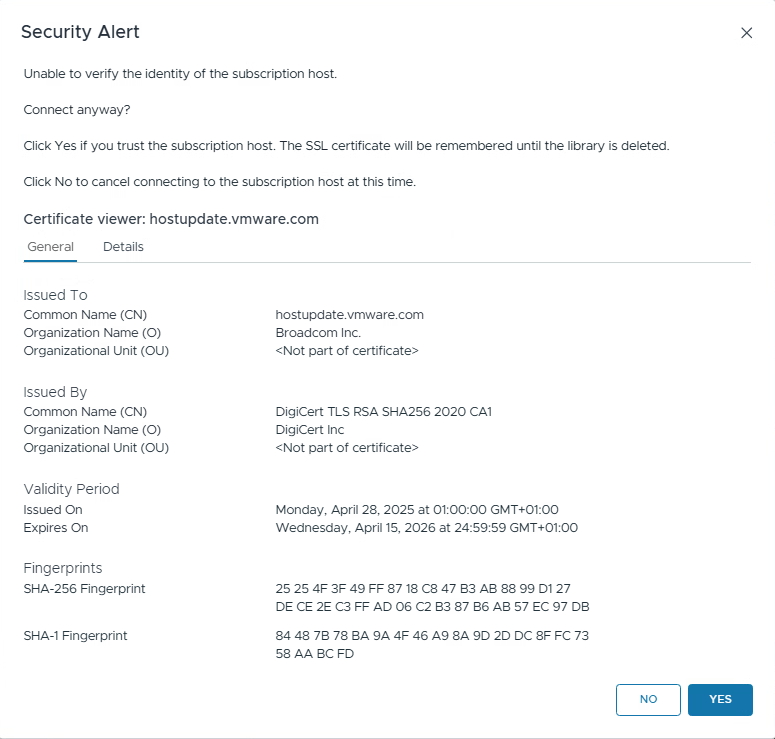
Press NEXT and accept the security alert.
3. To upgrade the Supervisor, see Supervisor Upgrade
Install the ArgoCD service in Supervisor.
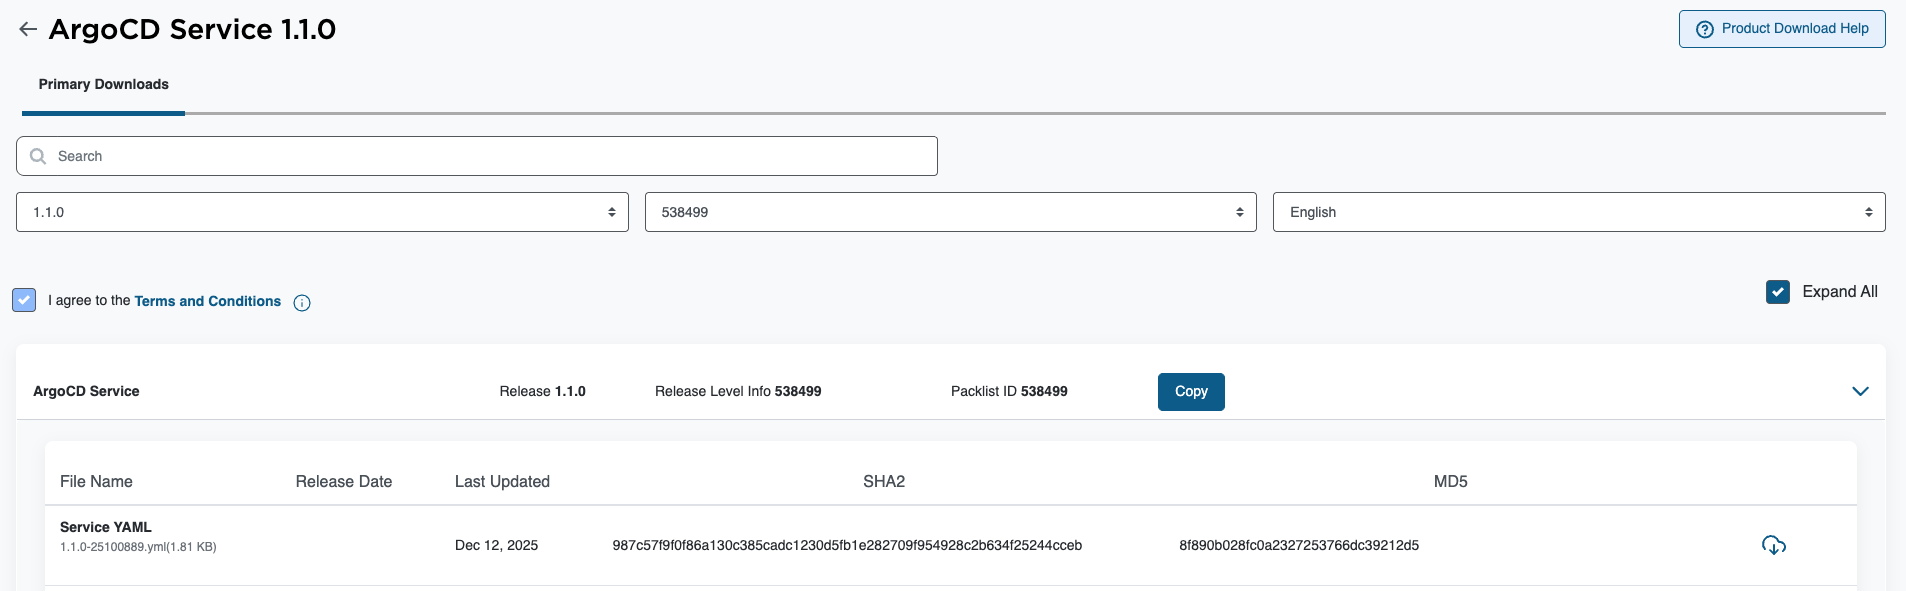
- Download the service yaml file from the Broadcom Support portal. (Search for Supervisor in the download section)
On this page, you can also download the ArgoCD CLI that is needed. Please do it right away. Windows, Linux, or MAC.
2. Goto Supervisor Management, services and click Add New Service.
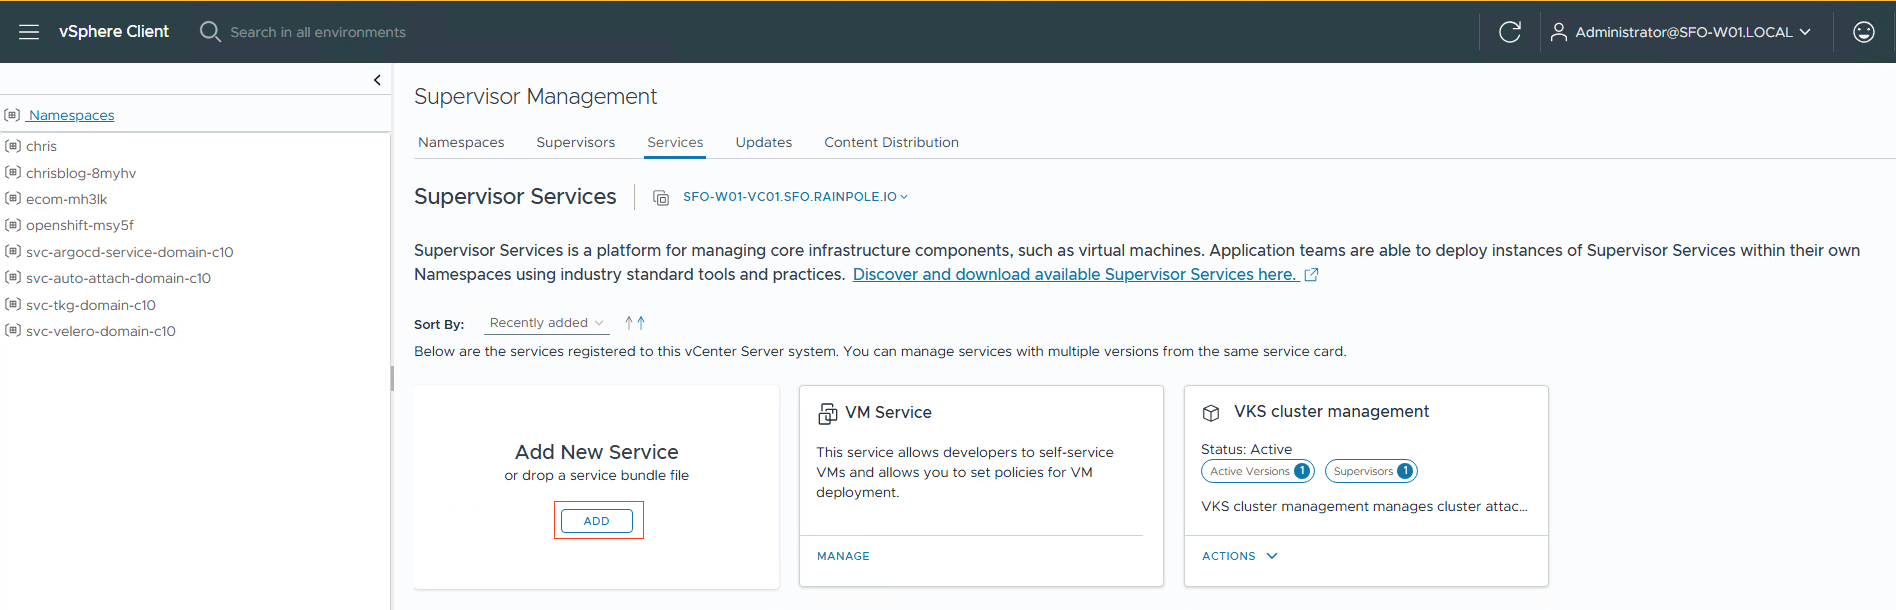
3. Upload the yaml file you downloaded from the Broadcom Support Portal.
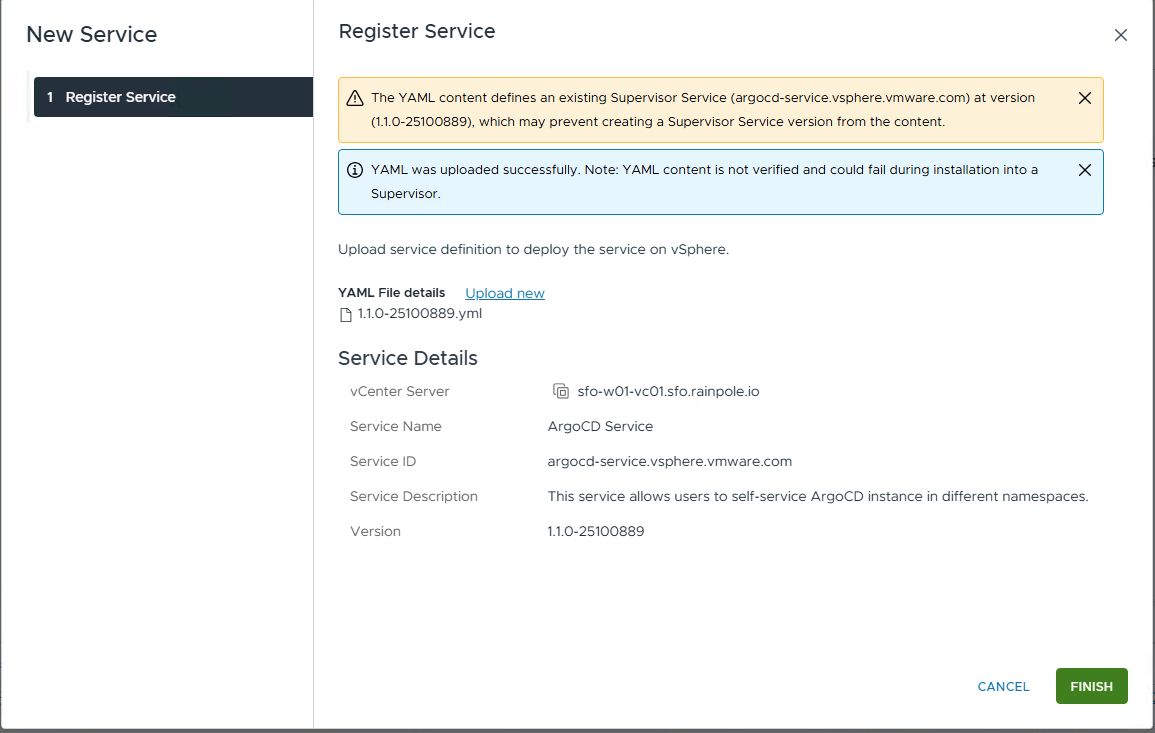
The ArgoCD service will be added to the services.
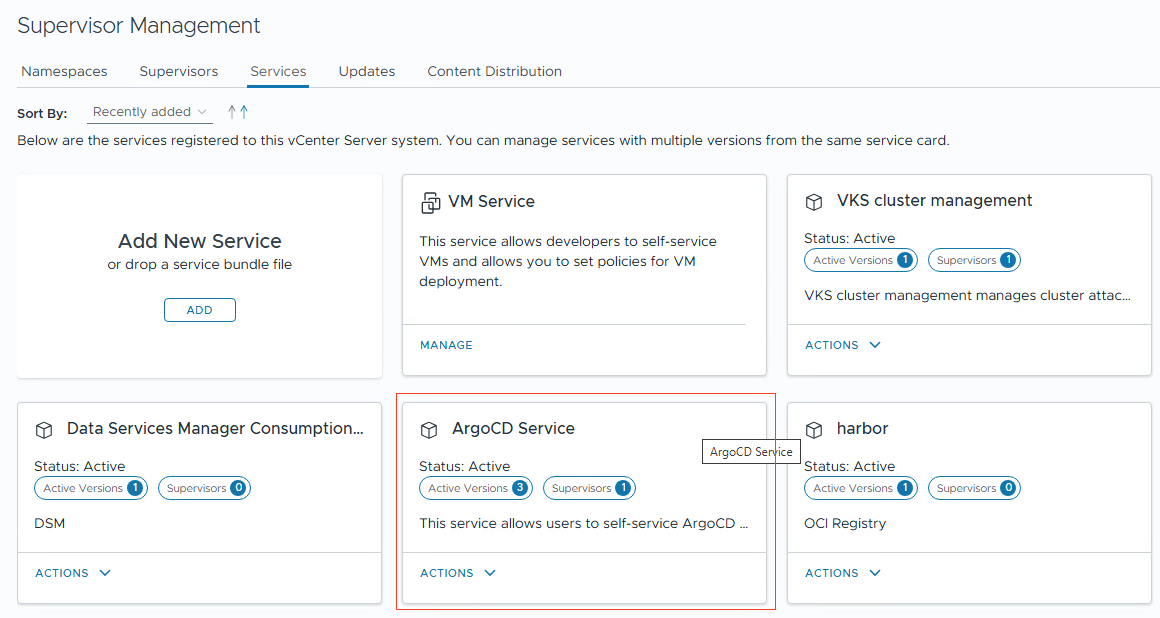
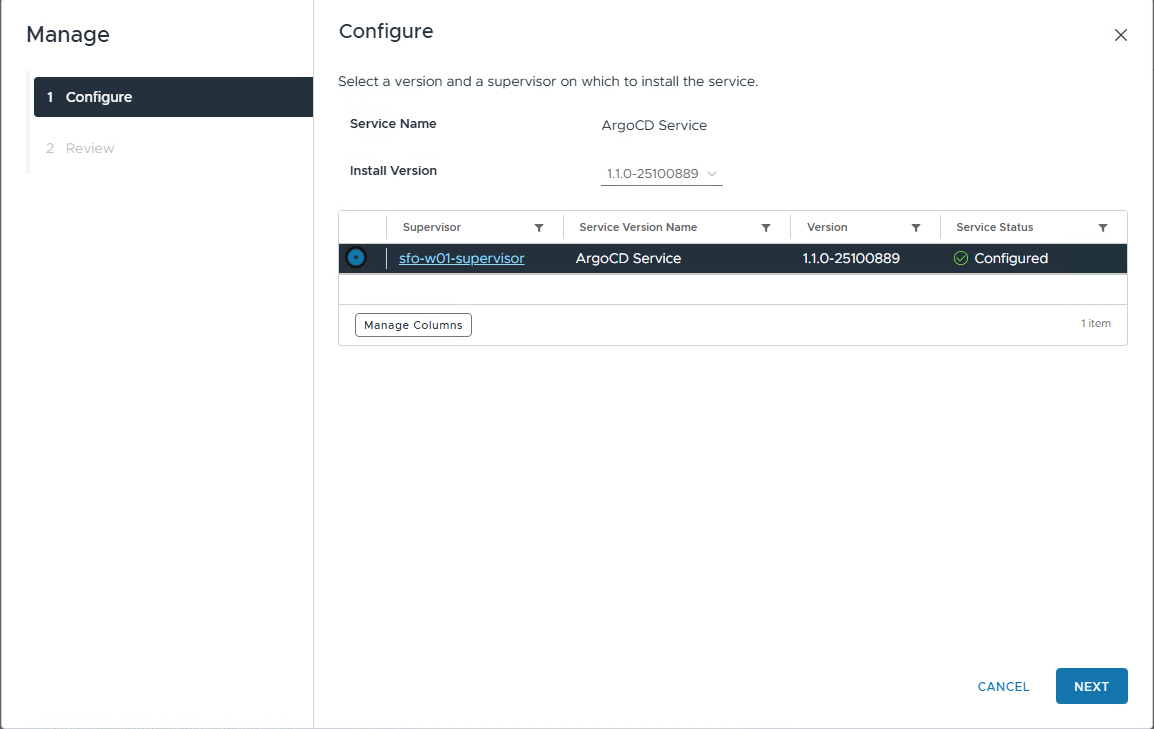
4. Goto Manage Service
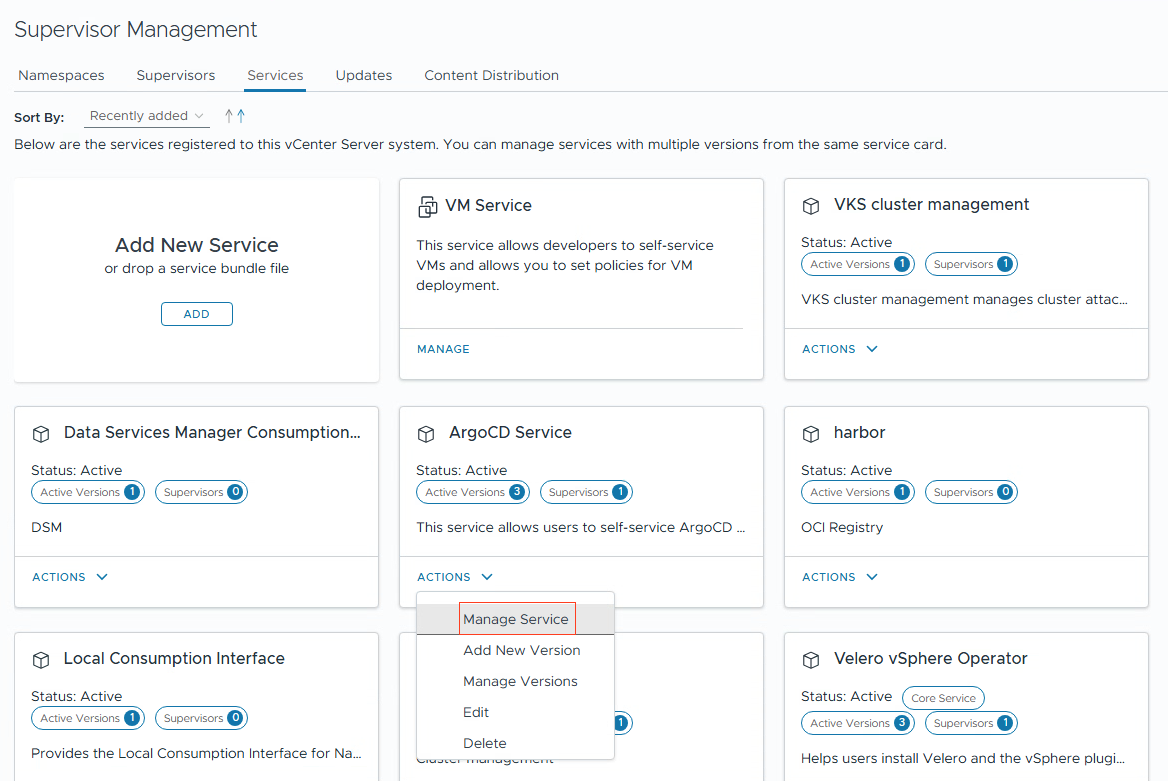
5. Now you can install the ArgoCD version.
6. You can check if ArgoCD is running. Log in to Supervisor and get pods for the argocd namespace
# kubectl get pods -n svc-argocd-service-domain-c10
NAME                                                 READY   STATUS    RESTARTS   AGE
argocd-service-controller-manager-85f6ff6dd6-jctxt   1/1     Running   0          2d22h
Configure ArgoCD
Refer to the documentation to install ArgoCD in the supervisor.
I am using the ArgoCD service 1.1.0. See release notes
- Refer to the release notes for the supported ArgoCD version.
You can do “kubectl explain argocd.spec.version” to see the latest supported version. In my case, it is 3.0.19
# kubectl explain argocd.spec.version
GROUP:      argocd-service.vsphere.vmware.com
KIND:       ArgoCD
VERSION:    v1alpha1

FIELD: version <string>


DESCRIPTION:
    Version specifies the ArgoCD Carvel Package version to deploy.
    The version must follow the pattern: X.Y.Z+vmware.W-vks.V
    Example: "3.0.19+vmware.1-vks.1"
2. Install an ArgoCD instance in your namespace.
Apply the YAML to your namespace.
apiVersion: argocd-service.vsphere.vmware.com/v1alpha1
kind: ArgoCD
metadata:
  name: argocd-1
  namespace: chrisblog-yhzxq
spec:
  version: 3.0.19+vmware.1-vks.1
# kubectl apply -f deploy-argocd.yaml
argocd.argocd-service.vsphere.vmware.com/argocd-1 created
3. ArgoCD will be deployed in namespace “chrisblog-yhzxq”. After a while, you can check and also get the ip address to use to connect to (in this case, it is 10.100.0.9)
# kubectl get pod
NAME                                 READY   STATUS      RESTARTS   AGE
argocd-application-controller-0      1/1     Running     0          8m57s
argocd-redis-7f7ff98dfd-827pv        1/1     Running     0          8m57s
argocd-redis-secret-init-kzvzk       0/1     Completed   0          9m29s
argocd-repo-server-c6dcf756d-gqbjc   1/1     Running     0          8m57s
argocd-server-777794b5b4-drvls       1/1     Running     0          8m57s

# kubectl get svc
NAME                  TYPE           CLUSTER-IP    EXTERNAL-IP   PORT(S)                      AGE
argocd-redis          ClusterIP      10.96.1.9     <none>        6379/TCP                     10m
argocd-repo-server    ClusterIP      10.96.0.106   <none>        8081/TCP                     10m
argocd-server         LoadBalancer   10.96.1.234   10.100.0.9    80:30538/TCP,443:30956/TCP   10m
chrisblog-cluster01   LoadBalancer   10.96.0.147   10.100.0.7    6443/TCP                     27h
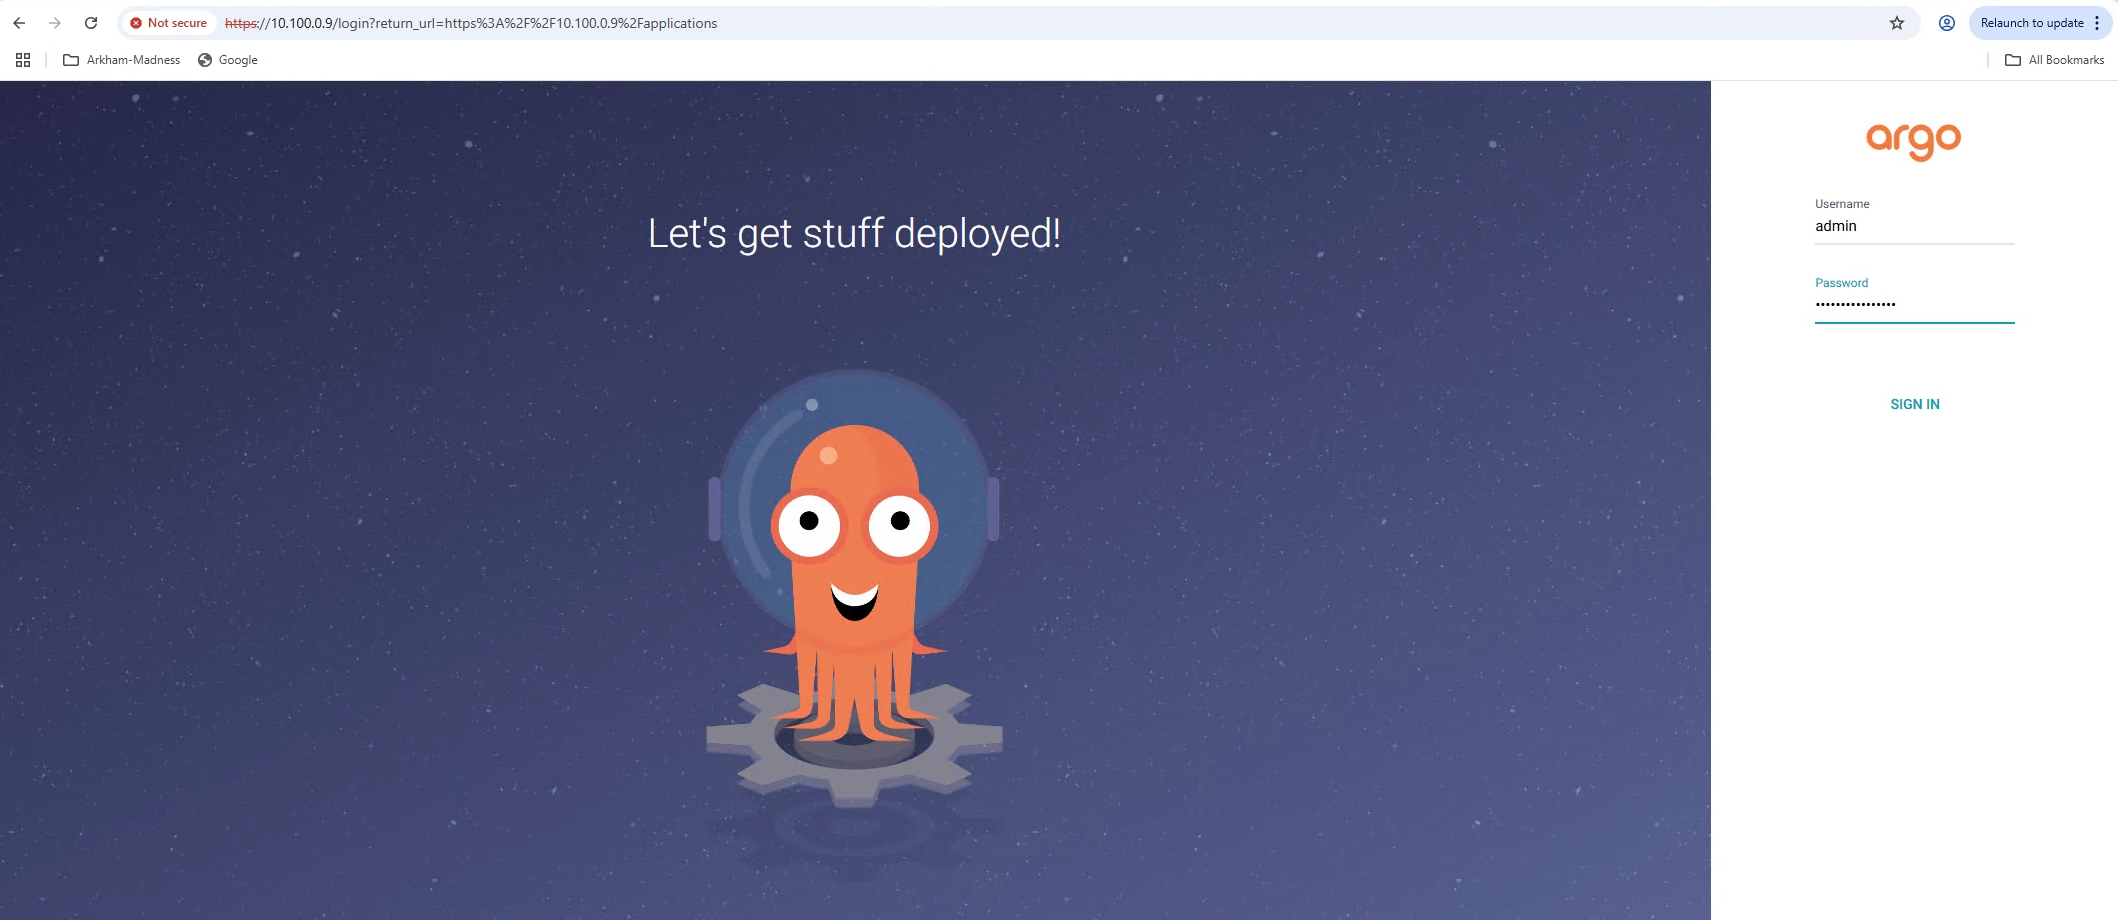
4. To log in to ArgoCD, you will need the password.
You can get the password from the secret that is set automatically during installation.
# kubectl get secret  argocd-initial-admin-secret -o jsonpath='{.data.password}' | base64 -d
yDt-GW9BGqy-dV5U
With the password, you can log in to the GUI. The IP address is the External-IP address for the service. In my case, it is 10.100.0.9.
In the GUI, you can change the admin password if you want.
5. To add the VKS cluster to ArgoCD, you need to use the CLI. (You can download this from the Support portal at the same place where you download the ArgoCD services YAML.
Important is to get the kubeconfig for your cluster. You can get this by using the following command in the supervisor namespace. Copy the content to a file. (Mine is called kubeconfig-chris-cluster01)
# kubectl get secret|grep kubeconfig
chrisblog-cluster01-kubeconfig      cluster.x-k8s.io/secret               1      38d

# kubectl get secret chrisblog-cluster01-kubeconfig --template={{.data.value}} | base64 -d
apiVersion: v1
clusters:
- cluster:
    certificate-authority-data: LS0tLS1CRUdJTiBDRVJUSUZJQ0FURS0tLS0tCk1JSUM2akNDQWRLZ0F3SUJBZ0lCQURBTkJna3Foa2lHOXcwQkFRc0ZBREFWTVJNd0VRWURWUVFERXdwcmRXSmwKY201bGRHVnpNQjRYRFRJMU1USXhPREV3TWp
<SNIIP>
6. Log in to ArgoCD and add the cluster to the config. Notice the –kubeconfig pointing to the file with the kubeconfig content.
Also, define the namespace you allow ArgoCD to use. (in my case, sock-shop)
# argocd login 10.100.0.9
WARNING: server certificate had error: tls: failed to verify certificate: x509: cannot validate certificate for 10.100.0.9 because it doesn't contain any IP SANs. Proceed insecurely (y/n)? y
Username: admin
Password:
'admin:login' logged in successfully
Context '10.100.0.9' updated
# argocd cluster add chrisblog-cluster01-admin@chrisblog-cluster01 --namespace sock-shop --kubeconfig ./kubeconfig-chris-cluster01 --insecure
WARNING: This will create a service account `argocd-manager` on the cluster referenced by context `chrisblog-cluster01-admin@chrisblog-cluster01` with full namespace level privileges. Do you want to continue [y/N]? y
guest cluster
INFO[0002] ServiceAccount "argocd-manager" created in namespace "kube-system"
INFO[0002] Role "sock-shop/argocd-manager-role" created
INFO[0002] RoleBinding "sock-shop/argocd-manager-role-binding" created
INFO[0002] Created bearer token secret for ServiceAccount "argocd-manager"
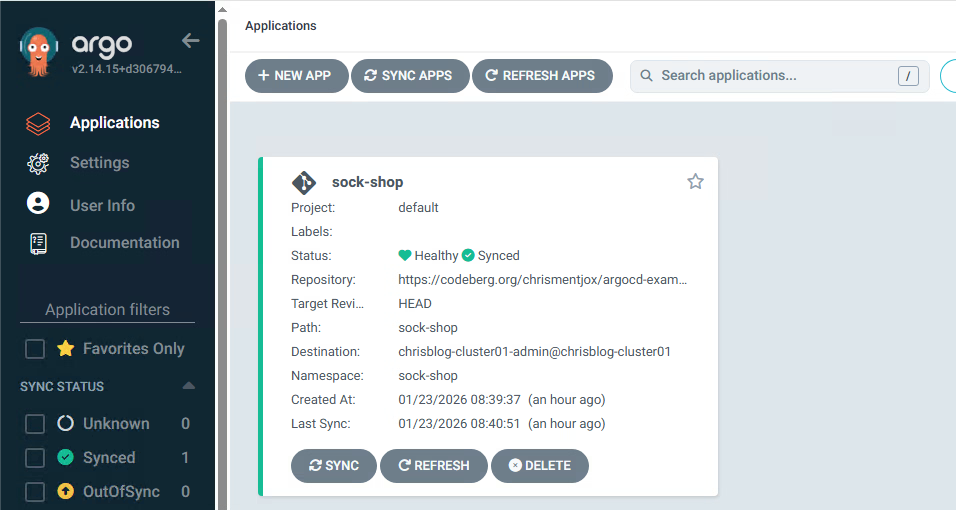
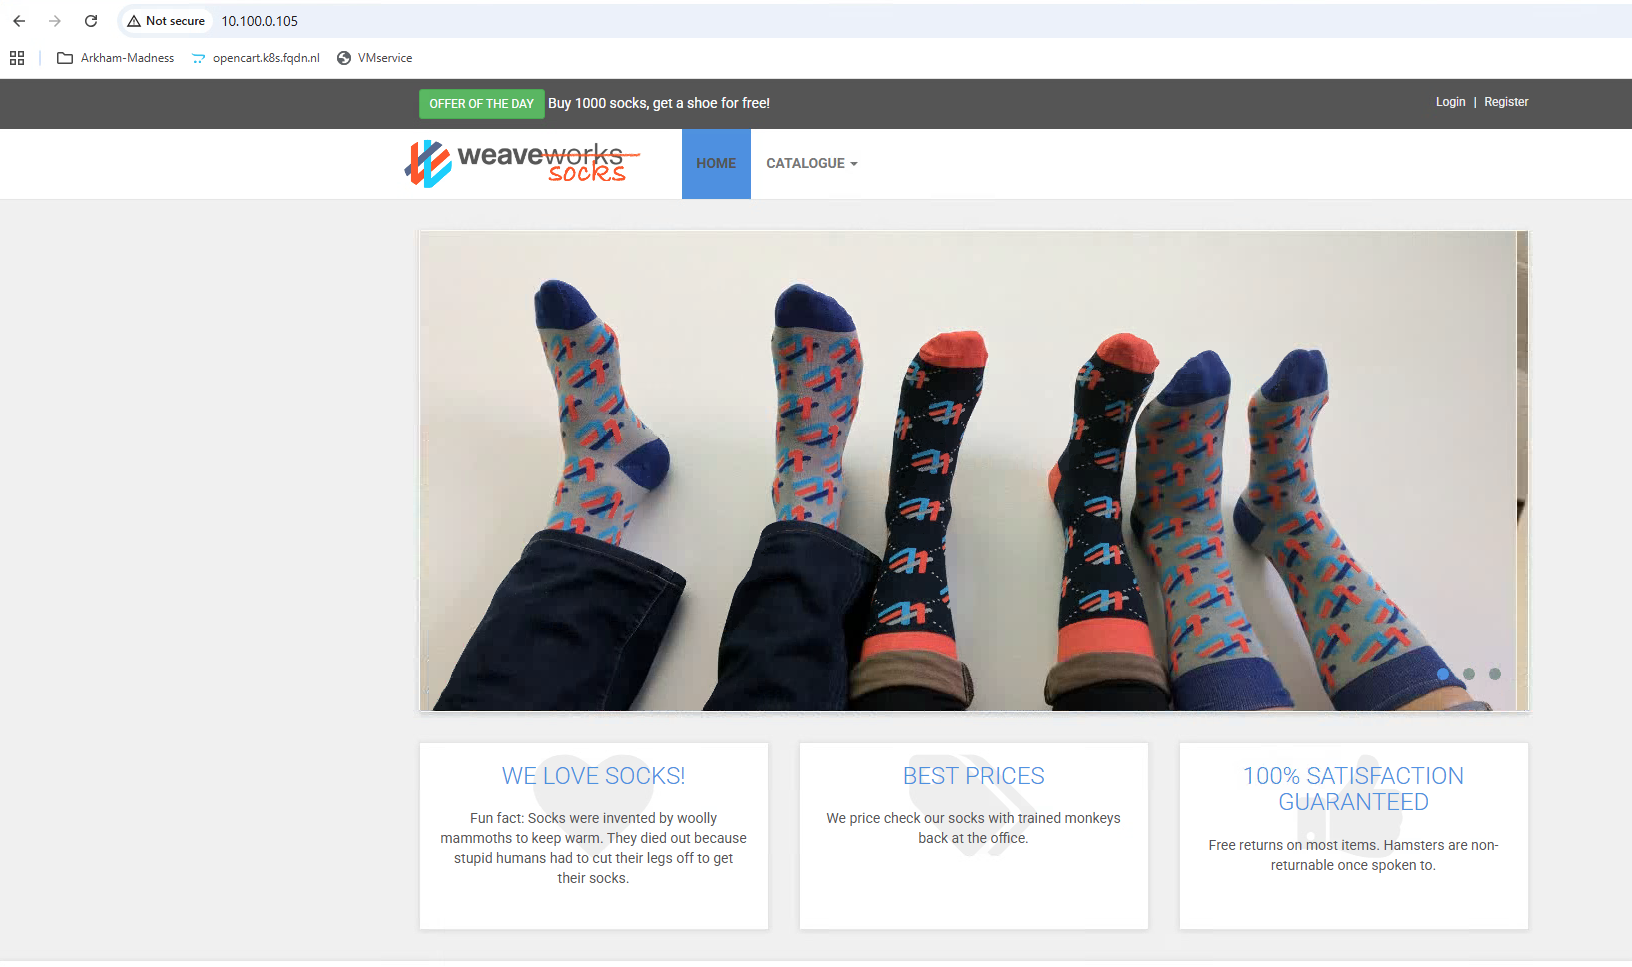
Cluster 'https://10.100.0.40:6443' added7. Now we can deploy an application. I am deploying a simple app called sock-shop.
The yaml file is on my Codeberg repository.
#  argocd app create sock-shop --repo https://codeberg.org/chrismentjox/argocd-example-apps/ --path sock-shop --dest-server https://10.100.0.40:6443 --dest-namespace sock-shop
application 'sock-shop' created

# argocd app sync sock-shop

# argocd app get sock-shop
Name:               chrisblog-8myhv/sock-shop
Project:            default
Server:             https://10.100.0.40:6443
Namespace:          sock-shop
URL:                https://10.100.0.4/applications/sock-shop
Source:
- Repo:             https://codeberg.org/chrismentjox/argocd-example-apps/
  Target:
  Path:             sock-shop
SyncWindow:         Sync Allowed
Sync Policy:        Manual
Sync Status:        Synced to  (3da13f6)
Health Status:      Progressing

GROUP  KIND        NAMESPACE  NAME          STATUS  HEALTH       HOOK  MESSAGE
       Service     sock-shop  payment       Synced  Healthy            service/payment created
       Service     sock-shop  queue-master  Synced  Healthy            service/queue-master created
       Service     sock-shop  rabbitmq      Synced  Healthy            service/rabbitmq created
# kubectl get svc -n sock-shop
NAME           TYPE        CLUSTER-IP       EXTERNAL-IP   PORT(S)             AGE
carts          ClusterIP   10.101.167.52    <none>        80/TCP              5d1h
carts-db       ClusterIP   10.99.252.102    <none>        27017/TCP           5d1h
catalogue      ClusterIP   10.107.253.24    <none>        80/TCP              5d1h
catalogue-db   ClusterIP   10.96.170.4      <none>        3306/TCP            5d1h
front-end      ClusterIP   10.97.15.21      <none>        80/TCP              5d1h
orders         ClusterIP   10.104.244.85    <none>        80/TCP              5d1h
orders-db      ClusterIP   10.106.56.12     <none>        27017/TCP           5d1h
payment        ClusterIP   10.102.60.224    <none>        80/TCP              5d1h
queue-master   ClusterIP   10.103.91.225    <none>        80/TCP              5d1h
rabbitmq       ClusterIP   10.111.43.125    <none>        5672/TCP,9090/TCP   5d1h
session-db     ClusterIP   10.110.153.48    <none>        6379/TCP            5d1h
shipping       ClusterIP   10.97.73.10      <none>        80/TCP              5d1h
user           ClusterIP   10.103.170.214   <none>        80/TCP              5d1h
user-db        ClusterIP   10.109.96.147    <none>        27017/TCP           5d1h


# kubectl get ingress -n sock-shop
NAME                CLASS    HOSTS                   ADDRESS      PORTS     AGE
ingress-sock-shop   avi-lb   sock-shop.k8s.fqdn.nl   10.100.0.2   80, 443   8m3s
The IP address for the Ingress is 10.100.0.2. You can use this IP in the browser to access the sock-shop.
I am using the name “sock-shop.k8s.fqdn.nl”
Verifying the application
- You can use the GUI to verify the installation.
2. Or use the CLI to check the deployment
# argocd app get sock-shop
Name:               chrisblog-8myhv/sock-shop
Project:            default
Server:             https://10.100.0.40:6443
Namespace:          sock-shop
URL:                https://10.100.0.4/applications/sock-shop
Source:
- Repo:             https://codeberg.org/chrismentjox/argocd-example-apps/
  Target:
  Path:             sock-shop
SyncWindow:         Sync Allowed
Sync Policy:        Manual
Sync Status:        Synced to  (3da13f6)
Health Status:      Progressing

GROUP  KIND        NAMESPACE  NAME          STATUS  HEALTH       HOOK  MESSAGE
       Service     sock-shop  payment       Synced  Healthy            service/payment created
       Service     sock-shop  queue-master  Synced  Healthy            service/queue-master created
       Service     sock-shop  rabbitmq      Synced  Healthy            service/rabbitmq created
3. Use the hostname in the browser, in my case https://sock-shop.k8s.fqdn.nl.
You can see the sock-shop deployment.
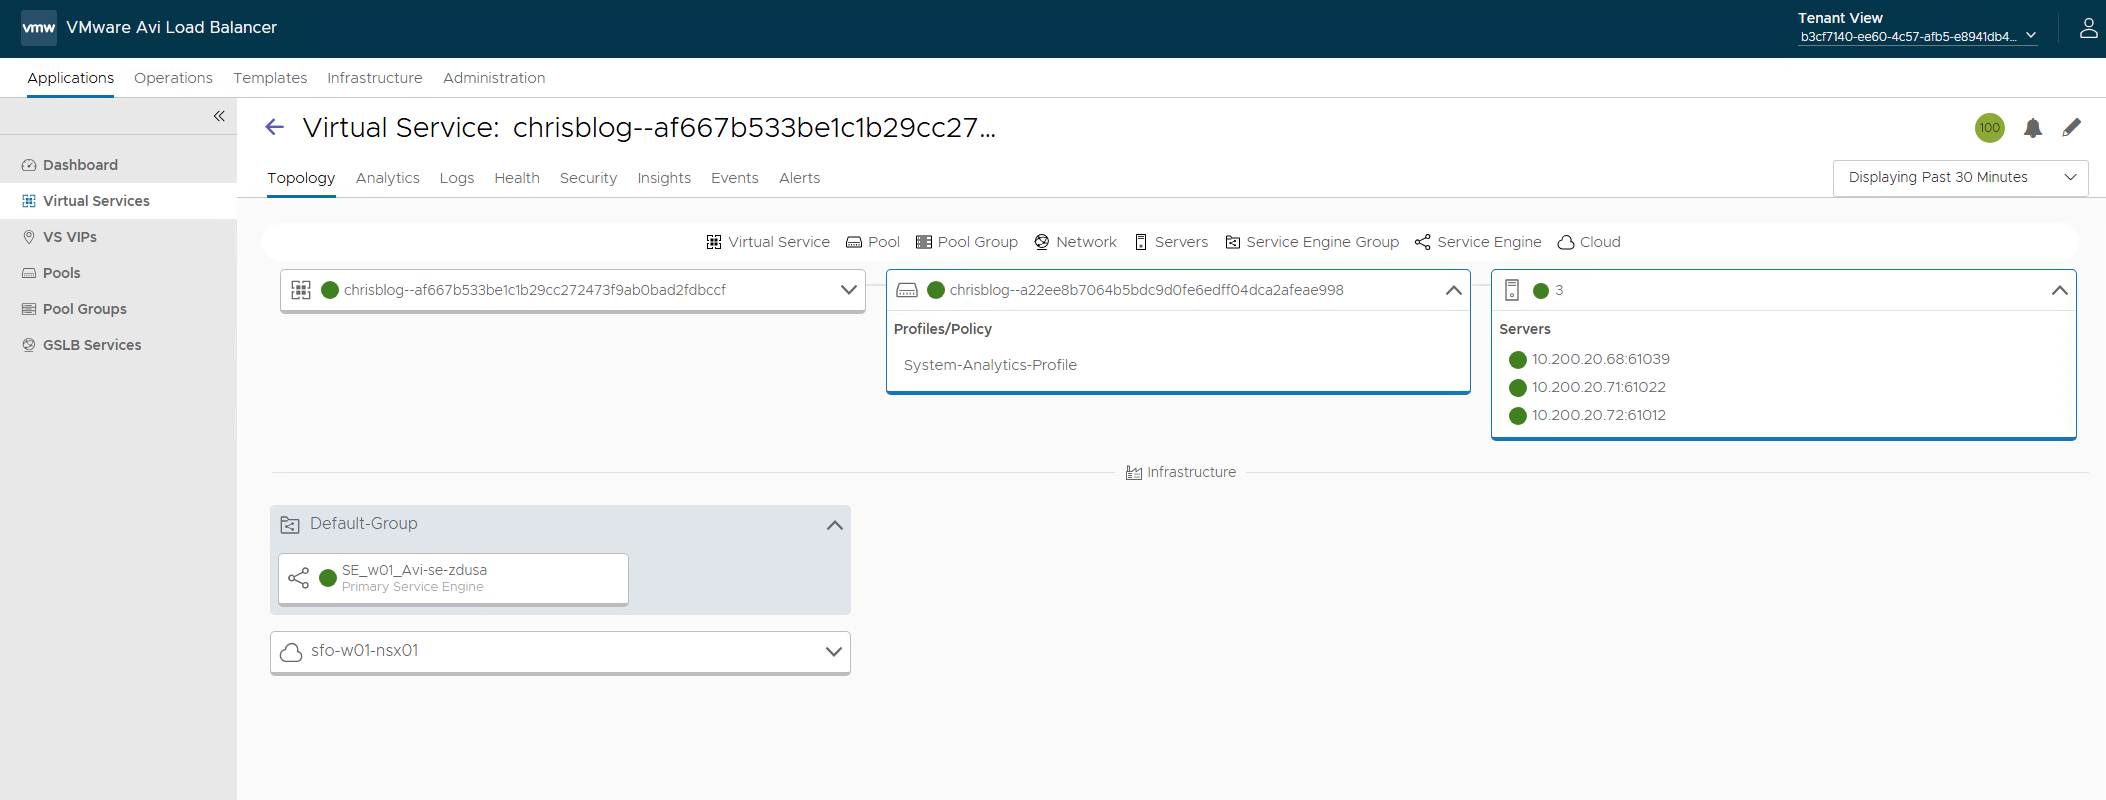
4. Checking Avi
The type: Loadbalancer has been created on Avi.
Avi: Ingress, GatewayAPI, and WAF
Let us take a look at the yaml file.
Here you see the Ingress objects. I am using cert-manager with Vault to create the certificates for me.
Because I am using Avi, the cert object will be pushed to the Avi controller and used on the virtual service it creates for this Ingress. You could use GatewayAPI. See below for examples for GatewayAPI.
- Using Ingress instead of type: LoadBalancer
apiVersion: networking.k8s.io/v1
kind: Ingress
metadata:
  annotations:
    cert-manager.io/issuer: vault-issuer2
    cert-manager.io/common-name: sock-shop.k8s.fqdn.nl
    cert-manager.io/renew-before: "24h"
  name: ingress-sock-shop
spec:
  ingressClassName: avi-lb
  rules:
    - host: sock-shop.k8s.fqdn.nl
      http:
        paths:
          - pathType: Prefix
            path: "/"
            backend:
              service:
                name: front-end
                port:
                  number: 80

  tls:
  - hosts:
    - sock-shop.k8s.fqdn.nl
    secretName: sockshop-secret
2. Adding WAF to the Ingress.
I added “front-end-hostrule.yaml” to GIT.
Here you can see the definition for the WAF profile.
---
apiVersion: ako.vmware.com/v1beta1
kind: HostRule
metadata:
  name: sock-shop-waf-rule
spec:
  virtualhost:
    fqdn: sock-shop.k8s.fqdn.nl
    fqdnType: Exact
    useRegex: false
    enableVirtualHost: true
    wafPolicy: System-WAF-Policy
In ArgoCD, the application will now be OutOfSync because I added this file to the GIT repository.
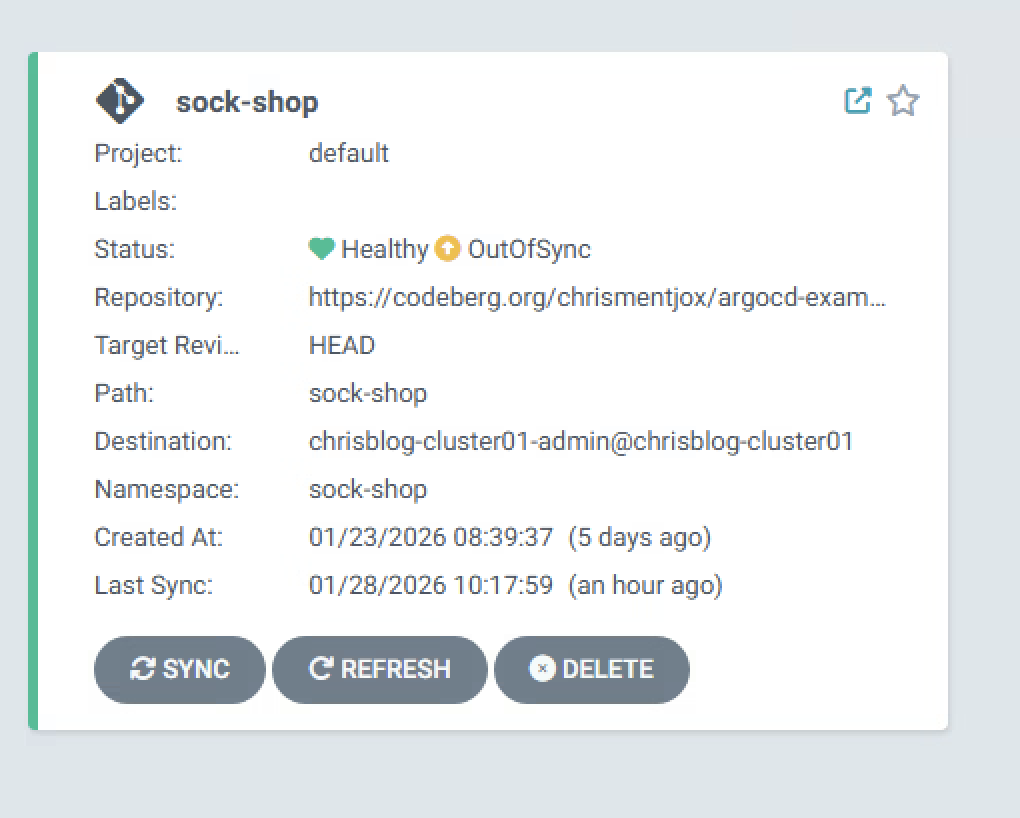
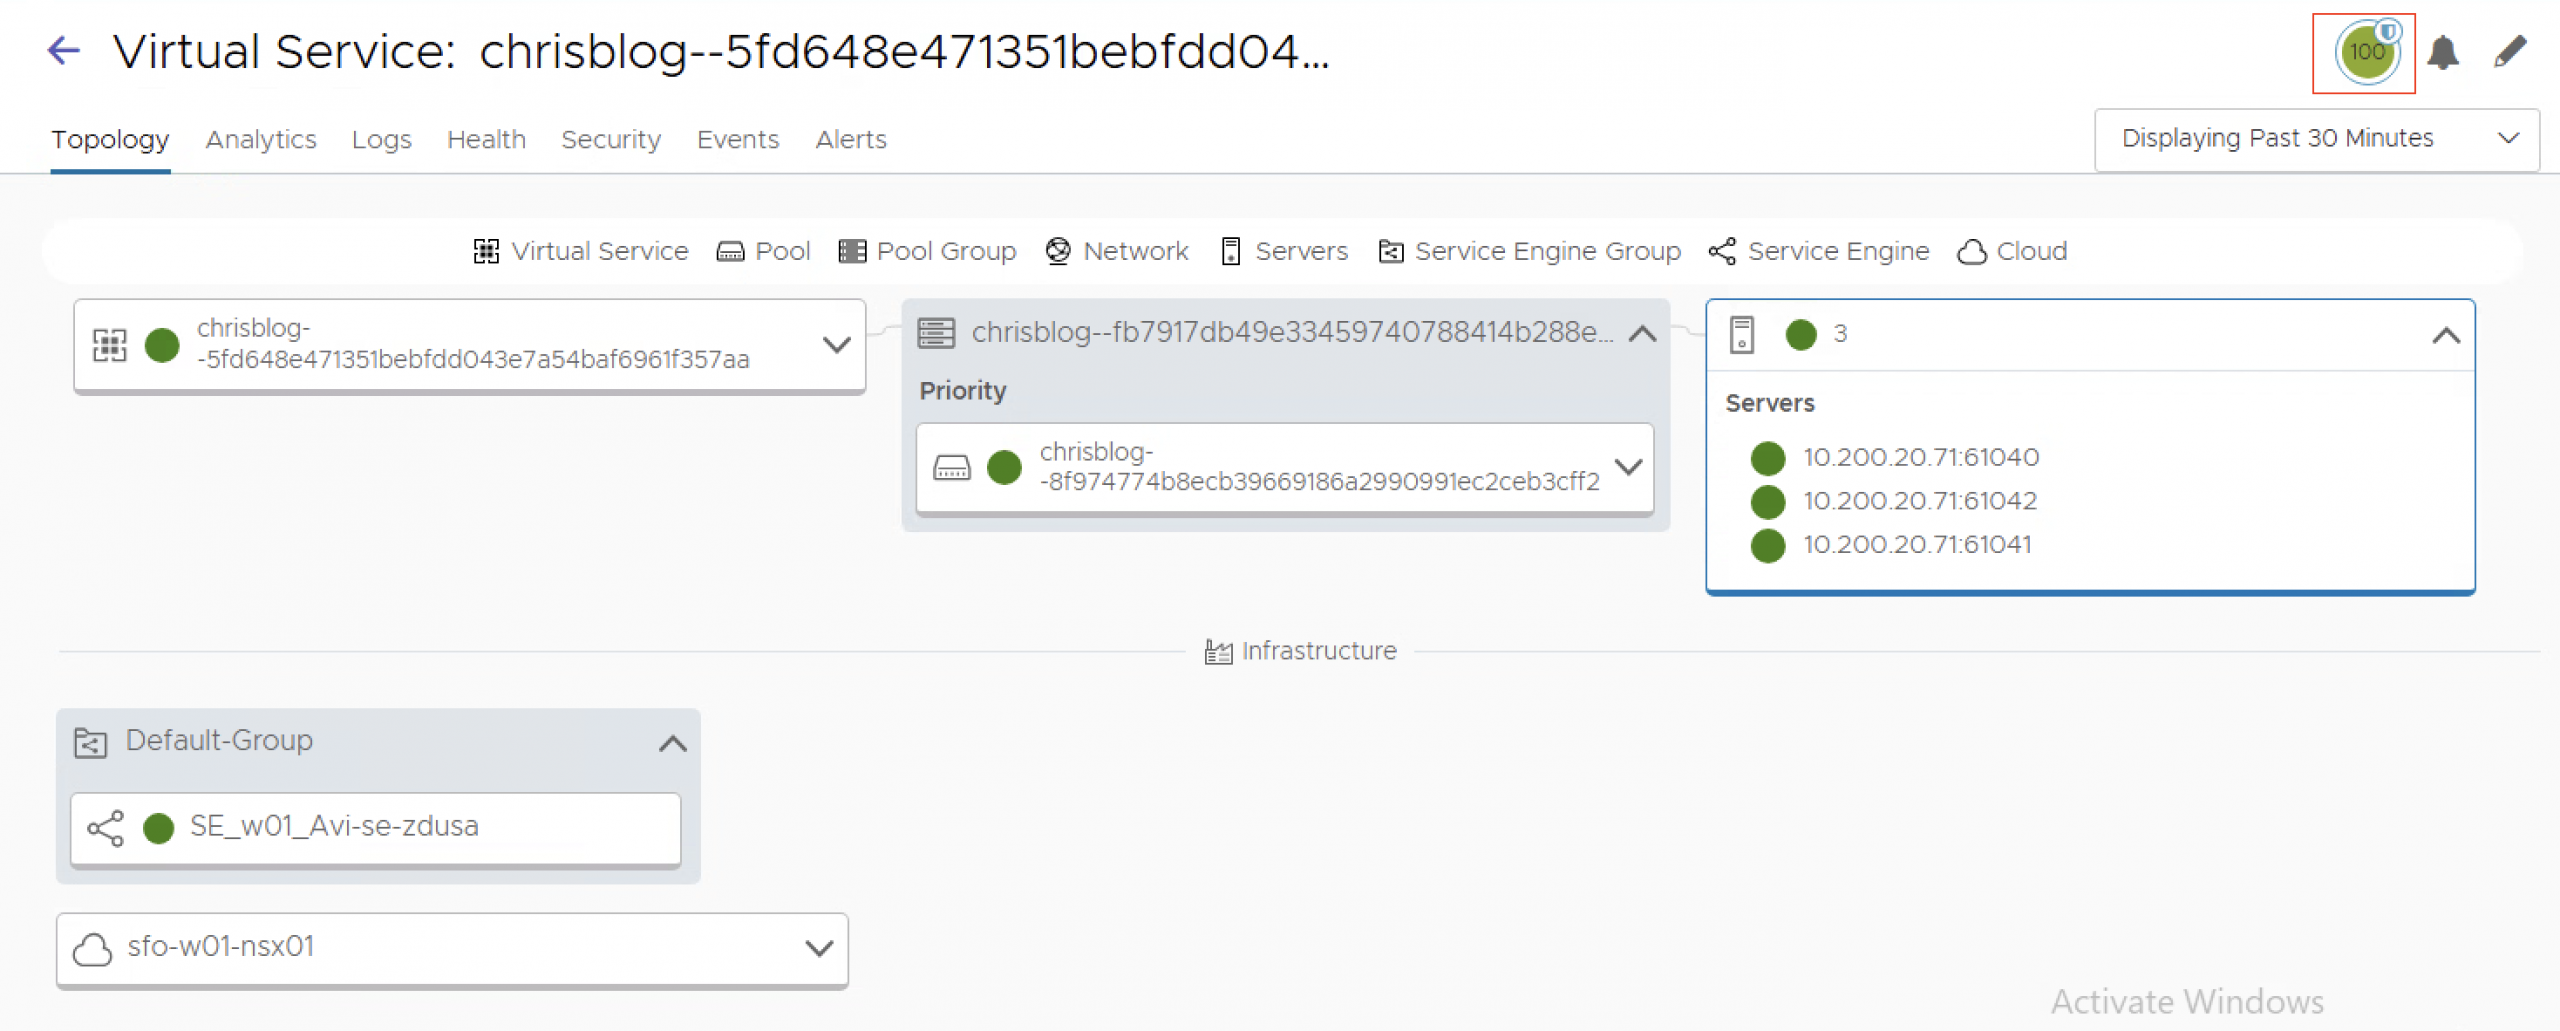
When we now sync the deployment, WAF will be added to he virtualservice.
Notice the ‘shield’ in the top right of the screenshot. This indicates that WAF has been enabled on the virtualservice.
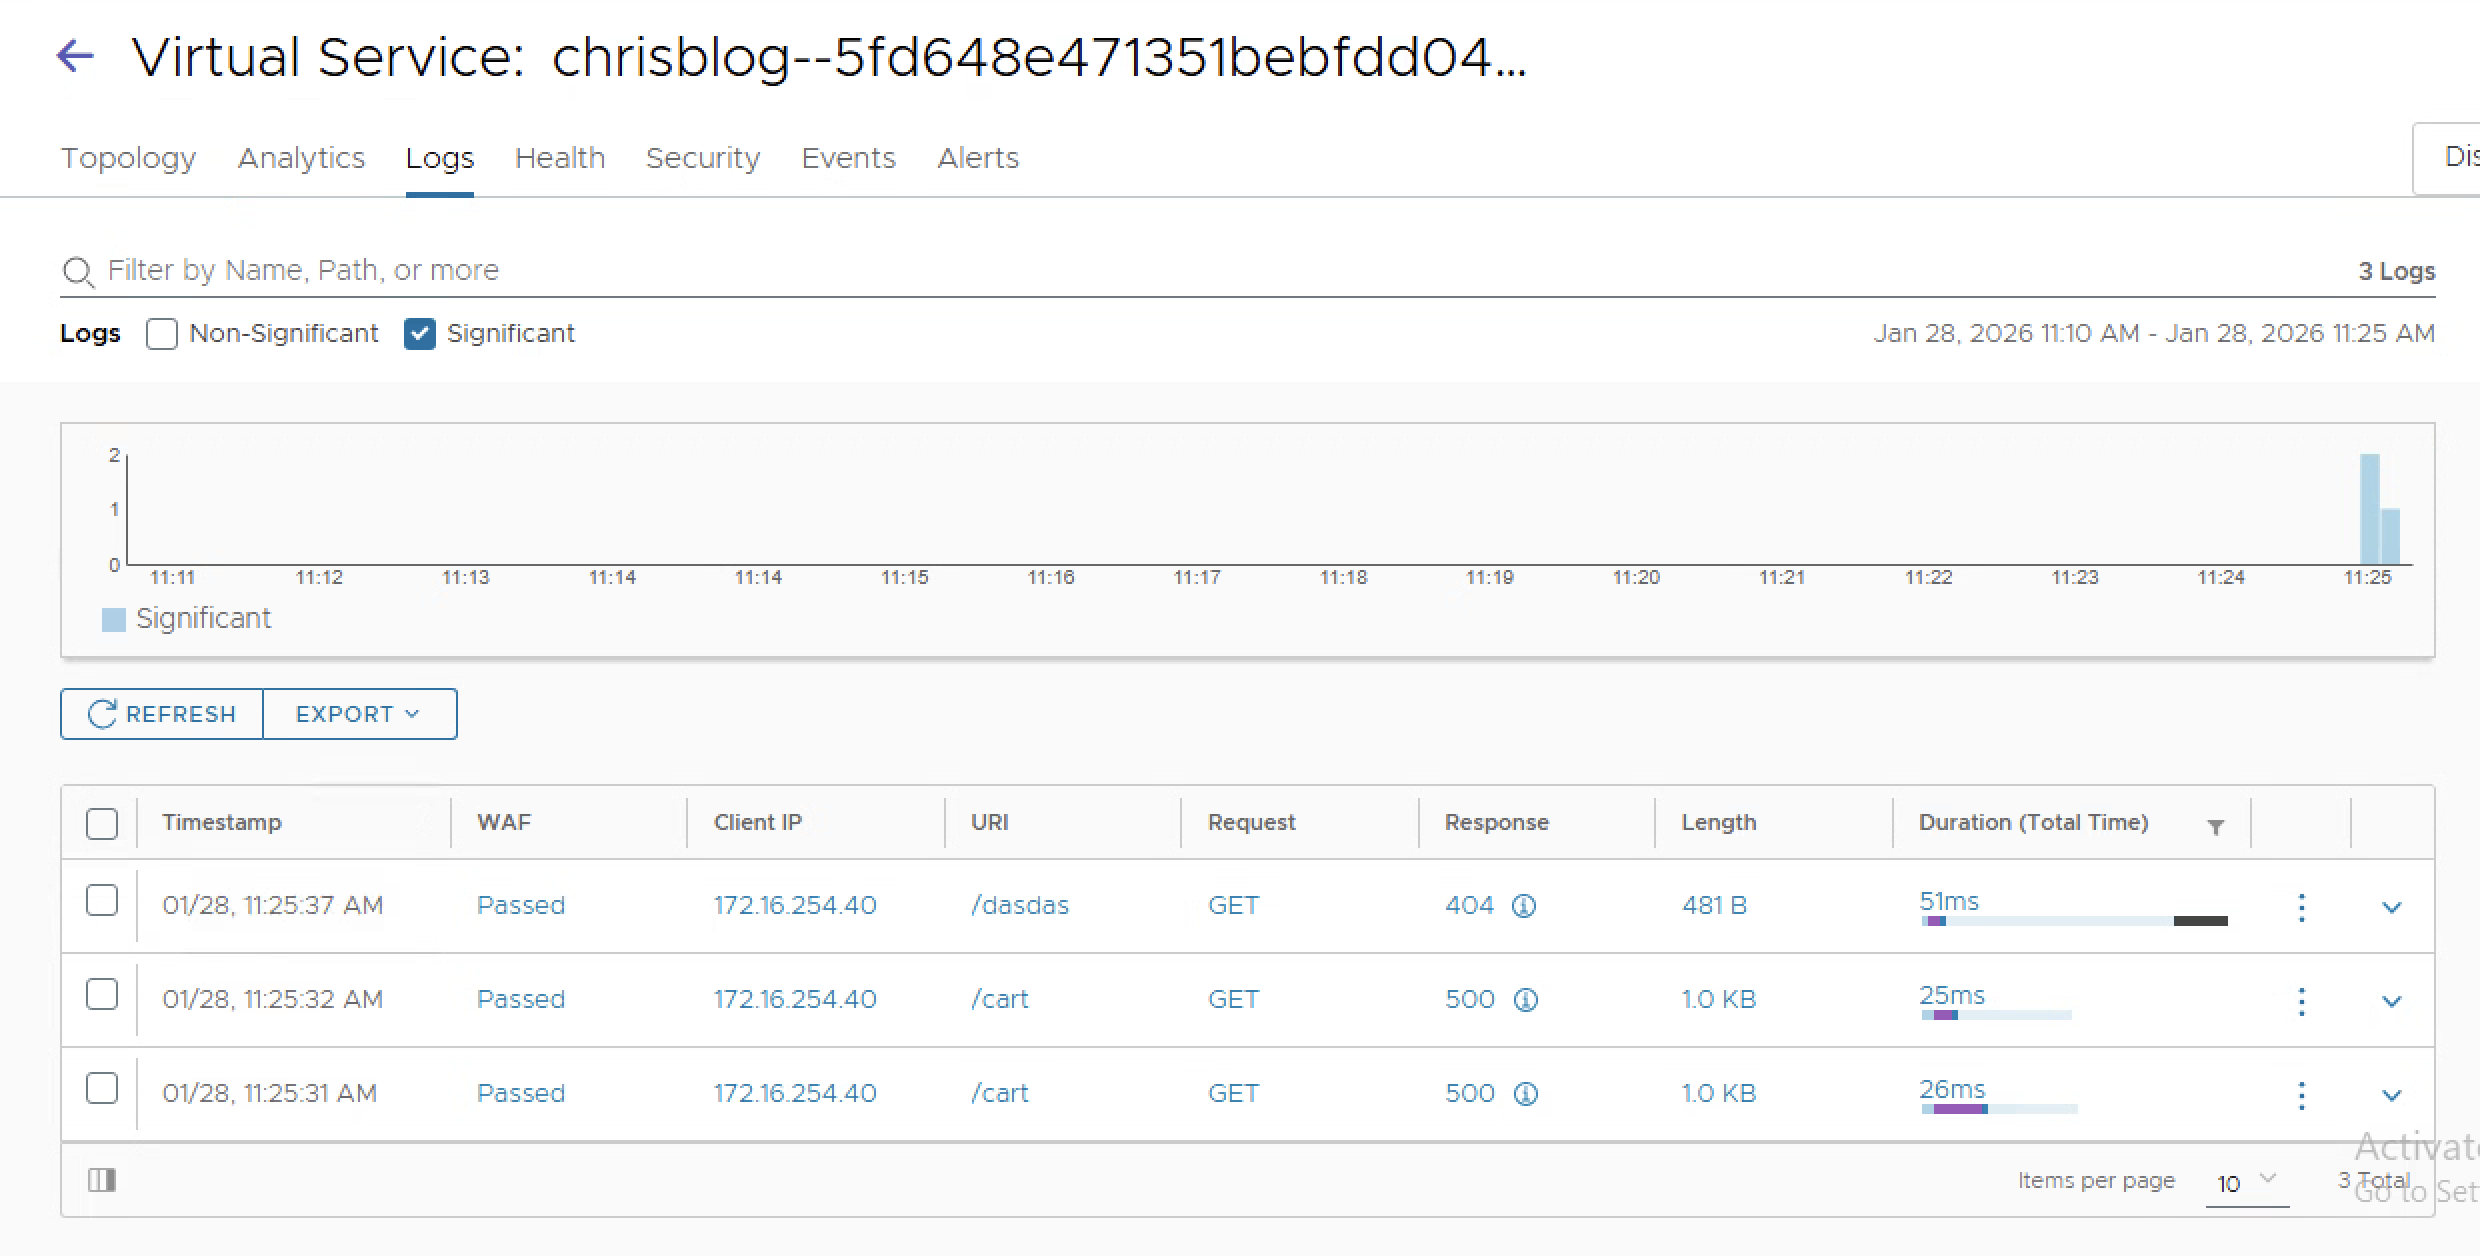
3. Analytics
Because we are using L7 now with Avi, we also have insights into the application. I.e. seeing HTTP code 404
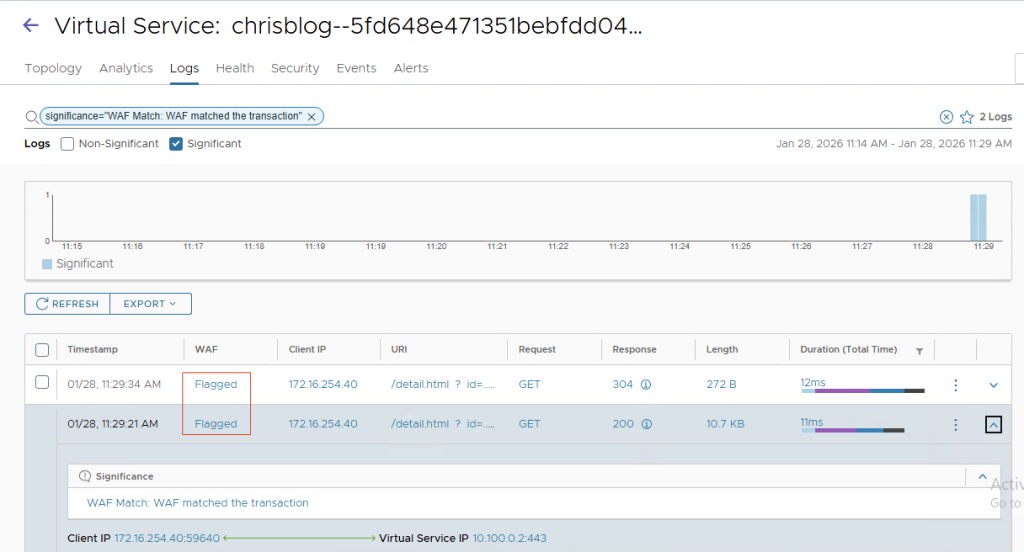
4. WAF
Because we enabled WAF (My profile only detects and does not block), we will see the WAF flagging in the logs. (I did a simple id=../../../etc/passwd in the URL)
GatewayAPI
For gatewayAPI to work, you need to configure AKO to use GatewayAPI (Refer to documentation)
GatewayAPI gives more control to the different personas. The infrastructure team defines the gateway, the listeners, and the allowed hostnames and allowed namespaces. In this example, I am creating a gateway in the ‘default’ namespace. This could be, for example, the ‘infrastructure-namespace’. I define two listeners, one on port 80 and one on port 443. The allowedRoutes option we need to use is “All”
Note: AKO does not support using the selector option (yet) in the from field of the allowedRoutes.namespaces section.
The allowed hostnames are *.k8s.fqdn.nl. Cert-manager creates a wildcard certificate for me.
- Create the gateway object
apiVersion: gateway.networking.k8s.io/v1
kind: Gateway
metadata:
  annotations:
    cert-manager.io/issuer: vault-issuer2
    cert-manager.io/common-name: "*.k8s.fqdn.nl"
    cert-manager.io/renew-before: "24h"
  name: chris-tkg-gateway
spec:
  gatewayClassName: avi-lb
  listeners:
  - name: foo-http
    protocol: HTTP
    port: 80
    hostname: "*.k8s.fqdn.nl"
    allowedRoutes:
      namespaces:
        from: All
  - name: foo-https
    protocol: HTTPS
    port: 443
    allowedRoutes:
      namespaces:
        from: All
    hostname: "*.k8s.fqdn.nl"
    tls:
      certificateRefs:
      - kind: Secret
        group: ""
        name: gw1.k8s.fqdn.nl
2. Always check if the gateway is running
# kubectl get gateway
NAME                CLASS    ADDRESS        PROGRAMMED   AGE
chris-tkg-gateway   avi-lb   10.100.0.108   True         39m
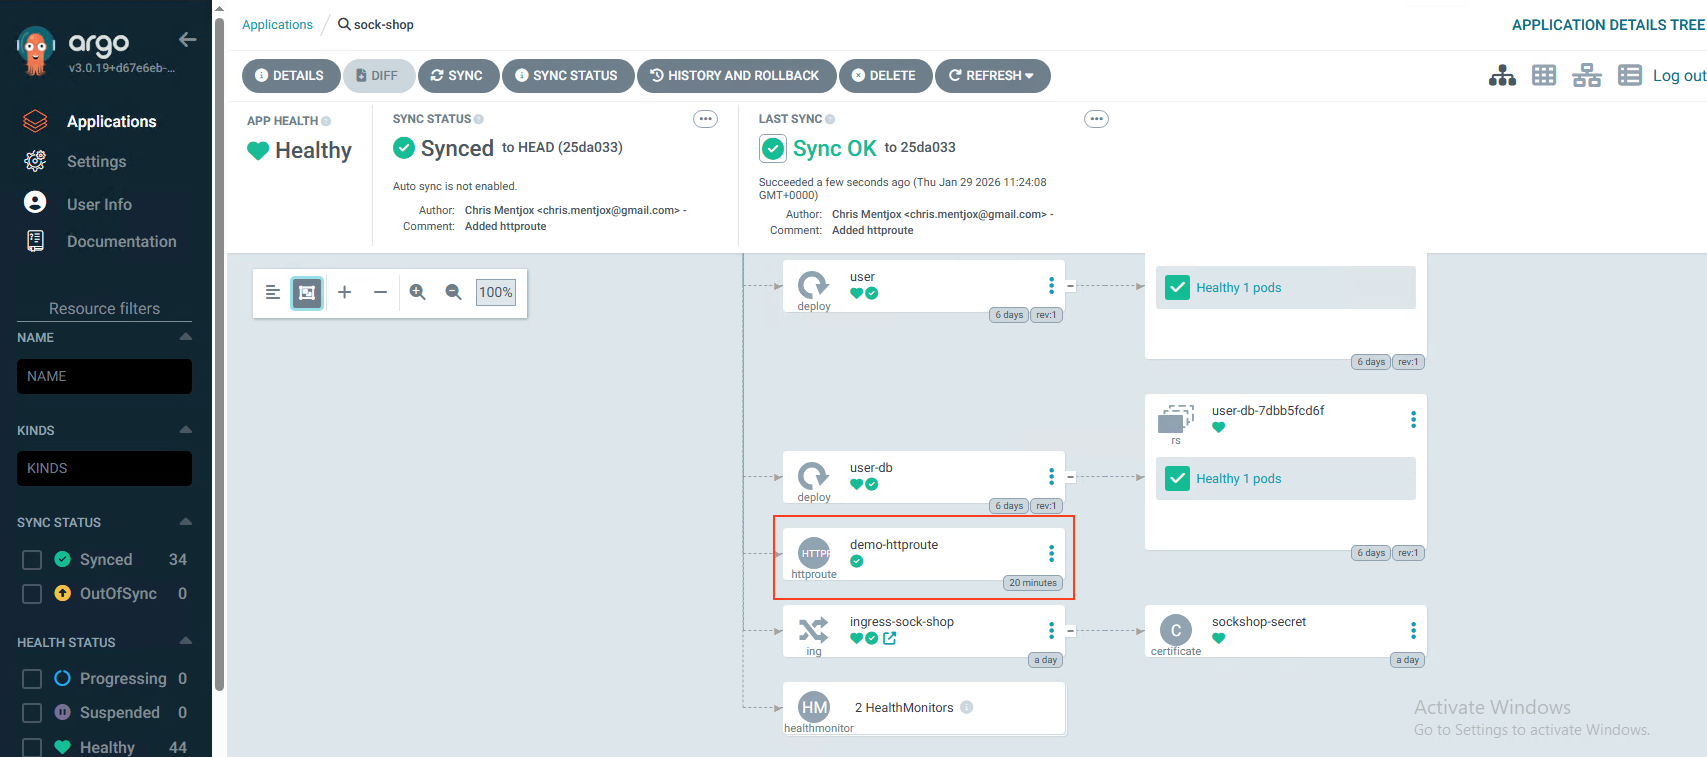
4. Create the httproute object in sock-shop namespace (I added this file to GIT and let ArgoCD do the work)
In this YAML, I define multiple objects. HealthMonitor, WAF profile, and httproute
apiVersion: ako.vmware.com/v1alpha1
kind: HealthMonitor
metadata:
  name: hm-webapp
spec:
  type: HEALTH_MONITOR_TCP
  send_interval: 10
  receive_timeout: 4
  successful_checks: 2
  failed_checks: 2
  is_federated: false
  tcp_monitor:
    tcp_half_open: false

---
apiVersion: ako.vmware.com/v1alpha2
kind: L7Rule
metadata:
  name: gw-sec
spec:
  wafPolicy:
    kind: AviRef
    name: System-WAF-Policy

---
apiVersion: gateway.networking.k8s.io/v1
kind: HTTPRoute
metadata:
  name: demo-httproute
spec:
  hostnames:
  - "sockshop.k8s.fqdn.nl"
  parentRefs:
  - name: chris-tkg-gateway
    namespace: default
  rules:
  - filters:
     - type: ExtensionRef
       extensionRef:
         group: ako.vmware.com
         kind: L7Rule
         name: gw-sec
    matches:
    - path:
        type: Exact
        value: /
    backendRefs:
    - name: front-end
      port: 80
      filters:
       - type: ExtensionRef
         extensionRef:
           group: ako.vmware.com
           kind: HealthMonitor
           name: hm-webapp
5. Final checking.
In ArgoCD, you will see the added httproute.
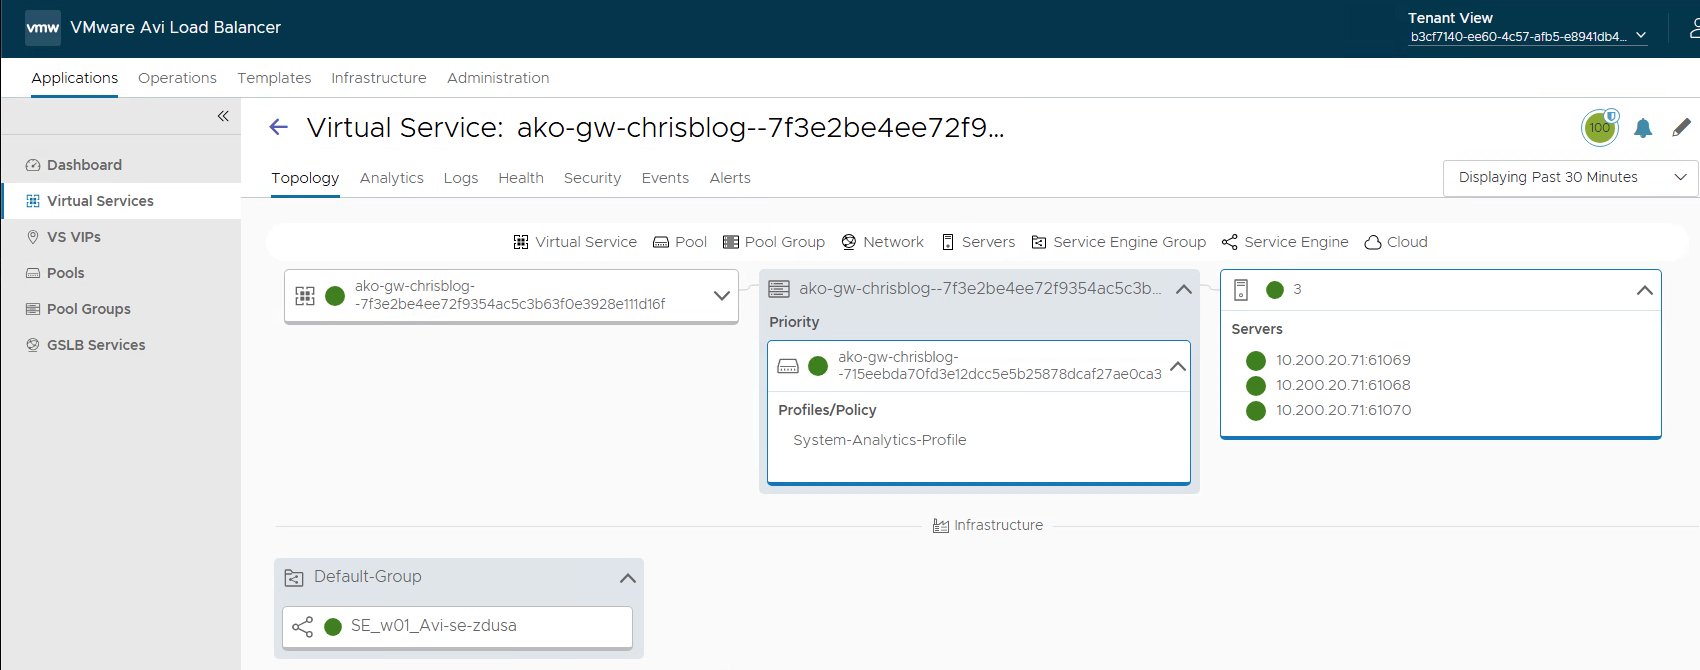
In Avi, you will see the virtual service corresponding to the httproute.
Final words
ArgoCD integrates well with the Supervisor and provides developers with a robust GitOps-based continuous delivery workflow. As a widely adopted and well-established tool, ArgoCD enables declarative application deployment and lifecycle management using Git as the single source of truth.
By integrating Avi, we provide a strong application delivery solution that includes built-in WAF capabilities and Gateway API support, enhancing both security and traffic management.