Introduction
OKD is the upstream and community-supported version of the Red Hat OpenShift Container Platform (OCP). OpenShift expands Kubernetes on an Enterprise level
NSX Advanced load balancer (AVI) is a 100% software-defined multi-cloud application services platform with Software Load Balancers, Intelligent WAF (iWAF), and Container Ingress.
Antrea is a Kubernetes-native project that implements the Container Network Interface (CNI) and Kubernetes NetworkPolicy, providing network connectivity and security for pod workloads.
Antrea extends the benefit of programmable networks from Open vSwitch (OVS) to Kubernetes.
All modern applications use load balancing nowadays. Load balancing is the process of distributing network traffic across multiple servers.
In this blog, I am using three control plane nodes (master nodes) and two worker nodes, since I am using multiple servers, it makes sense to have a load balancer in front.
The goal of this blog
I have based my guide on a guide by Craig Robinson. You can find it here.
Craig uses HA-PROXY to do the load balancing. I will be using AVI instead.
I will go over the steps to install OKD 4.11, VMware Container Networking with Antrea, and AKO.
I will use a manual ‘Installing a cluster on vSphere with user-provisioned infrastructure’.
For more info see OKD documentation. The process for OpenShift is similar to that of OKD.
As a bonus, I will integrate Antrea with NSX-T.
Please note the following:
Officially Antrea is NOT supported with OKD. Antrea has been tested with OCP 4.7- 4.10
Officially Ako is NOT supported with OKD. Ako has been tested with OCP 4.6 – 4.10
Officially Ako and Antrea NodePortLocal in combination with OKD/OpenShift is NOT supported.
Antrea will use NodePortLocal. More info about NPL can be found here.
I will not go over the installation of vSphere, NSX-T, and Avi.
Why am I using OKD instead of OCP (OpenShift Container Platform)?
For OpenShift you need RedHat licenses. It is possible to run with a trial license, but I like to keep my platform running for longer than the trial period.
What I am using / prerequisites
For my setup, I am using the following.
vCenter 7.0.3
Esxi 7.0 U3g
OKD 4.11
Avi 22.1.2-2p2
Ako 1.8.1
VMware Container Networking with Antrea 1.5.0 (based on Antrea 1.7.1 opensource release)
NSX-T 3.2.1.2 (Nsx-t will also act as DHCP server.)
Fedora Core OS 36. (this is based on RedHat Enterprise 9)
I will be using the subdomain ‘okd.nordic.fqdn.nl’ for all the DNS naming.
Prerequisites
DNS server.
Resources.
Six VMs with 4 vcpu, 16gb memory, 75gb storage (bootstrap, masters, workers)
(optional) jump host VM. You might already have a jump host VM running.
My jump host is running CentOS stream 8. I use this VM to host my webserver and my CLI client to OKD
One VM with 2 vcpu, 8gb memory, 75gb storage (jump host, services)
Web server.
Needed for the ignition booting of Fedora Core OS. I have that web server running on the jump host.
The webserver needs to be reachable from the OKD nodes.
Internet access.
The nodes need to be able to talk to the internet to get OS files, deployment, antrea, etc.
An overview of the IPs and Hostnames I am using
| Ip address | Host |
| 192.168.36.100 | services01 |
| 192.168.36.101 | bootstrap01 |
| 192.168.36.102 | master01 |
| 192.168.36.103 | master02 |
| 192.168.36.104 | master03 |
| 192.168.36.105 | worker01 |
| 192.168.36.106 | worker02 |
| 192.168.35.101 | apiVIP |
| 192.168.35.102 | ingressVIP |
Initial setups
The subdomain I will be using is ‘okd.nordic.fqdn.nl’
The OKD cluster name will be ‘lab’
1. DNS
Create the following records. Also, create PTR records for this.
PTR (reverse lookup) records are important to auto-populate the hostnames when using DHCP.
bootstrap01.okd.nordic.fqdn.nl IN A 192.168.36.101
master01.okd.nordic.fqdn.nl IN A 192.168.36.102
master02.okd.nordic.fqdn.nl IN A 192.168.36.103
master03.okd.nordic.fqdn.nl IN A 192.168.36.104
worker01.okd.nordic.fqdn.nl IN A 192.168.36.105
worker02.okd.nordic.fqdn.nl IN A 192.168.36.106
api.lab.okd.nordic.fqdn.nl IN A 192.168.35.101
api-int.lab.okd.nordic.fqdn.nl IN A 192.168.35.101
*.apps.lab.okd.nordic.fqdn.nl IN A 192.168.35.102
2. Create a segment in NSX-T
The segment where the OKD nodes will be is called ‘okd’
The segment will be running a DHCP server.
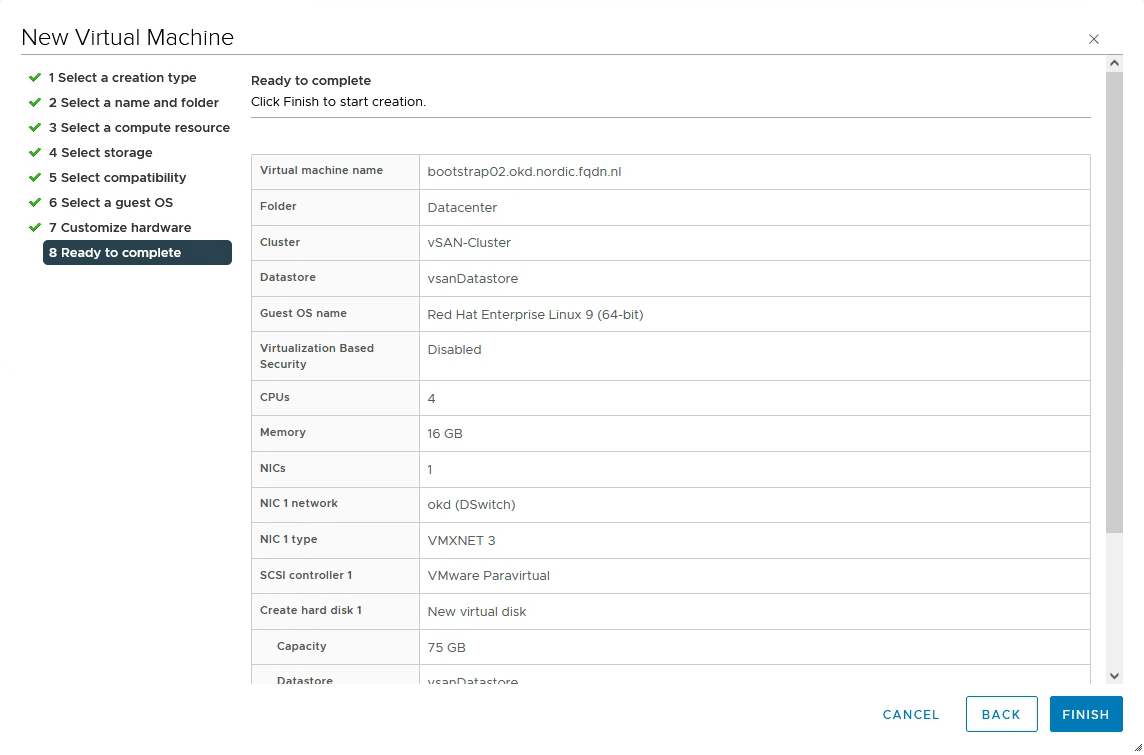
3. Create the VMs
Create six VMs with 4 vcpu, 16gb of memory, and 75gb storage (75gb is enough for my test environment)
(Create one, clone the others. You could also make a template)
The minimum VM Hardware version for OKD 4.11 is 15. I am using version 19.
As a guest os choose Linux / RedHat Enterprise Linux 9 (64-bit)
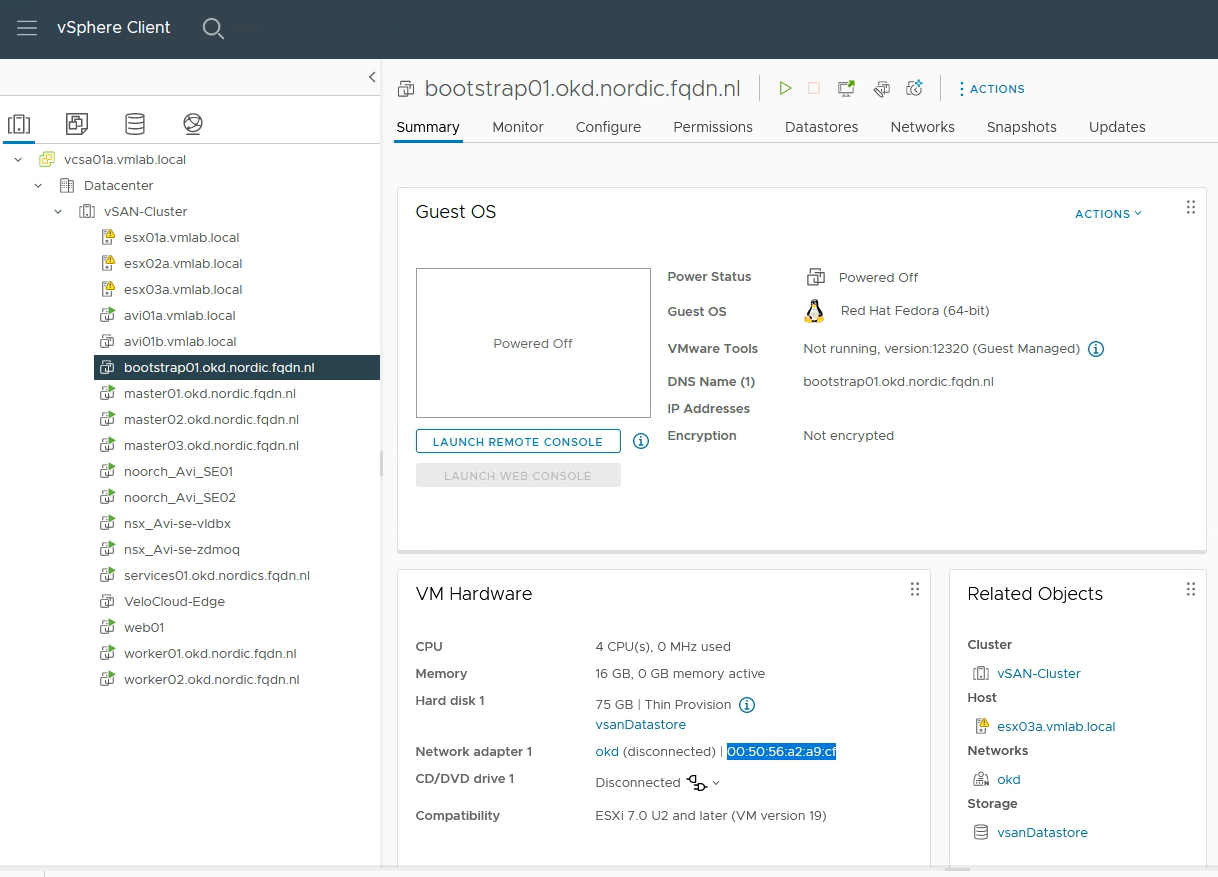
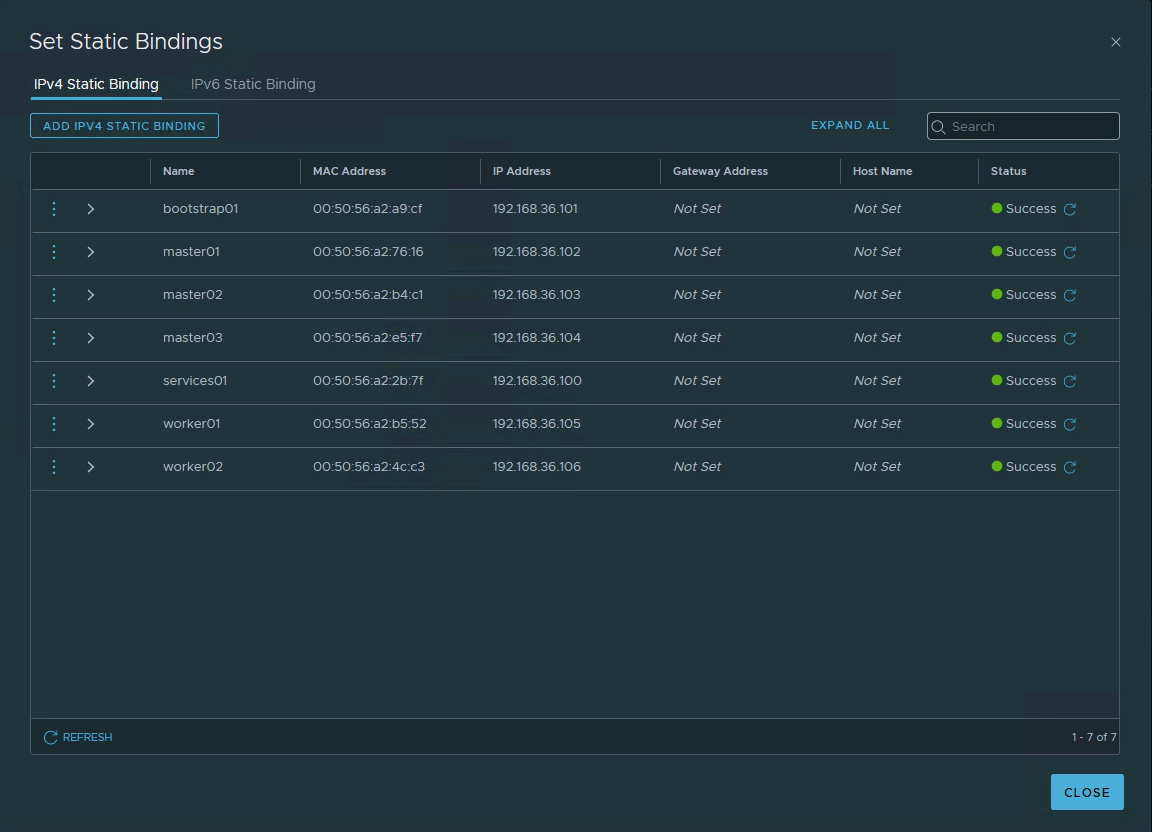
4. Create static DHCP entries.
To be sure the VMs will always get the same IP addresses, I will create static entries in NSX-T.
To get the correct mac address associated with the VM, go to vCenter.
Go to NSX-T manager->Networking->Segement and edit okd and DHCP static binding
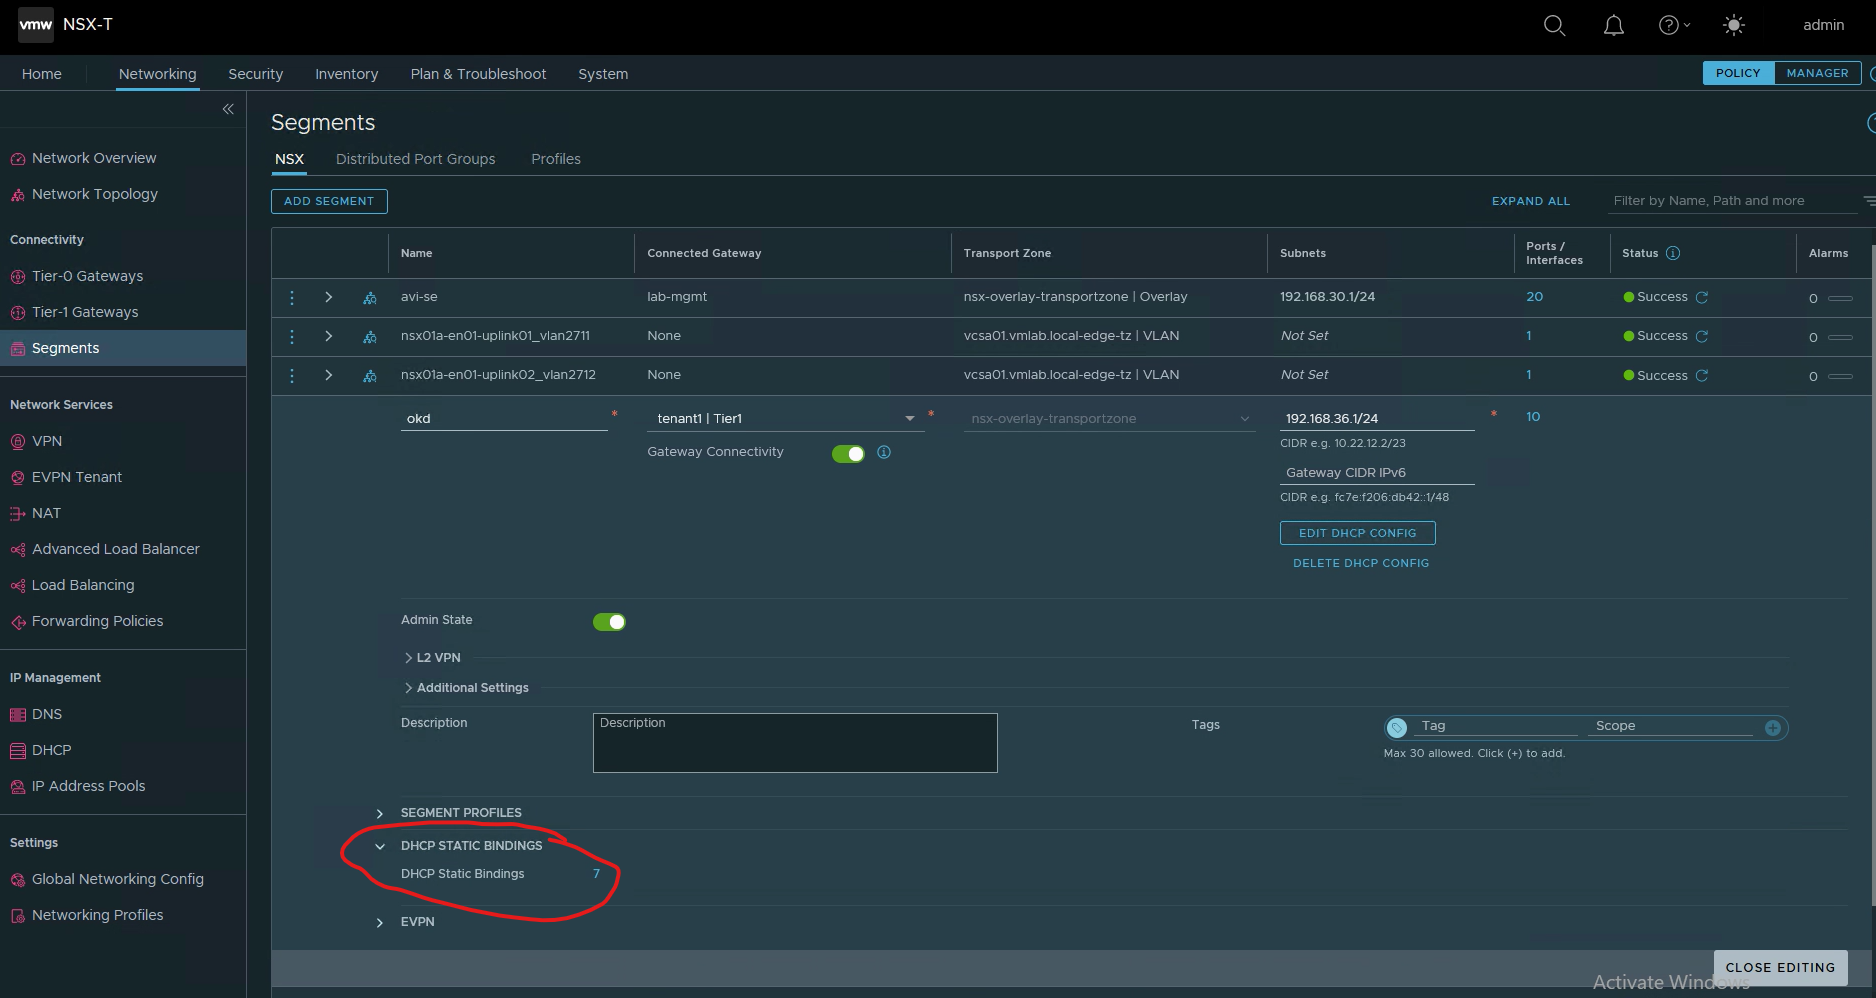
Add the hostnames with the corresponding mac address
5. Downloading images
On the jump host / services VM download the following:
These are the openshift client and install files.
wget https://github.com/okd-project/okd/releases/download/4.11.0-0.okd-2022-10-15-073651/openshift-client-linux-4.11.0-0.okd-2022-10-15-073651.tar.gz
wget https://github.com/okd-project/okd/releases/download/4.11.0-0.okd-2022-10-15-073651/openshift-install-linux-4.11.0-0.okd-2022-10-15-073651.tar.gz

tar xvfz openshift-client-linux-4.11.0-0.okd-2022-10-15-073651.tar.gz
tar xvfz openshift-install-linux-4.11.0-0.okd-2022-10-15-073651.tar.gz

cp oc kubectl openshift-install /usr/local/bin
Download the following iso image.
This is the coreos iso image we are using for the VMs
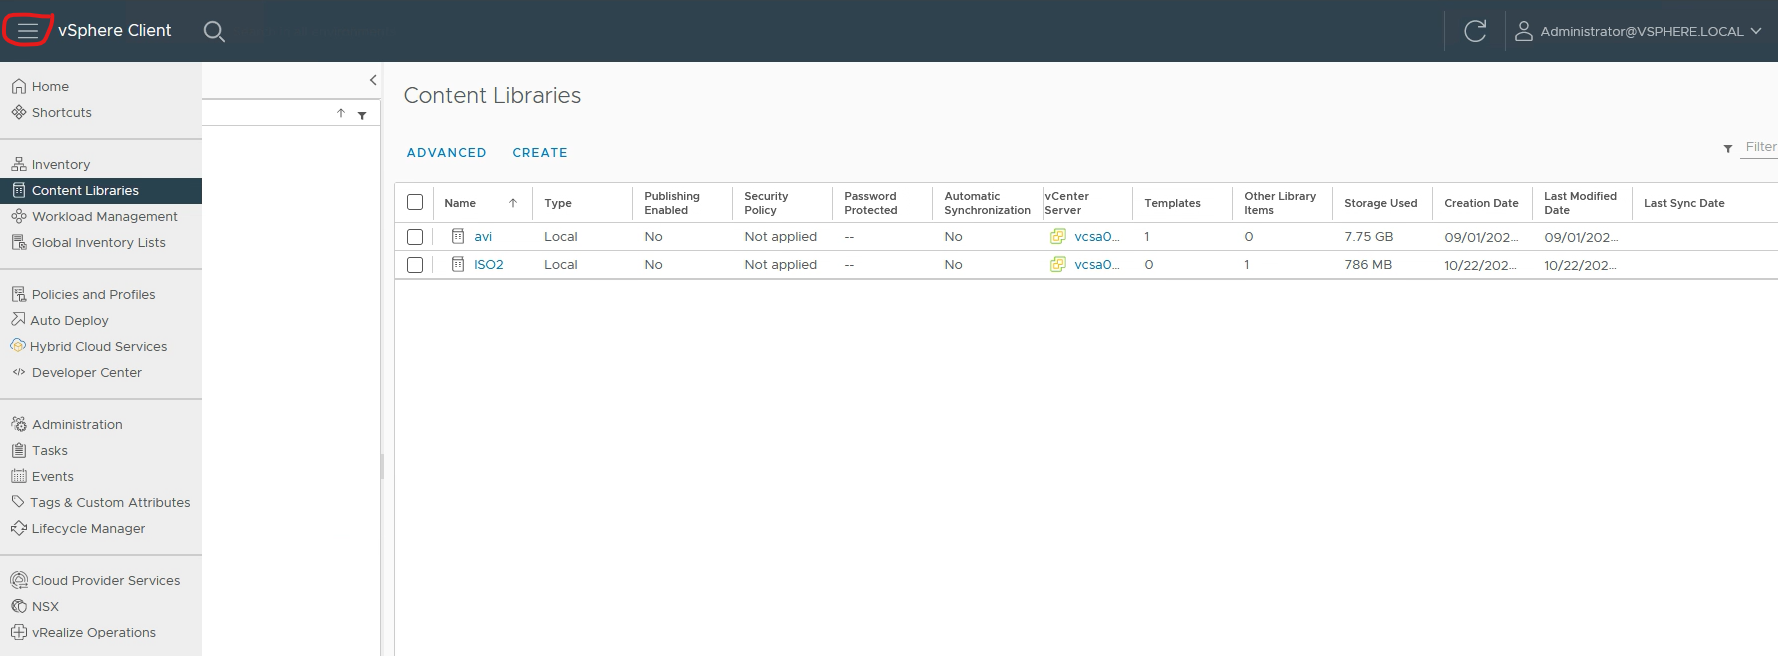
https://builds.coreos.fedoraproject.org/prod/streams/stable/builds/36.20220918.3.0/x86_64/fedora-coreos-36.20220918.3.0-live.x86_64.isoUpload this file to the vSphere Content Library. (If you do not have a Content Library, create one in vCenter)
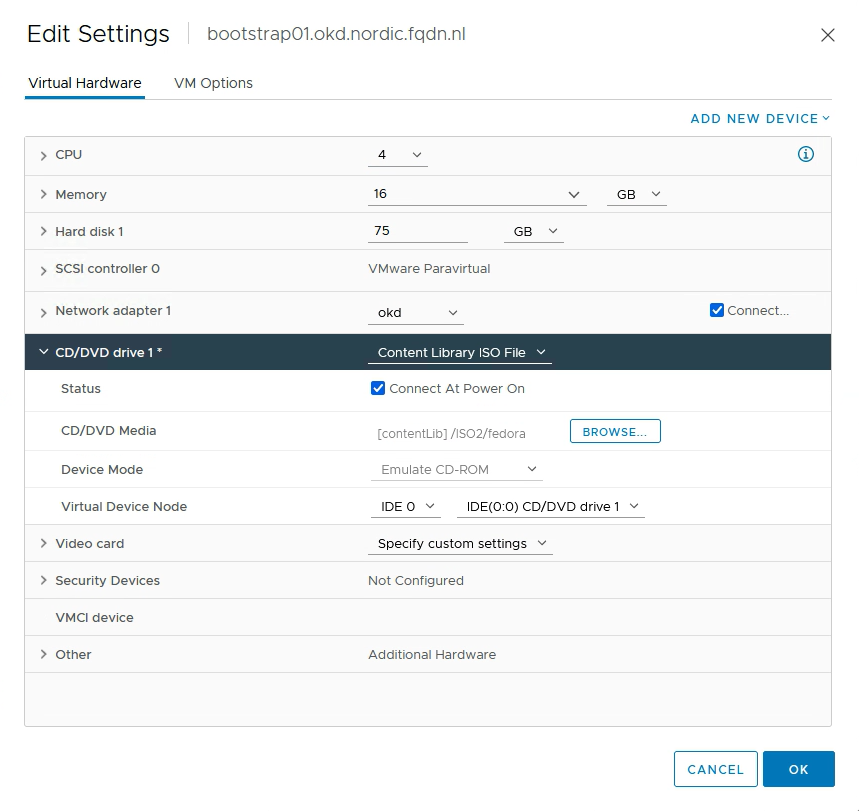
Goto the settings of your VMs and add the fedoracore iso file to your VMs.
Download Antrea files. You need entitlement to Antrea files.
Download VMware Antrea – VMware Customer Connect
Download ‘VMware Container Networking with Antrea, K8s Operator Manifests’ (deploy.tar.gz) to your jump host.
I will be using the images from projects.registry.vmware.com.
You can choose to put the images in your own Harbor registry. Follow the guide on installing Antrea, it can be found here.
Create a directory and unpack the deploy.tar.gz file.
mkdir antrea
cd antrea
tar xvfz ../deploy.tar.gz
6. Prepare VIPS on Avi
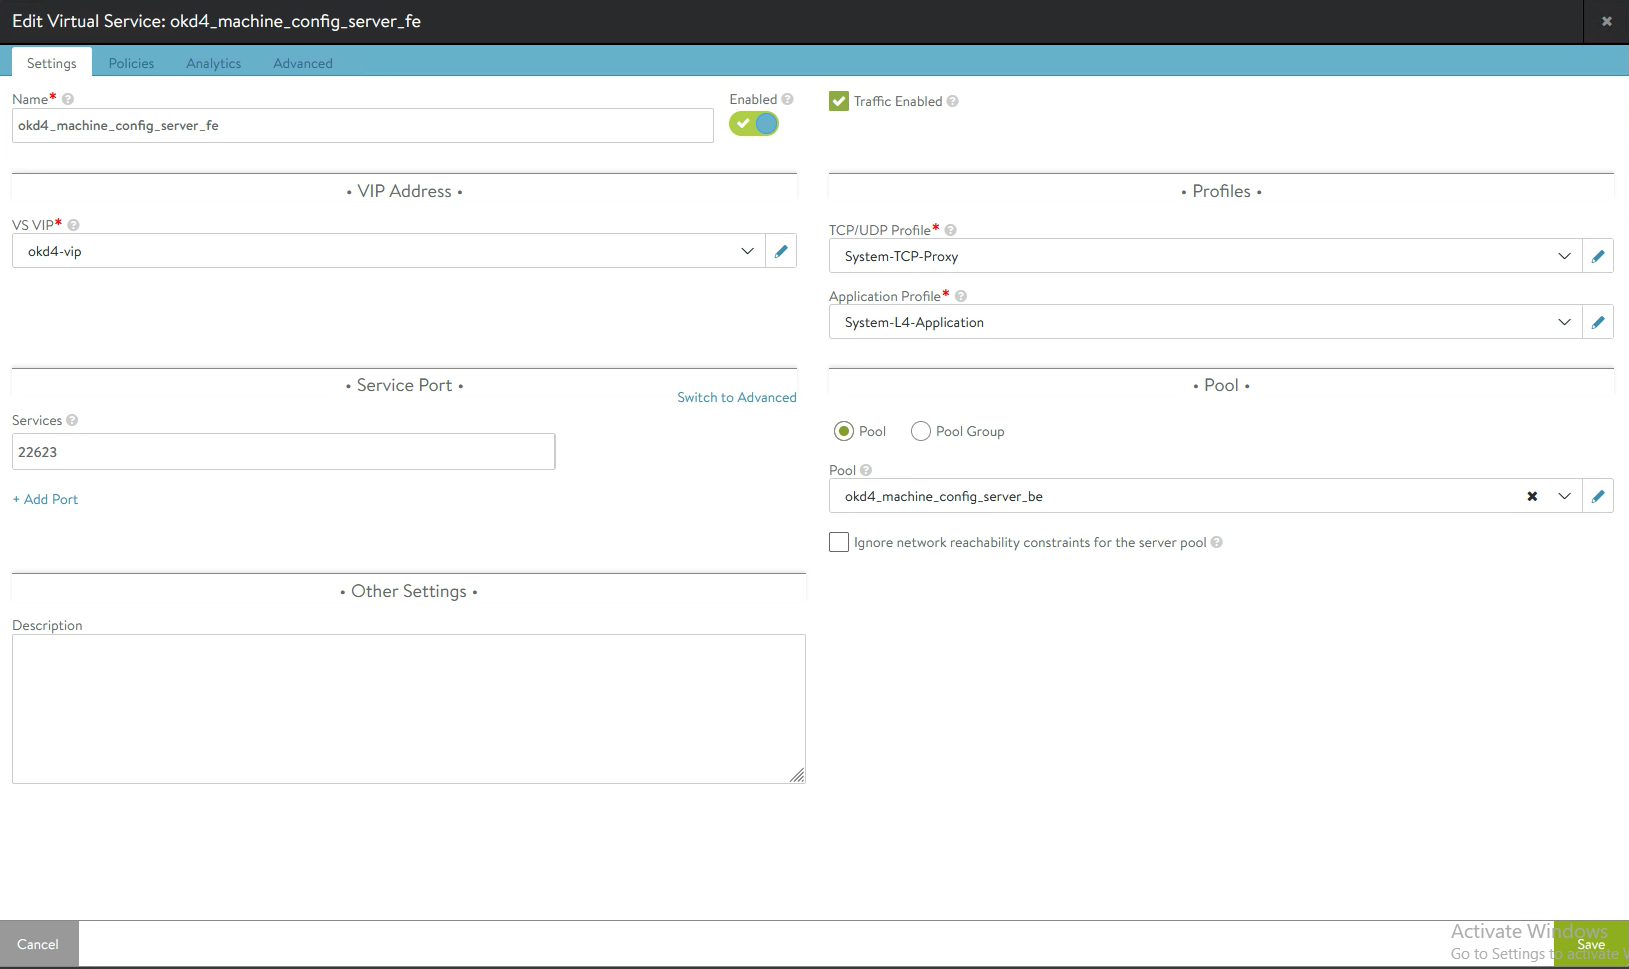
I will be using two VIPs. one apiVIP (192.168.35.101) and one ingressVIP (192.168.35.102)
apiVIPs will be using port 6443(API) and port 22623 (machine config)
Use the fours ips as pool members (bootstrap and three master ips.)
When the bootstrap machine is booted, that member will come up and supply the initial API.
When the master nodes come up, they will connect to the bootstrap API and start configuring.
When the setup is complete, you can remove the bootstrap IP from the pool.
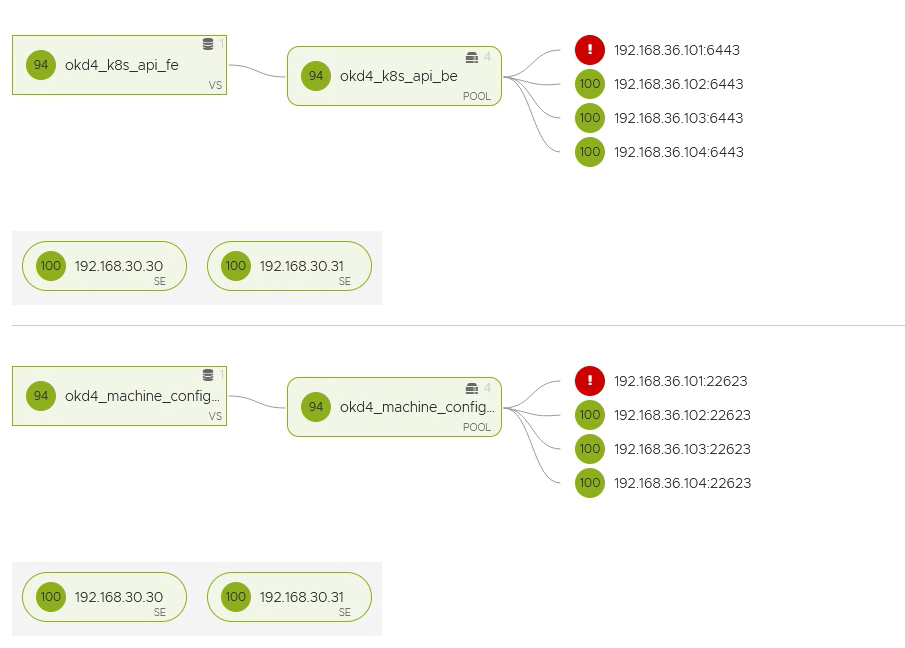

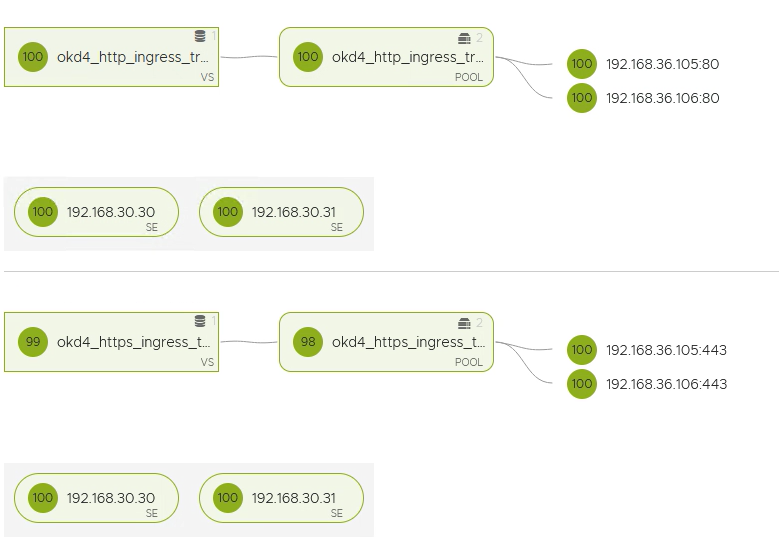
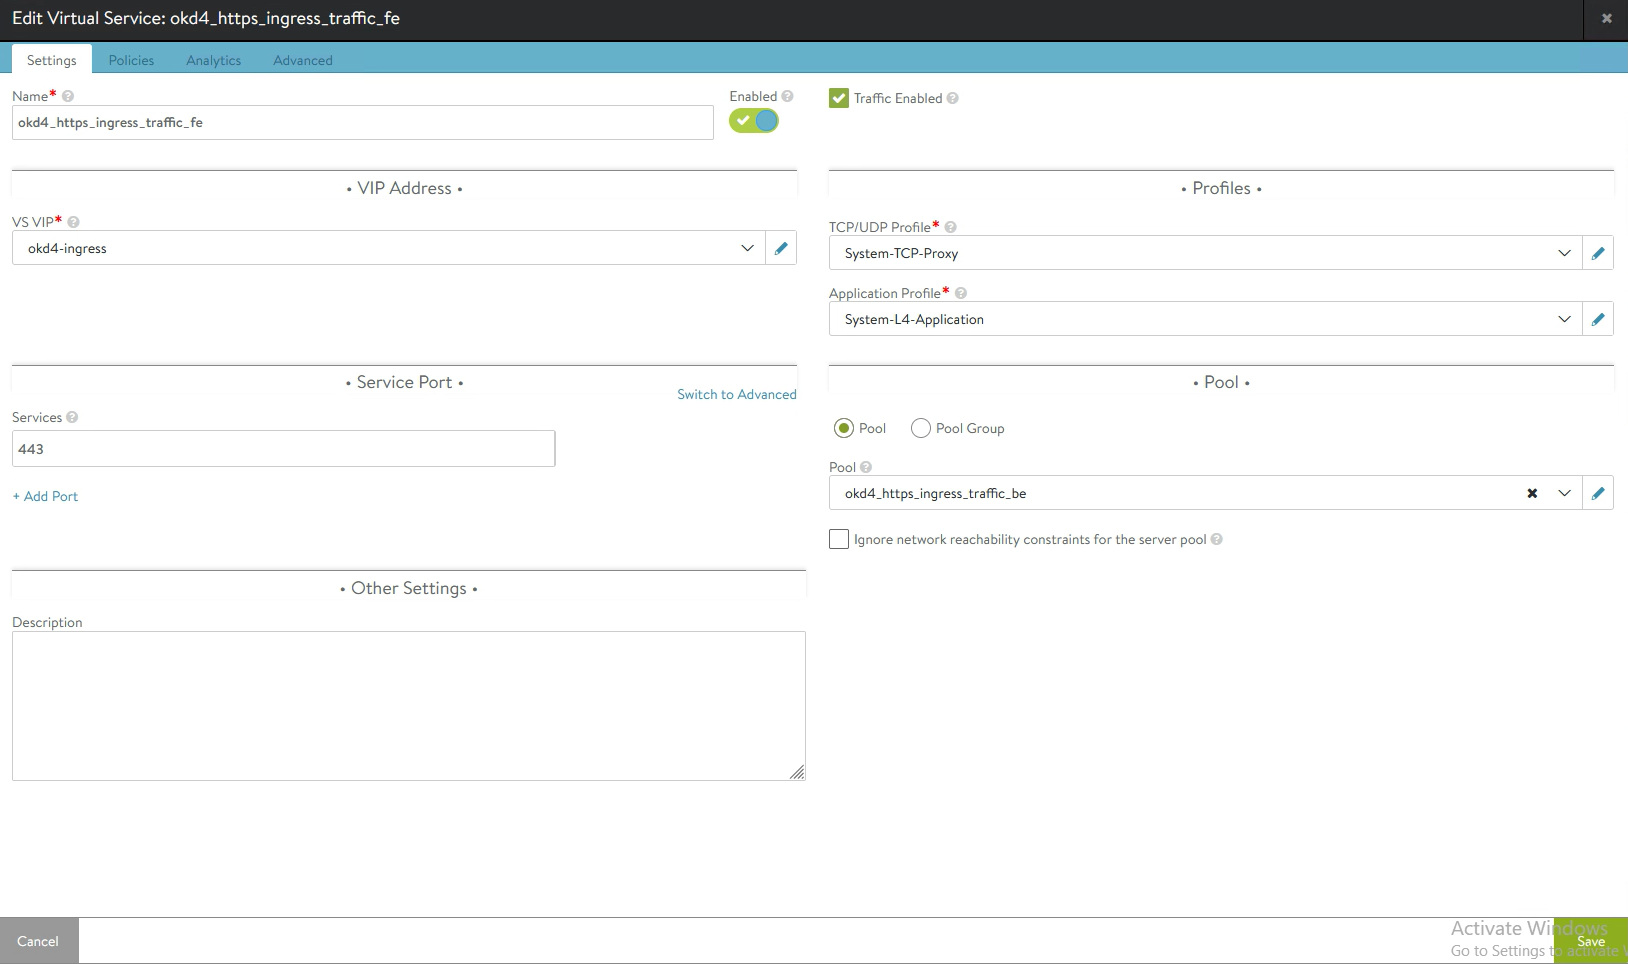
ingressVIP will be using ports 80 and 443
As pool members use the two worker ips.
Both VIPs will be down. They will come up after the master setup and worker bootup.

Installing OKD
Now we are ready to install OKD.
When you are here, you should have the following in place.
– DNS server with the required A and PTR records
– Jump host VM
– six VMs ready for OKD, with ISO image attached to cd-drive.
– DHCP server with static binding
– Antrea manifest files are ready on jump host.
– OKD install files and client ready on jump host.
– Created the VIPs on Avi
– webserver for the ignition files.
If you are missing something, please read back and get everything prepared.
1. Preparing the config
# Create a ssh key. This key will be used to access the OKD nodes.
ssh-keygen
# Create a directory where we store the install files.
mkdir antrea-ocp
cd antrea-ocp
vi install-config.yaml
# Paste the following code into it. Change where needed.
# Put your public key in the last field. (can be found here: ~/.ssh/id_rsa.pub)
# important
# networkType: antrea
# apiVIP: 192.168.35.101
# ingressVIP: 192.168.35.102
# metadata name: lab. This is the name i use.apiVersion: v1
baseDomain: okd.nordic.fqdn.nl
metadata:
name: lab
compute:
- hyperthreading: Enabled
name: worker
replicas: 0
controlPlane:
hyperthreading: Enabled
name: master
replicas: 3
networking:
clusterNetwork:
- cidr: 10.128.0.0/14
hostPrefix: 23
networkType: antrea
serviceNetwork:
- 172.30.0.0/16
platform:
vsphere:
vcenter: vcsa01a.vmlab.local
username: administrator@vsphere.local
password: VMware1!
datacenter: Datacenter
defaultDatastore: vsanDatastore
network: okd
cluster: vSAN-Cluster
apiVIP: 192.168.35.101
ingressVIP: 192.168.35.102
fips: false
pullSecret: '{"auths":{"fake":{"auth": "bar"}}}'
sshKey: 'ssh-rsa AAAAB3NzaC1yc2EAAAADAQABAAABgQDGQawNhsk0HBbYQB20apUEBDj8Pe2ksNUqxlZTc1oQXHBNwqFeFcs/O/CyO32Kc37HhQQleW8ZWVlvPLcwQiYwRcbfRPxtlx6OemAe/BCcTM= root@services01'Note: The pullSecret for OKD can be “pullSecret: ‘{“auths”:{“fake”:{“auth”: “bar”}}}'”
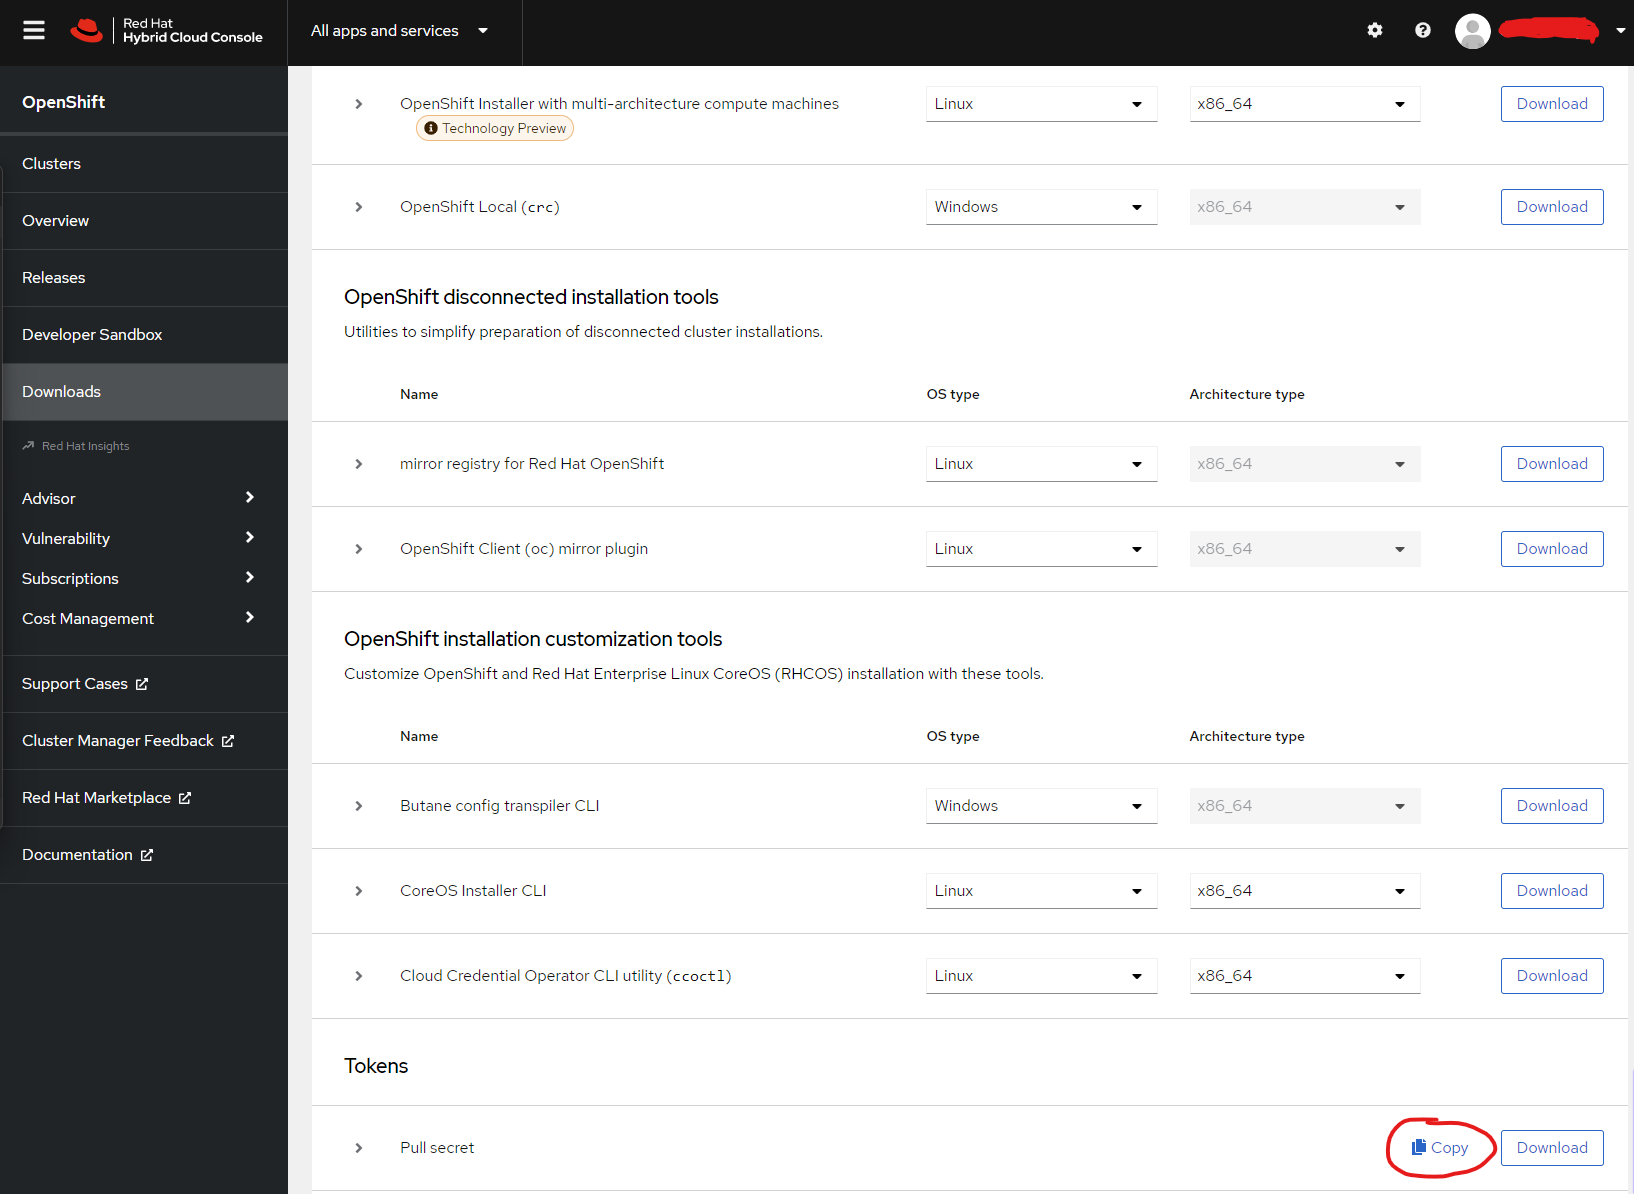
If you are using Openshift, you need to get the pullsecret from the redhat console.
Go to Downloads, scroll down to the bottom to Tokens.
2. Create manifest files
# create the manifest files
cd ..
openshift-install create manifests --dir=antrea-ocp
INFO Consuming Install Config from target directory
WARNING Making control-plane schedulable by setting MastersSchedulable to true for Scheduler cluster settings
INFO Manifests created in: antrea-ocp/manifests and antrea-ocp/openshift

# copy antrea manifest files
cp antrea/deploy/openshift/* antrea-ocp/manifests

# disable POD placement on masternodes.
sed -i 's/mastersSchedulable: true/mastersSchedulable: False/' antrea-ocp/manifests/cluster-scheduler-02-config.yml

# edit antrea config files.
vi antrea-ocp/manifests/operator.antrea.vmware.com_v1_antreainstall_cr.yaml

# Scroll to the end and change the images
# antreaImage: projects.registry.vmware.com/antreainterworking/antrea-ubi:v1.7.1_vmware.1
# interworkingImage: projects.registry.vmware.com/antreainterworking/interworking-ubi:0.7.0

vi antrea-ocp/manifests/operator.yaml
# Replace image with
# image: projects.registry.vmware.com/antreainterworking/antrea-operator:v1.7.1_vmware

# Important: Make a backup of the files. And copy files that are needed later for Antrea and NSX-T integration.
cp -av antrea-ocp antrea-ocp.bak
cp antrea-ocp/manifests/operator.antrea.vmware.com_v1_antreainstall_cr.yaml antrea/
cp antrea-ocp/manifests/nsx-cert.yaml antrea/
3. Create ignition files.
# create ignition files. This will create bootstrap, master and worker ignition files.
openshift-install create ignition-configs --dir=antrea-ocp
INFO Consuming Worker Machines from target directory
INFO Consuming Openshift Manifests from target directory
INFO Consuming Common Manifests from target directory
INFO Consuming Master Machines from target directory
INFO Consuming OpenShift Install (Manifests) from target directory
INFO Ignition-Configs created in: antrea-ocp and antrea-ocp/auth
Copy the files bootstrap.ign, master.ign, worker.ign to your web server.
4. Booting bootstrap
Power on the bootstrap machine.
It will boot from CD. After boot, it will drop to a shell. Check the hostname and IP address. It should be auto-assigned with the correct information. If not, check the DHCP static binding.
# on the shell type the following. (change the url to you webserver)
sudo coreos-installer install /dev/sda --ignition-url http://192.168.36.100:8080/okd/bootstrap.ign --insecure-ignition
# this will install coreos and prepare for ignition.
# when completed, reboot the server
sudo reboot
# OKD will be installed and the server will reboot.
# after a while (can take up to 30 minutes) Avi will see the member as UP.
# the two vips will be working (API and machine-config)
# if the vips are up, move to the next step. If not, try some troubleshooting
# ssh <bootstrap-ip> -l core
5. Booting master nodes
Power on the master01 VM.
It will boot from CD. After boot, it will drop to a shell. Check the hostname and IP address. It should be auto-assigned with the correct information. If not, check the DHCP static binding.
# on the shell type the following. (change the url to you webserver)
sudo coreos-installer install /dev/sda --ignition-url http://192.168.36.100:8080/okd/master.ign --insecure-ignition
# this will install coreos and prepare for ignition.
# when completed, reboot the server
sudo reboot
# OKD will be installed and the server will reboot.
# when you reboot the server, start the next one and repeat the steps.
Sit back and relax. This might take up to an hour to complete.
# check the status on the jumphost
export KUBECONFIG=~/antrea-ocp/auth/kubeconfig
openshift-install --dir=antrea-ocp wait-for bootstrap-complete --log-level=info
# it will check for 30 minutes if the cluster is up.
# if it is, it will tell you that you can remove the bootstrap machine.
# If not, try the command again and wait for another 30 minutes.
# If still not up, there might be a problem. Log into the master nodes and try some troubleshooting.
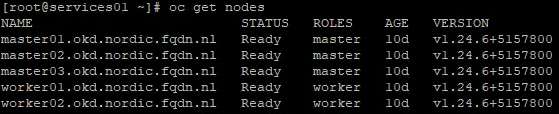
oc get nodes
# this should display the three master nodes.6. Booting worker nodes
Power on the worker01 VM
It will boot from CD. After boot, it will drop to a shell. Check the hostname and IP address. It should be auto-assigned with the correct information. If not, check the DHCP static binding.
# on the shell type the following. (change the url to you webserver)
sudo coreos-installer install /dev/sda --ignition-url http://192.168.36.100:8080/okd/worker.ign --insecure-ignition
# this will install coreos and prepare for ignition.
# when completed, reboot the server
sudo reboot
# OKD will be installed and the server will reboot.
# when you reboot the server, start the next one and repeat the steps.
When the worker nodes are booted up, they try to connect to the master.
To allow this, we need to accept certificates. (from the jump host)
oc get csr
# this will show some certificates waiting
# to accept multiple certificates at once
# install jq
wget -O jq https://github.com/stedolan/jq/releases/download/jq-1.6/jq-linux64
chmod +x jq
mv jq /usr/local/bin/
# accept the certificates
oc get csr -ojson | jq -r '.items[] | select(.status == {} ) | .metadata.name' | xargs oc adm certificate approve

# check the nodes. The worked nodes should be there.
oc get nodes

7. Final check and console access
oc get clusteroperatorsCheck if antrea is installed. And check the console.

If everything is available, you can log in on the console. Please note: it can take pretty long before the console is available. The ingress VIPs on Avi should be up.
# get the admin password.
cat antrea-ocp/auth/kubeadmin-password
Go to https://console-openshift-console.apps.lab.okd.nordic.fqdn.nl
Login with username: kubeadmin

Congratulations, OKD is running. Play around, create some pods and enjoy the platform 🙂
Installing AKO
Let’s install AKO and let Avi handle the routes that are created in OKD.
1. Install helm
Helm is a tool to help you define, install, and upgrade applications running on Kubernetes. At its most basic, Helm is a templating engine that creates Kubernetes manifests. What makes Helm more than that is it can upgrade and scale applications as well.
Click here for more information about helm and install options.
# Download the helm install script and run it.
curl -fsSL -o get_helm.sh https://raw.githubusercontent.com/helm/helm/main/scripts/get-helm-3
chmod 700 get_helm.sh
./get_helm.sh
2. Install AKO
# Download the config for AKO deployment
helm show values oci://projects.registry.vmware.com/ako/helm-charts/ako --version 1.8.1 > values.yaml
# edit values.yaml
# Setting to take a look at
# Clustername. I called it okd. You could call it 'lab' to match with the OKD cluster.
clusterName: okd
# cniPlugin. We are using antrea here
cniPlugin: 'antrea'
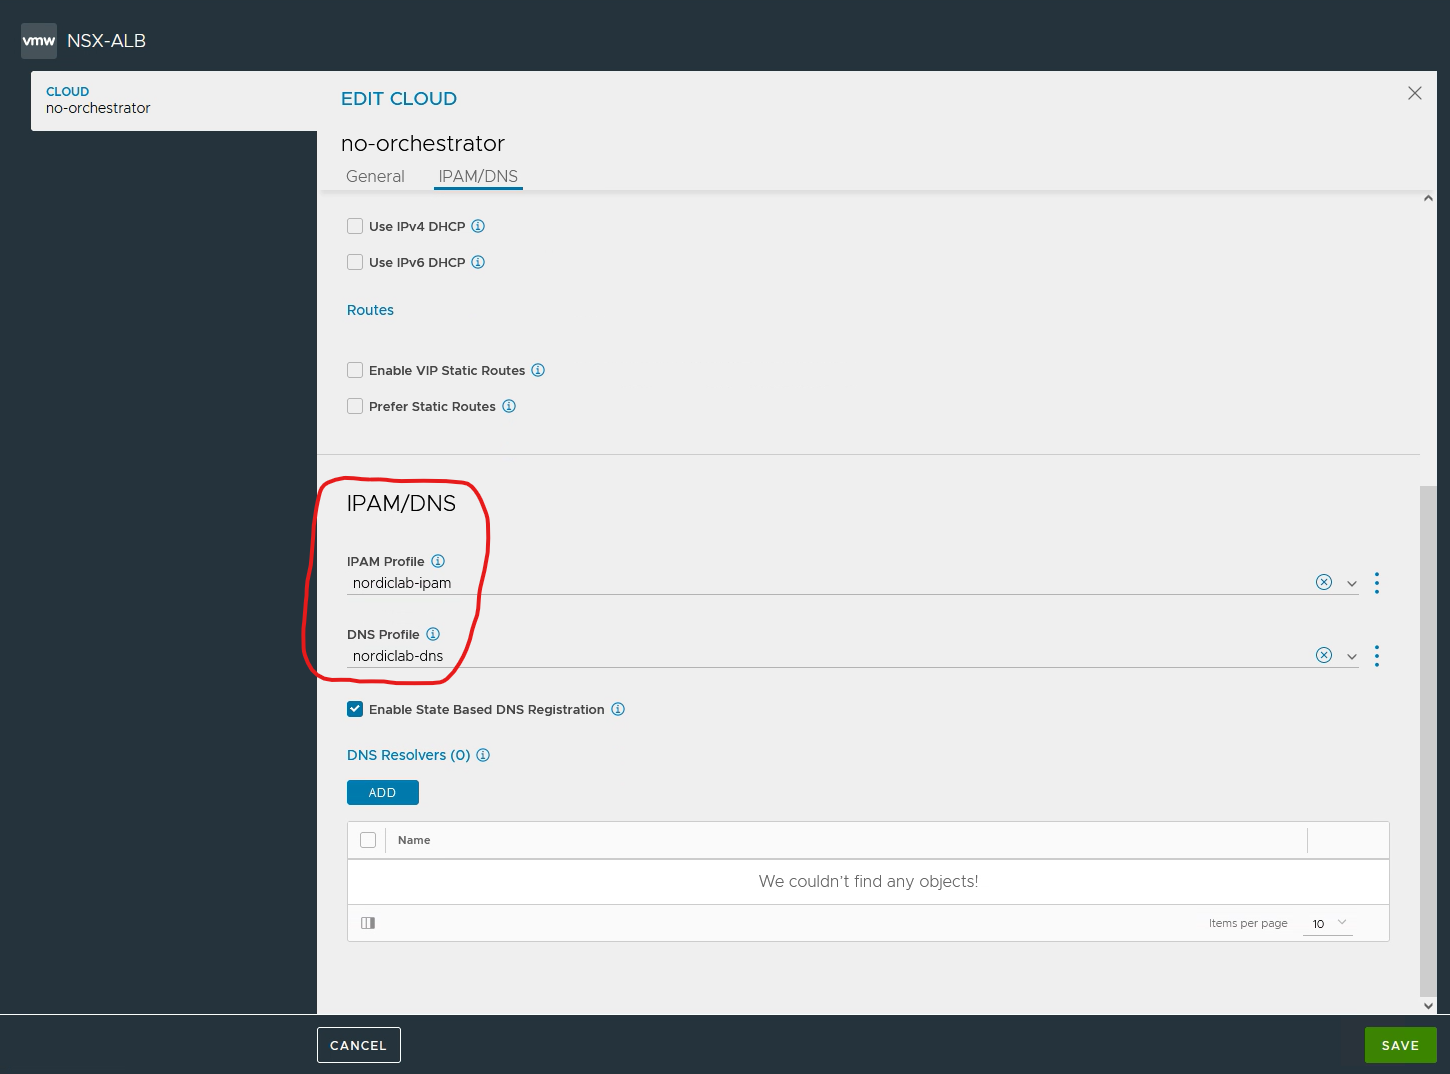
# vipNetworkList. The network difined in Avi to use a VIP network. Important note here, you also need IPAM and DNS setup on Avi. (see screenshots)
vipNetworkList:
- networkName: vip-segment
cidr: 192.168.35.0/24
# serviceType. Since we are using antrea, this should be NodePortLocal
serviceType: NodePortLocal
# ControllerSetting.
ControllerSettings:
serviceEngineGroupName: Default-Group # Name of the ServiceEngine Group.
controllerVersion: '22.1.1' # The controller API version
cloudName: no-orchestrator # The configured cloud name on the Avi controller.
controllerHost: '192.168.11.71' # IP address or Hostname of Avi Controller
tenantName: admin # Name of the tenant where all the AKO objects will be created in AVI.
# avicredentials
avicredentials:
username: 'admin'
password: 'VMware1!'

# create namespace
kubectl create ns avi-system

# install AKO with helm
helm install  oci://projects.registry.vmware.com/ako/helm-charts/ako  --generate-name --version 1.8.1 -f values.yaml  --set ControllerSettings.controllerHost=192.168.11.71 --set avicredentials.username=admin --set avicredentials.password=VMware1\! --namespace=avi-system

# check the helm install
helm list -n avi-system

NAME          	NAMESPACE
ako-1593523840	avi-system

kubectl get pod -n avi-system
NAME    READY   STATUS    RESTARTS   AGE
ako-0   1/1     Running   0          44h

# you can check the logs if needed
kubectl logs ako-0 -n avi-system
Example
Before I will go into the bonus part ‘Integrating Antrea with NSX-T’, here is an example of deployment.
Import note here is the annotation for nodeportlocal in Antrea.
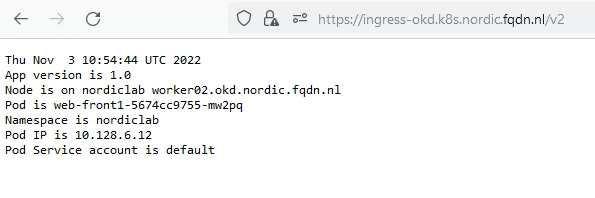
This example is a very simple deployment, which will echo some information when doing an HTTP request to port 8080. I am using namespace nordiclab.
# deployment.yaml
apiVersion: apps/v1
kind: Deployment
metadata:
  name: web-front1
  annotations:
    nodeportlocal.antrea.io/enabled: "true"
spec:
  replicas: 4
  selector:
    matchLabels:
      app: web-front1
  template:
    metadata:
      name: web-front1
      labels:
        app: web-front1
    spec:
      containers:
        - name: web-front1
          image: tacobayle/busybox-v1
          command: [ "sh", "-c"]
          args:
          - while true; do
              echo -e "HTTP/1.1 200 OK\n\n$(date)\nApp version is $(printenv AppVersion)\nNode is on nordiclab $(printenv MY_NODE_NAME)\nPod is $(printenv MY_POD_NAME)\nNamespace is $(printenv MY_POD_NAMESPACE)\nPod IP is $(printenv MY_POD_IP)\nPod Service account is $(printenv MY_POD_SERVICE_ACCOUNT)" | nc -l -p 8080;
            done;
          env:
            - name: MY_NODE_NAME
              valueFrom:
                fieldRef:
                  fieldPath: spec.nodeName
            - name: MY_POD_NAME
              valueFrom:
                fieldRef:
                  fieldPath: metadata.name
            - name: MY_POD_NAMESPACE
              valueFrom:
                fieldRef:
                  fieldPath: metadata.namespace
            - name: MY_POD_IP
              valueFrom:
                fieldRef:
                  fieldPath: status.podIP
            - name: MY_POD_SERVICE_ACCOUNT
              valueFrom:
                fieldRef:
                  fieldPath: spec.serviceAccountName
      restartPolicy: Always
# service.yaml
apiVersion: v1
kind: Service
metadata:
name: web-front-1
annotations:
nodeportlocal.antrea.io/enabled: "true"
spec:
selector:
app: web-front1
ports:
- protocol: TCP
port: 80
targetPort: 8080# route.yaml
apiVersion: route.openshift.io/v1
kind: Route
metadata:
name: ingress-okd.k8s.nordic.fqdn.nl
spec:
host: ingress-okd.k8s.nordic.fqdn.nl #Provide Your Hostname here
path: "/v2"
to:
kind: Service
name: web-front-1
port:
targetPort: 8080
tls:
termination: edge
insecureEdgeTerminationPolicy: Redirect
certificate: |-
-----BEGIN CERTIFICATE-----
MIIFhzCCA2+gAwIBAgIULtLTqMvOOEzIj6YhS3wDEtGokbYwDQYJKoZIhvcNAQEL
BQAwUzELMAkGA1UEBhMCTkwxFTATBgNVBAcMDERlZmF1bHQgQ2l0eTENMAsGA1UE
CgwERlFETjEeMBwGA1UEAwwVdnMwMi5nc2xiLmxhYi5mcWRuLm5sMB4XDTIyMTAx
OTEzMDQ1OFoXDTMyMTAxNjEzMDQ1OFowUzELMAkGA1UEBhMCTkwxFTATBgNVBAcM
DERlZmF1bHQgQ2l0eTENMAsGA1UECgwERlFETjEeMBwGA1UEAwwVdnMwMi5nc2xi
LmxhYi5mcWRuLm5sMIICIjANBgkqhkiG9w0BAQEFAAOCAg8AMIICCgKCAgEAqOb8
SXQGAlI3usRrfMM0ewC3p26Qho1HzdJ4Y/AUWa13C+DkDlmxaH2lHj3paqLN+PKE
Nhc5B6qOYIk3Xn3WzqrZ+pWZMD7oKNOcI+/bUPFDnPsiwteFJXYwp437fiaOOeEX
tU+poWX9OMdFffT7B+DFayuwXYRcsLbQ1b+gFZBlpie64WM1nryIDCZ6ftBJoYly
a0uwJEUeiR8Q+Ve/zNxq+Yh6ZbzsOYm+MWE2DIJVueBZMZkzUzyzltWKJjV4pGzk
F1Apdk6EVKCC7VwQYXIzncIGe3LbS0YjjzSdbUL8EpTQZku9nL9lzoYCvTbpSTpR
71DOedGKDtOQXRzmJeWoGmINUkMCqg4cGmE1/4L83lQeawOBTI1EUoiSzjbGmyX+
rr7GehDzBVoPp9Ibgy3LmVlbLFoKlmrYdhR5008Hwtv1J+ofgpA7ZeCw3KmyHfLZ
aktjXKg30ppXsE6rJeYhBNk9m666rH3S9RCorL0Nfvd85jlbVDoenUG1nDFmyF0x
xFvIjoEDud+lTIkXkCGNc/wfW0DzGLAYAHY9cM1HHIl3zCfsxyZ8LmbbuIR2/t5K
owAsKQ9ZHhuXO7nrWT9bapWTjz49InhLiZ6gdLz0gvglU1FVCsHQjuxIKx8Is46L
z2rQcJcQ1qiOCS2GZJa6rBOmY6b4QHvekabQxKECAwEAAaNTMFEwHQYDVR0OBBYE
FIg+sKPGg4QJXvI11T8CpTO6FgPEMB8GA1UdIwQYMBaAFIg+sKPGg4QJXvI11T8C
pTO6FgPEMA8GA1UdEwEB/wQFMAMBAf8wDQYJKoZIhvcNAQELBQADggIBAAU7In9S
1an3sb3mNARdrShLef7WuUpKmEK63edadl6LS9qvvTifwig3kcSE4ekhITb6FOHn
MUqS4+dkoQsyBtj/pbekoieRIVPeB80IAlmaThK8Gm6WYPcICdzZ/e3SlZYGkk9+
6cfA0hY6YMu+t/nmKmYPpLSkP6utBlgzsmneiMoQ6ABumxmoNE3mSMyAsdA36DEY
0qfe5k3H65KTKYmwigSAjKcdkdlutKY9MU8pnL7j4wym8NEs7TWcc2OvnmH7QdLp
U9CD0ccDFBomi28zF0Gg9YP0H5vD+SixytbEoAVr+kQ2g+6Gju6Kclo5PBmJRjI5
YPLItj5p16MnckW6LWbSvCtp3eVXto86iOuwGqUpJk0rkvOaYAlOraOaRtSfvgkT
PuYu69rhbEa5PwazJnmUDnCH8AYjPitqzRiFzhFyVPwdabbJ/SsVJA2GcRXqXxET
MDim1Jrw4ITBmDx0vHssVBongAqDXd9O3/8hpRf55NfY3+WUXHn/Igvxl2AydEcB
gHhH14YlEBVfK+g8I6MyVnFtyoJcSHyUKZWq8hCHcRcapzVRMwk/XsUDySTpDVMV
XdlqqW5jHNmIsN1j6+vyw/VzYr+6NNabYE+F8yURNaT2lyzOW1BI6tAEw+GW+Nqg
bOfpbgyKjHTX7JWd/ccmKT2jlYmWmlmxrLdU
-----END CERTIFICATE-----
key: |-
-----BEGIN PRIVATE KEY-----
MIIJRAIBADANBgkqhkiG9w0BAQEFAASCCS4wggkqAgEAAoICAQCo5vxJdAYCUje6
xGt8wzR7ALenbpCGjUfN0nhj8BRZrXcL4OQOWbFofaUePelqos348oQ2FzkHqo5g
iTdefdbOqtn6lZkwPugo05wj79tQ8UOc+yLC14UldjCnjft+Jo454Re1T6mhZf04
x0V99PsH4MVrK7BdhFywttDVv6AVkGWmJ7rhYzWevIgMJnp+0EmhiXJrS7AkRR6J
HxD5V7/M3Gr5iHplvOw5ib4xYTYMglW54FkxmTNTPLOW1YomNXikbOQXUCl2ToRU
oILtXBBhcjOdwgZ7cttLRiOPNJ1tQvwSlNBmS72cv2XOhgK9NulJOlHvUM550YoO
05BdHOYl5agaYg1SQwKqDhwaYTX/gvzeVB5rA4FMjURSiJLONsabJf6uvsZ6EPMF
Wg+n0huDLcuZWVssWgqWath2FHnTTwfC2/Un6h+CkDtl4LDcqbId8tlqS2NcqDfS
mlewTqsl5iEE2T2brrqsfdL1EKisvQ1+93zmOVtUOh6dQbWcMWbIXTHEW8iOgQO5
36VMiReQIY1z/B9bQPMYsBgAdj1wzUcciXfMJ+zHJnwuZtu4hHb+3kqjACwpD1ke
G5c7uetZP1tqlZOPPj0ieEuJnqB0vPSC+CVTUVUKwdCO7EgrHwizjovPatBwlxDW
qI4JLYZklrqsE6ZjpvhAe96RptDEoQIDAQABAoICAHWCnywLiNK8mQFb/tyCg1TA
nwXiKrMyQC62rAP72Gy7/wNIp+JEDOYB5Isxz9/c/SiisdFgPtFSnFQVo2weaQDI
ZXet9TJX0fX1o8Bs9E1QThY9s2WTxJLXs+ofIkYWVQV30aLXldEwwAhsu7BybOSC
QVfawY2OtV5NEuZjt+DI4a/EHIULHRcfXBf3/WmVSGUW14BG3HmfjSshbhHMNyk0
gUiy51U5J7CwYJ7CX3Q8iaAUsnmLeOYEaX4be04yDYl4KQj/QJmK7w5hzjWNw+fI
KJktkIz60A+C8OKFXLHT1MSovIUvVPBlSVNycR1rwsqrxK2Xrs+aNU8zalEd9hBt
ogEz3dHpAy4qUGr7Rye1h8uMKnzSgfNT5e9FHUY7zGAMZ1pnO4/c5iNJJ9L7aJr1
KW9EHqC2kpKUnFxGHpdpkInP6igNPi8VbdPm2QCkkVEXx4M1teJbBuB5E5wQfvic
6oxTcLFstrMef2uZLy6xHZvVPHdtSR2QaAMM/YJ6emxeDjIPD10ZRChkw7B4XVwb
8IDT/TZbCYMrVUnKFXRFaCryDe/wlp6Md1JvZkIiToo0oaaHQjauk7gqbLjm8NwT
VPquU6C2vpSt5xHnjHG/vMCLrjjB2dawS1KqYAtgWoa4lu61TKvvxLjUapoP8a6l
26rJ/JfgvGnNuW8Tyk9xAoIBAQDf2nv6jgiVGCbVpvtpCYMyuVRcbBzk4nRZZoiS
xYCpycOTPMBUodHSP24n13NyLTZg47whWlm/tyh4s4Rm1X3rg/CnAqu/v4nLacK6
tK0W40XHD10Xs8/7wn83E6pgTNV77zu83u0wVuyoG9lpEmUV3rtk2Knrf2qMYVGa
MbhYvug6bxghD7+I9B3WbSmUZUIy+HlcUVEIciHiTmGgGB4FexMFogjGgokytAtC
hCMergFROBp6Vf8r3qxQHdweFBfbgazyrQy091V02sw70CgHb2CPLNKv+IHhmvWQ
AKO1Dxw3m9eKDQubU45BwS72HMDFz7J9nNEn2GsI2vRltHWvAoIBAQDBKFVnqPAI
e8a4okbm0vkngVCtWUaRbuib7h7hLq9Ziz/0RiYeYYYVY8vAiqXFISHCwKCeOM5Z
/MeUrfp9iwPAq+PPuorERIxu3djXiKoHWsWGUIOSXOz9y27U8r2pC687zPyS2mYD
dAhM6J3Lxh3KGnTdFqfp31r4pp2qbn2MuEbEQ8ingEIQMkaIZisymm3FMC7E6qkt
hcH6Rkd0nU3HWGu7+a9bLgOiOdOOvqhfHHyfqyQQBGTb8PxILdQC0udxuUcJ+F6X
BV8rCRMBClL5TprCuGHRQAKE+SXNz/l/uee43i9143rsJlan9FHhpYVpDv5+wHXs
Imb3QHLkN06vAoIBAQDBuUbJ0tlCjiAtjdDNWdocr55+TWHEAuZF6CIRQrLSPTXv
2gdoNpJqrVIbUK0sBkylFPDevF4nN87ihhjzFZdfllNRdVJFIvGRA/ntsiaJRC5C
0tzxgj9f1TZa573ukQ+/rY25KgOCbfdolJFWCQFKJ/NslsSWdTI0QpRoKNcslipL
R5FOK17KmtinlNkC/46GpdoBNq417O+99a8u6TAx9gzENzH4+Ubahk2oRspN5rBl
JXRkor+tq4rb2rt/nEv5PwP5ECGLCvD9q8xLhxzdMloSDexXNWzRXVVeRe9m5ai5
xziE1D1TMsBNz21guAlsJw6E/o1TOkuG4lXXHpEpAoIBAQCeDJu9Yy1tM6KKBzaO
vshiO9zAyxEEBUVN+czIosOWOGvPO+sK5u+o5uyckpZLs+2FBssmTAME/OJt1OHn
Ae3DJKMWoWPUbuad/ObmjYva0rpXSeAuzdyZWnFIy4rHHKl4/CUbIJtibfowvBIJ
4AUWDwnasiQZKMquNN9Dyn7uuwYkp/YyoK7tw8WU7EyiblwtglxygjSF7DGp0QG8
+M3gtIgK2qZSrFcK0dg6r+TjVlLe71FlzcKdeRVlFiKpYNtCYcEv9kuntRyHATjM
nB8Cof/eHrLjXkXxelAllOxpR7vEuAELrGQzgLddXHv3b9G3Ai7Zli+nVQr9e33H
IT4/AoIBAQCFQfjbUu/DaXAoK9sz39CWBdosW4xQe3pHzSZQG3c5jQrEg6/X84B3
o0uPOks2ycs6BBy8NAu+3vMYJdxLXu84G6bvn8TEiC0Gj30DeuSoYoeqQPfmdEL7
trQ8Pix/xl4CVvdzysxLmIUIAbdeZgGR9Ur22i1OE21Fr8l+JwwhZeNkylluIqWi
p3rRLpWLsD2ex2tjojfgvelt2JC11jtuD8R6YcuTZ20NEk3pxtJa9e7AVgUAJbVf
ndTOUbRDsfGH1YwIwVNW7yZCkgk4zOarV52QIvwKrzdtcK/NsmWl6rZOEapKF/wu
Y2B9HrCyrzgcEi+fOLTmp4M00VNhEYXZ
-----END PRIVATE KEY-----The result of applying the yaml files will be the following. Ako will create the VirtualService in Avi.
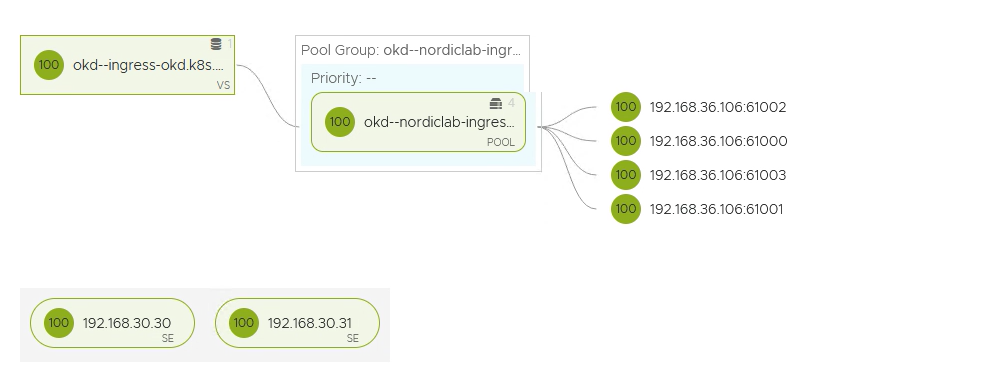
As you can see, all the pods are running on different ports. That is what nodeportlocal does in Antrea.
You can find the nodeportlocal entries on the pods.
kubectl describe pods -n nordiclab|grep nodeportlocal.antrea.io
nodeportlocal.antrea.io: [{"podPort":8080,"nodeIP":"192.168.36.106","nodePort":61000,"protocol":"tcp","protocols":["tcp"]}]
Ako will create a route in OKD.
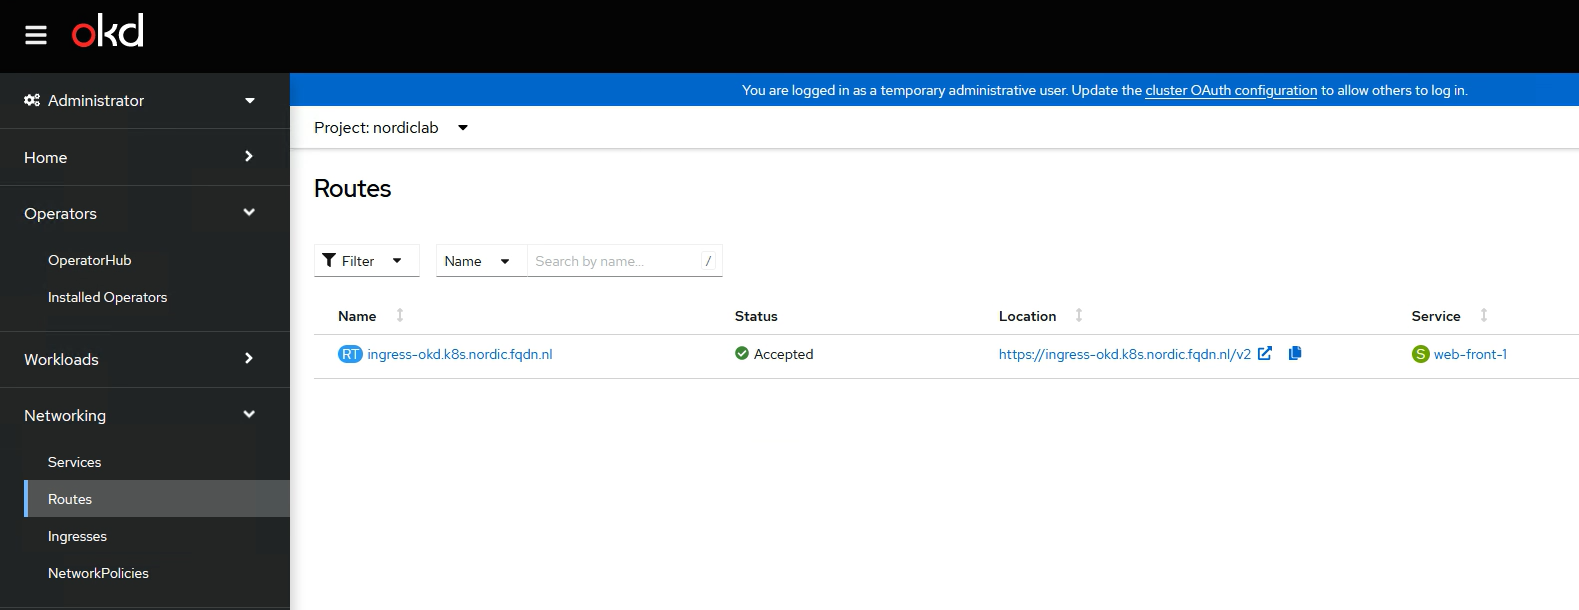
In the browser, it will look like this.
Antrea and NSX-T integration
Antrea will use the Principal Identity User in NSX-T to communicate with NSX-T
1. Create NSX-T principal identity
# Create a public and private key pair.
CLUSTER_NAME="okd-nordics"
openssl genrsa -out $CLUSTER_NAME-private.key 2048
openssl req -new -key $CLUSTER_NAME-private.key -out $CLUSTER_NAME.csr -subj "/C=US/ST=CA/L=Palo Alto/O=VMware/OU=Antrea Cluster/CN=$CLUSTER_NAME"
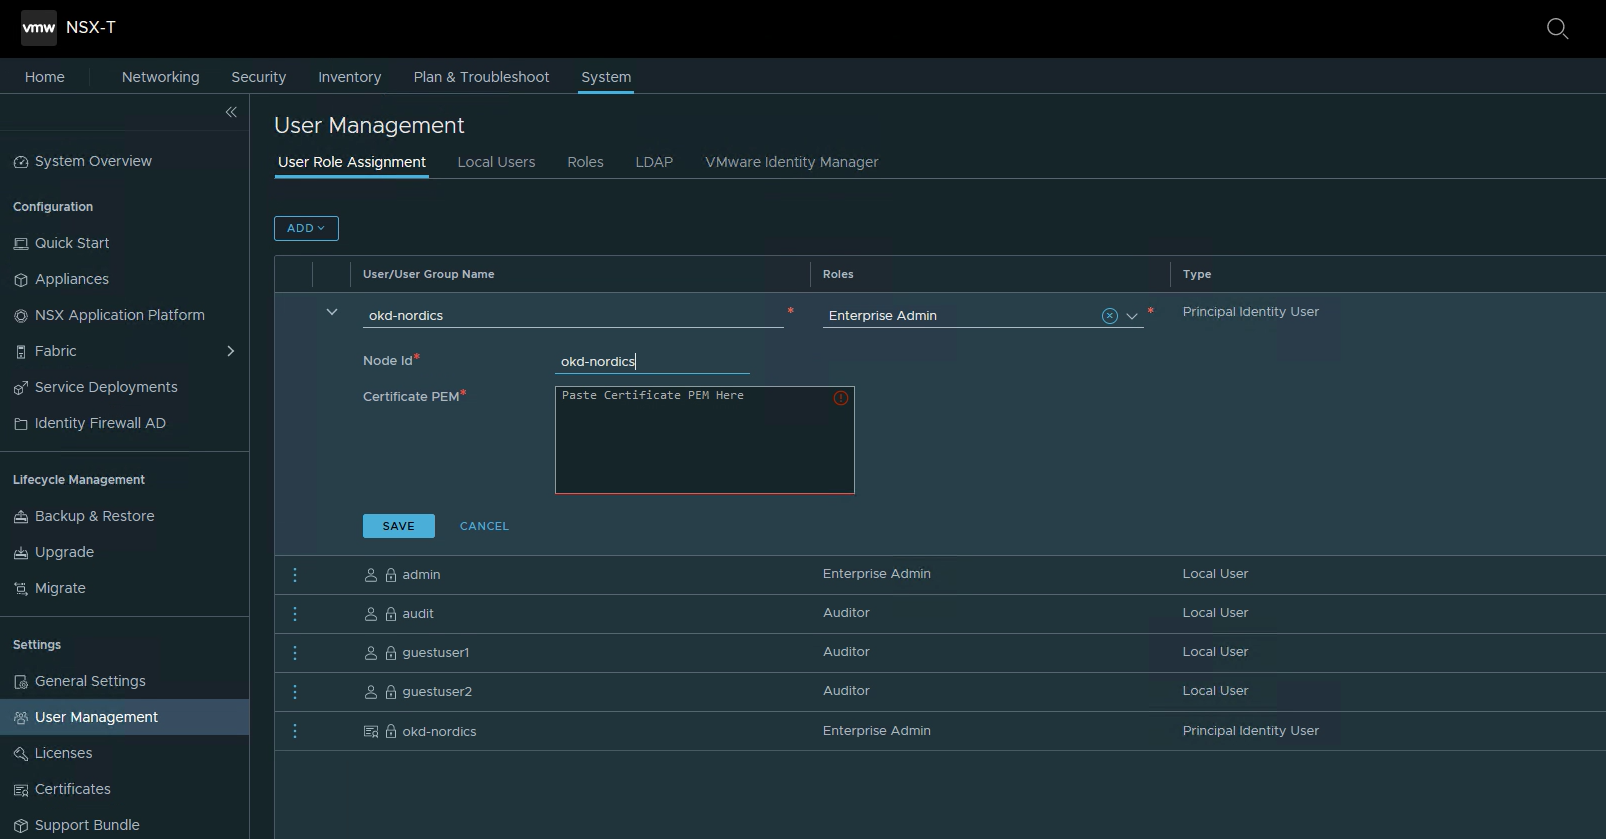
openssl x509 -req -days 3650 -sha256 -in $CLUSTER_NAME.csr -signkey $CLUSTER_NAME-private.key -out $CLUSTER_NAME.crtIn NSX-T go to System, User Management, User Role Assignment and click Principal Identity with Role
Name and Node id: okd-nordics
Role: select Enterprise Admin
Certificate PEM: paste the crt info you have created
2. Configure Antrea
# First we need to create a base64 of our created key and certificate
cat okd-nordics-private.key  | base64 -w 0
cat okd-nordics.crt  | base64 -w 0

# edit antrea/nsx-cert.yaml (this is the file you copied in step 2. of Installing OKD) and paste the two base64 into it.

apiVersion: v1
kind: Namespace
metadata:
  name: vmware-system-antrea
  labels:
    app: antrea-interworking
    openshift.io/run-level: '0'
---
apiVersion: v1
kind: Secret
metadata:
  name: nsx-cert
  namespace: vmware-system-antrea
type: kubernetes.io/tls
data:
  # One line base64 encoded data. Can be generated by command: cat tls.crt | base64 -w 0
  tls.crt: LS0tLS1CRUdJTiBDRVJUSUZJQ0FURS0tLS0tCk1JSURZekNDQWtzQ0ZBUW5TTGg5dUV5VW1mSktNN05zRFIzNW4rUVlNQTBHQ1NxR1NJYjNEUUVCQ3dVQU1HNHgKQ3pBSkJnTlZCQVlUQWxWVE1Rc3dDUVlEVlFRSURBSkRRVEVTTUJBR0ExVUVCd3dKVUdGc2J5QkJiSFJ2TVE4dwpEUVlEVlFRS0RBWldUWGRoY21VeEZ6QVZCZ05WQkFzTURrRnVkSEpsWVNCRGJIVnpkR1Z5TVJRd0VnWURWUVFECkRBdHZhMlF0Ym05eVpHbGpjekFlRncweU1qRXdNalV4TWpVNU5EWmFGdzB6TWpFd01qSXhNalU1TkRaYU1HNHgKQ3pBSkJnTlZCQVlUQWxWVE1Rc3dDUVlEVlFRSURBSkRRVEVTTUJBR0ExVUVCd3dKVUdGc2J5QkJiSFJ2TVE4dwpEUVlEVlFRS0RBWldUWGRoY21VeEZ6QVZCZ05WQkFzTURrRnVkSEpsWVNCRGJIVnpkR1Z5TVJRd0VnWURWUVFECkRBdHZhMlF0Ym05eVpHbGpjekNDQVNJd0RRWUpLb1pJaHZjTkFRRUJCUUFEZ2dFUEFEQ0NBUW9DZ2dFQkFLZ3oKMGdGSGNpcHFNS09VNGtiVUY4YlB1dkJ4NmxUZURMUm1ORjl3cCs1QW1vTEVWcitnaTJjZEdYYlBhSkJFZU1aRQpESDBkODcwUGdjWE4rdUYyVHJiT2p1WmV1Tmp3S0FxUzg1Zis2MG5vRlcrRStkN3VQRm50STlxdDFjeVI5elllCkJYZnV0bFE4L0sxcEM1QkFidUFmQ1UrSjZIaVRuNEN4cGY1K25Mb2JoVU5jQ0c4Y3ViL3BoOW9NQ0owZnRSUFAKcDlDNlVPSHBkeUlCVGVLSlhQTStvenZHell6Ri9vcGVQRG5sejNGZk43bFpHdzZ1dm5JKzdGWXJQaXBqdlVGcAo4M0lFeTBOcDBhKzhQbGJmdkZDMHJJelBmclV6U2RnRFlXcDhybEVWVHJTeFh1M1JIUmVla1dsc2VOb1k0VUxNCm9WUklPclIrUlpNR1BlaExMQXNDQXdFQUFUQU5CZ2txaGtpRzl3MEJBUXNGQUFPQ0FRRUFURVRKOUkyQ2FGYjMKSUFaeGUrVi8zdFdpaXlscHlhdWw5elp3SFhCbmJCZ2tKSkJnYXVRVHJURWp5R0ZEV0M3K2oxNjFaV1pwZWQzUQpSaG00WkR4NSs1c2gyVEhEb1B6alpGMFNDcEliQ2xiRWxWOWlSbDlLYmZMQWZoSWU5OEdOUG9HL0tJVHBqZ2R4CjVpNzRzT296ZmFXNWRvSXQ2WkF5VmRrRjUrZFNkSmlCVlc0dnNiOFY3cUU0Skl4aDNnb3NxaXBuOUtqU05JVnIKTFVDUHZ3YTRianhHWlI3N2VNci8rNU9WRFZRL2k0RGUyeUh6MlA1YzllcWgzaWFOQWFXNk1MSFZzaDZWRW1WbgoxdWlDdUtpMk43aUtSTk9uL01wQTBVaDBpZSthVVpuaEZqUm10MFNieGhmWUxkVjVkWlZOSFNGa25xakhqMXVSCkNwVWxNUGExRVE9PQotLS0tLUVORCBDRVJUSUZJQ0FURS0tLS0tCg==
  # One line base64 encoded data. Can be generated by command: cat tls.key | base64 -w 0
  tls.key: LS0tLS1CRUdJTiBSU0EgUFJJVkFURSBLRVktLS0tLQpNSUlFb2dJQkFBS0NBUUVBcURQU0FVZHlLbW93bzVUaVJ0UVh4cys2OEhIcVZONE10R1kwWDNDbjdrQ2Fnc1JXCnY2Q0xaeDBaZHM5b2tFUjR4a1FNZlIzenZRK0J4YzM2NFhaT3RzNk81bDY0MlBBb0NwTHpsLzdyU2VnVmI0VDUKM3U0OFdlMGoycTNWekpIM05oNEZkKzYyVkR6OHJXa0xrRUJ1NEI4SlQ0bm9lSk9mZ0xHbC9uNmN1aHVGUTF3SQpieHk1dittSDJnd0luUisxRTgrbjBMcFE0ZWwzSWdGTjRvbGM4ejZqTzhiTmpNWCtpbDQ4T2VYUGNWODN1VmtiCkRxNitjajdzVmlzK0ttTzlRV256Y2dUTFEyblJyN3crVnQrOFVMU3NqTTkrdFROSjJBTmhhbnl1VVJWT3RMRmUKN2RFZEY1NlJhV3g0MmhqaFFzeWhWRWc2dEg1Rmt3WTk2RXNzQ3dJREFRQUJBb0lCQUM5QWw0K0tiYlVpcmRWVwpueGE4d0kwMmtGSzUvZFducDdRS1BrNU5qSyt1OEhrcUJTRENUa2RDY29QaEVvUHM2R3p5Y3Z1M0xXRUFlVG1ECmV5WlpvUlZVQStzTjB5b0dsWWthN1ZuVzRHeWJ5V0hSM294Vkt4a3NPSFZYZm9lQXZnMHk4K0JVYkY1UDM4QXIKa1hjTjB0Z2RmL1ViVGZhSnFqWnlNYXJFRU8xckZ5MnFuLzNzZjFXdHJvcHhNMUM2QTArbXM0N2JJYW44c3M2VwplVmd1dU9aRGh6aENwQzdickVDRGdUaEJoU0NmU2grRVo0dEVCRjh3cisxQkdKbk1ZejA0R1poMVQ1RklzL1U2CkRCN2dmbWxSNHUrdi9aTWNoL0lkanB0UTVOWEJNV2kyVTJIeE1NeVMzUWdQWU5KeHE4VGVwL0FxZ1FrS0IxNTMKc01ub0tUa0NnWUVBMUs5ditMK2xKbHNxYXh0b1BxWWRYUUxSdVI4dmtyYWFVbDUrNFB1QjJOdGl3MitKNWxjNQpIQm1LRklqV09GQ25tSnpjWGRJdXlsR21JOUV2aTk3UnFOcU1VWmF6YitHWE9Va1V6bG1ydGk3dWMwcGRFOG5NCmNiWXdSVFR2L3YxNlE5MXFkd3IvUjBvc09YcWNKclRvMUVoL25tVWNnZzBBR1h6ZnNuRm5qeDBDZ1lFQXluVTUKSTlOajNvRWp4NHgyRXRPaGhsd2lCck1CbTI3NmV3WlJXMGFxU0p2a2F6ekZWSWorbjZycGhEUUJYOWN5ZVM2TwpXd3V6Ui9FeDI5eWNTTUovZVlJeW50d0RxNzVCN1ZpUmlGMTRsWXhFT1lzbjRuaVRNeFovekFJcUk5TkhTcmgzCndIWmVZMFhFM0JJU0NVbDFVak91QTNjUnlVTkxZdThNdE10OGQwY0NnWUFWKzhSQkc5NEFKdkF0ZmZtNmNBVWMKOWd1amJOdkgrR1BmRzdGVm8rbDU5c013bkRqT3ZEbEU5RWJYZElWZjhNWkIrZ1MxRmVLTU93QkhOM29JcFJGYQp1S3hFU3FWbGJSWHFiK2xjb3R3aXlwc1BBNkszUnVhQTRtbiszVWZwUFY0RDRjRDlhUCtWNk03RmFpejF1MEZOCm4rakJBSVovMHNRdDNrQm8rMXZPNlFLQmdHbTBKRjR4R3o1cnZHdU9TWU53M1MrU1lPMlFmbkZSMHhOeWEvMjAKK21rb2cyejk4S1UvVlhtMXVYQWQydTNZSkhFaXZvNklvRlVhZUFhcnV5azk2MkpjZU9ONlNheGNqSDFJTmN1MQp5YVNDOUlmNndKczhpdFlzbEJMR3VvdXozdEFEV2ZxeGtueFFUQVQrcGs0VS9WMHF3RnJzeXV1QzZCUkNiU2JqCjZ4czNBb0dBUVc4M3M2emlXT3R4bjl4b3VsWVdXR1BJa1JlUnJ4MlBobXJwRmw5VVNxcmpYcjBiZE5NS3phT1kKSC95TFhMVnhqZEdLUms1T1VRcEZYTHQ5Nm5XU1NKZ1ZLckxnQUJ2UTRncmpXeGpwVDdYSDZ6NGVJS0FaNUp4UApmaWkwNmIxODUyWnk2UkdiRWl3THZlei9QM0EvWHlON3FOK2VmOElVUThBL1UrbTAwMEE9Ci0tLS0tRU5EIFJTQSBQUklWQVRFIEtFWS0tLS0tCg==
# edit operator.antrea.vmware.com_v1_antreainstall_cr.yaml
# And the end of the file you will find bootstrapConfig
bootstrapConfig: |

# clustername: should match the name and nodeid of the Principal Identity
clusterName: okd-nordics


# NSXManagers: Ip of your manager
NSXManagers: [192.168.11.21]

# interworkingImage: change this line to match the correct url
interworkingImage: projects.registry.vmware.com/antreainterworking/interworking-ubi:0.7.0


# enableInterworking: set to true
enableInterworking: true
# Apply the config
kubectl apply -f operator.antrea.vmware.com_v1_antreainstall_cr.yaml
kubectl apply -f nsx-cert.yaml
# check that the pods are running
kubectl get pods -n vmware-antrea-system
3. Check NSX-T
After a while, NSX-T should show the cluster.
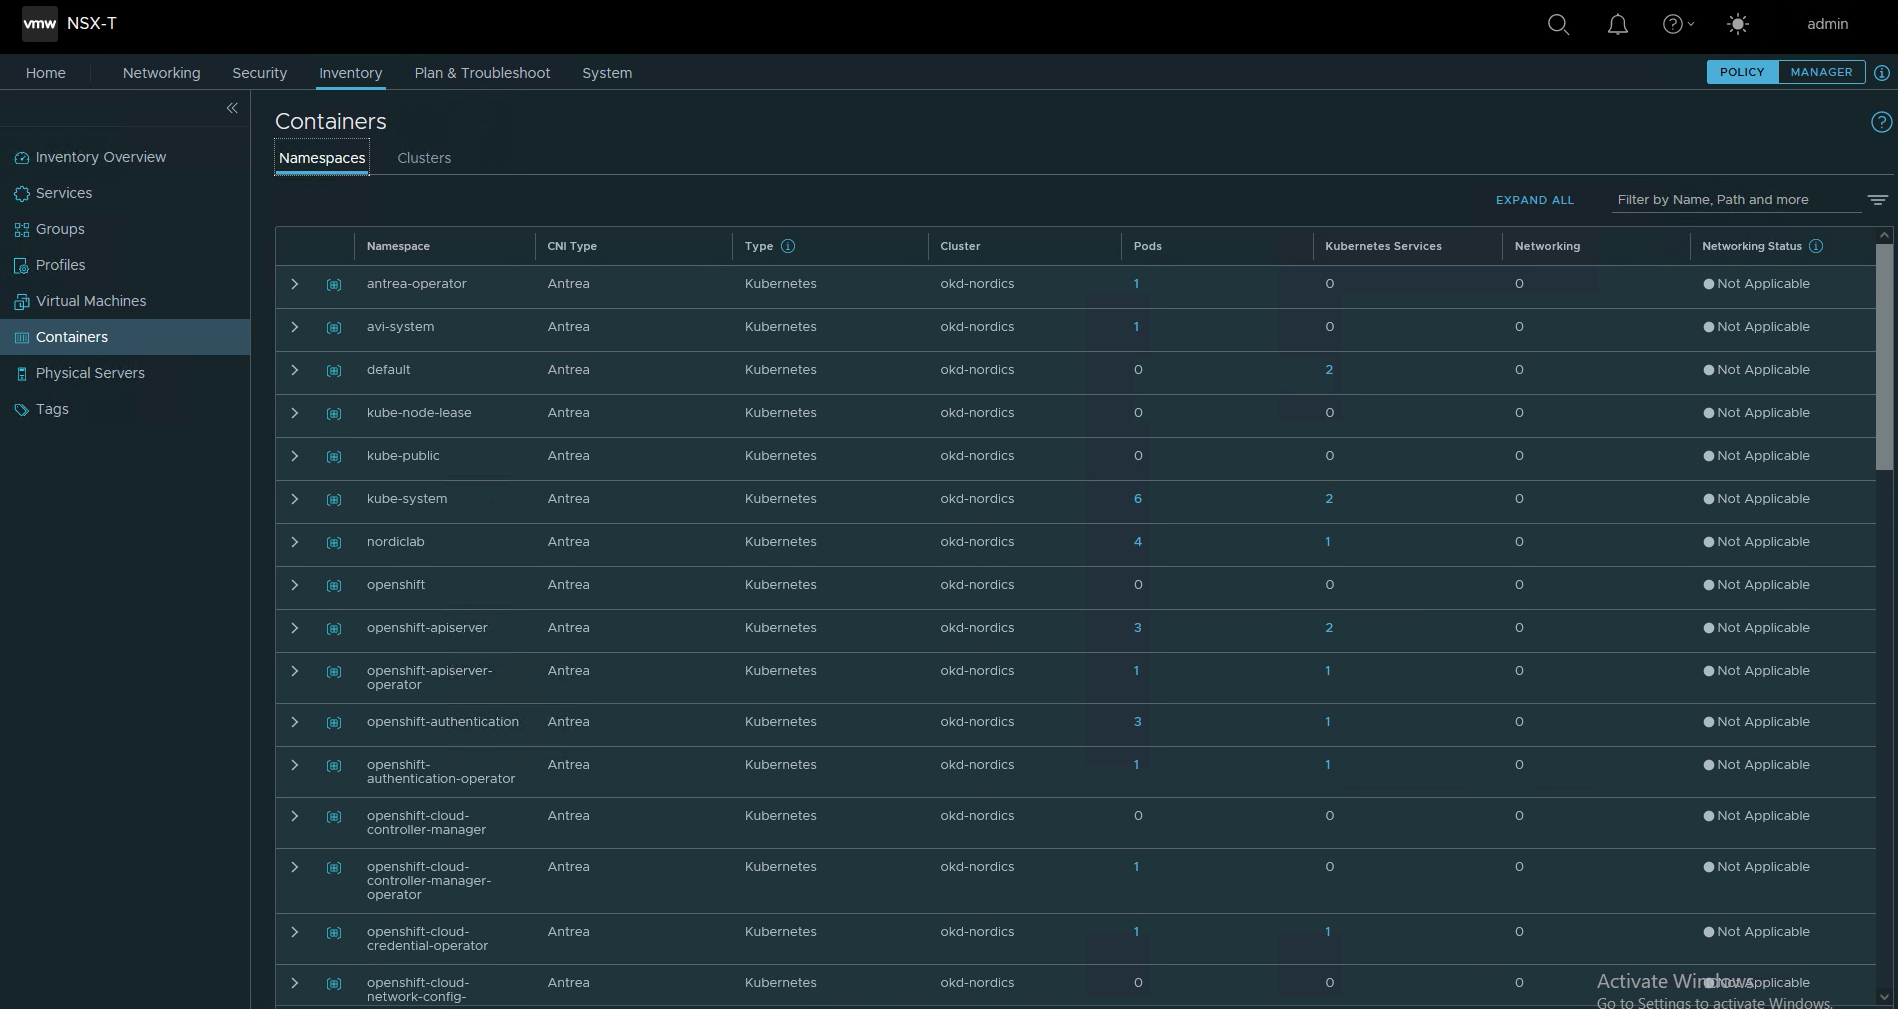
Go to Inventory, Containers, Clusters
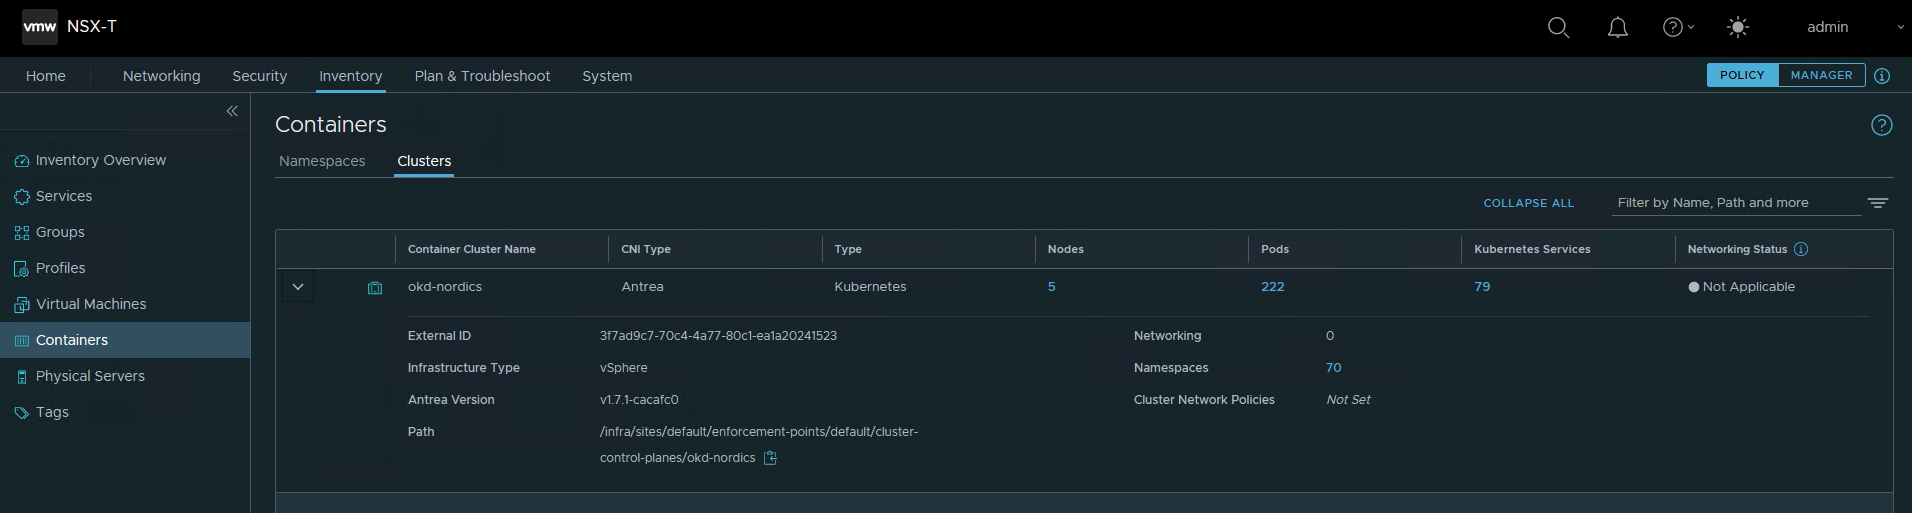
Namespace info should get populated
Conclusion
What can I say? It just works 🙂
If you have any questions or suggestions, please leave a comment.