
Introduction
VMware NSX Advanced Loadbalancer (formerly known as Avi Networks) is a powerful ADC (application delivery controller). In this blog, I will use the name AVI.
Avi makes it easy to apply load balancing, web application firewall, and container ingress to any application in any data center and cloud.
The goal of this blog
This blog series aims to give you some examples of GSLB (Global Server Load Balancing) in AVI.
GSLB is the act of balancing an application’s load across instances of the application that have been deployed to multiple locations (typically, multiple data centers and/or public clouds). Application load at any one of those locations is usually managed by a “local” load balancer, which could be Avi or a third-party ADC solution.
This blog will be part 1
Part 1 will cover basic GSLB with two sites.
I will not go over the initial installation of Controllers, Service Engines and Clouds.
If you are new to AVI, this blog is not a good read for you. I am expecting that you have basic knowledge of how to install and configure controllers and configure VIPS.
Overview
Avi uses the Domain Name System (DNS) for providing the optimal destination information to the user clients. When a client (typically a browser) performs a DNS query on fully qualified domain names (FQDNs), Avi GSLB responds with the IP address (VIP) of the optimal application instance.
In my setup, I am using gslb.lab.fqdn.nl as the domain.
All the sites have their own Controller and Service Engines. In my lab, I have one controller on each site. This is not suitable for a production setup. Production should consist of three controllers per site.
My setup is as follows:
Avi version 22.1.1
Cloud type VMware vCenter/vSphere ESX
The IPs I am going to use for deployment.
| IP | Used for | Location | Notes |
| 10.225.9.93 | Controller 1 | Amsterdam | Primary site |
| 10.225.9.95 | Controller 2 | New York | Secondary site |
| 100.64.33.100 | VIP 1 | Amsterdam | |
| 100.64.33.101 | amsterdam_dns_vip | Amsterdam | |
| 100.64.33.102 | newyork_dns_vip | New York | |
| 100.64.33.103 | VIP 2 | New York | |
| 100.64.32.100 | Linux server 1 | All | |
| 100.64.32.101 | Linux server 2 | All |
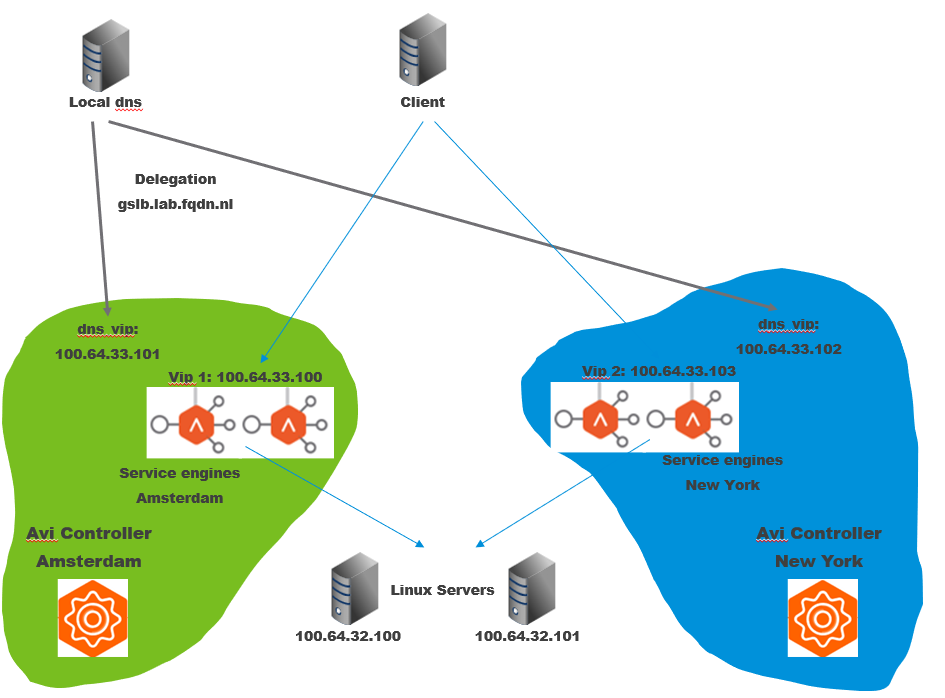
Side note: My setup is pretty compact. In a real scenario VIP 1 and VIP 2 would be in different subnets.
For the backend (Linux servers) I use the same servers. In a real scenario, these will be different servers on different subnets.
Setting up an admin user.
You are allowed to use user admin for the GSLB setup. I have chosen to make a separate user for GSLB.
The controllers will use this user to talk to each other. The user needs to be created on all controllers.
From the GUI, go to Administration, Accounts, Users

My user is called ‘gslbuser’
I have selected no-lockout-user-account-profile to be sure the user is not locked when using the wrong password multiple times.

Configure GSLB
1. Enable GSLB on the primary controller
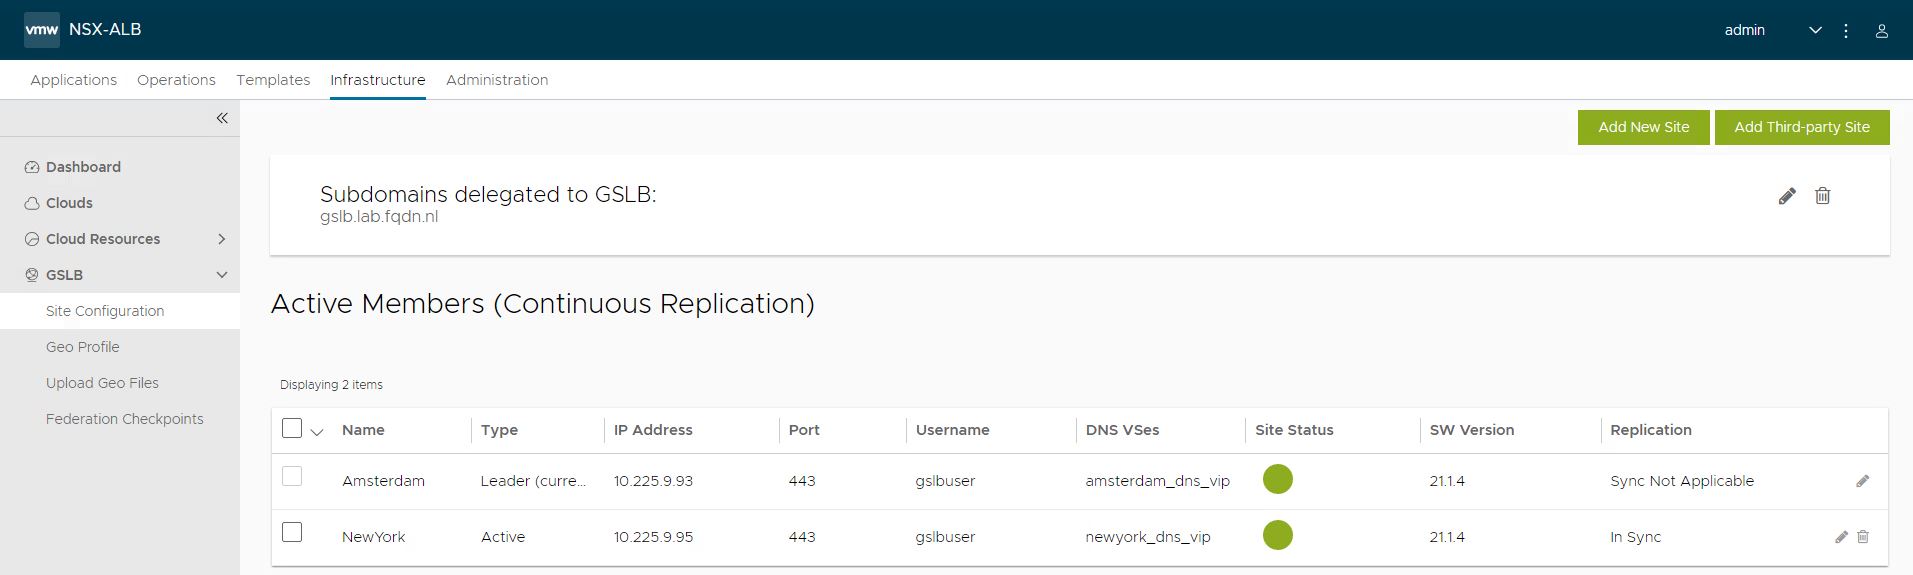
From the GUI go to Infrastructure, GSLB, Site Configuration
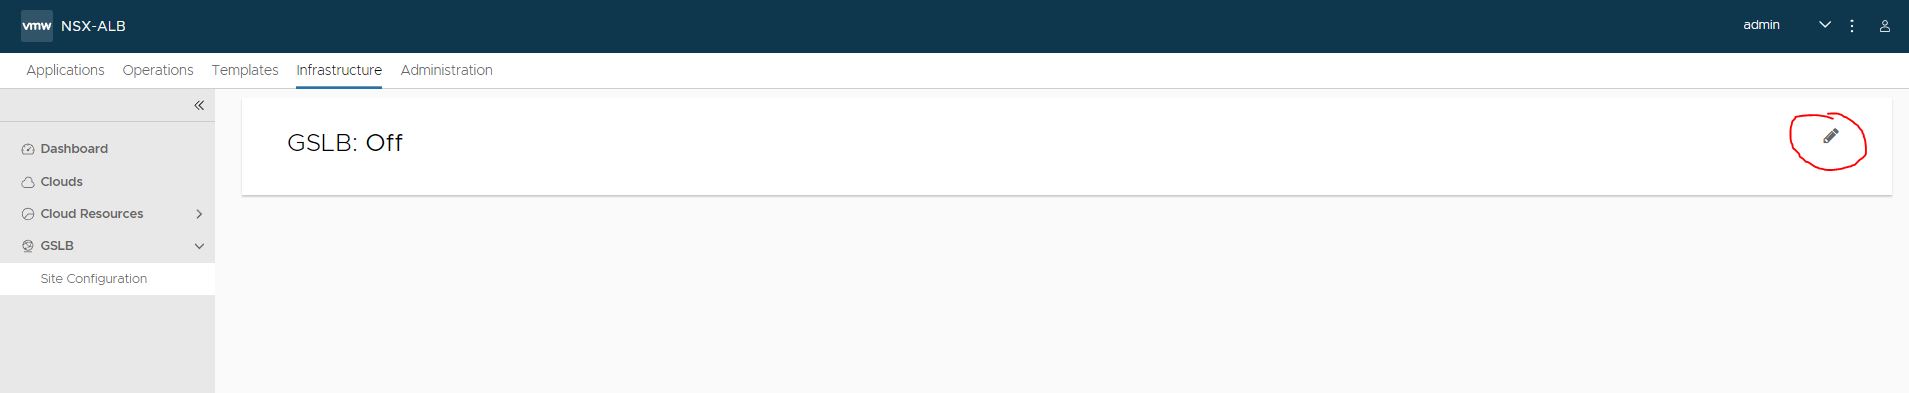
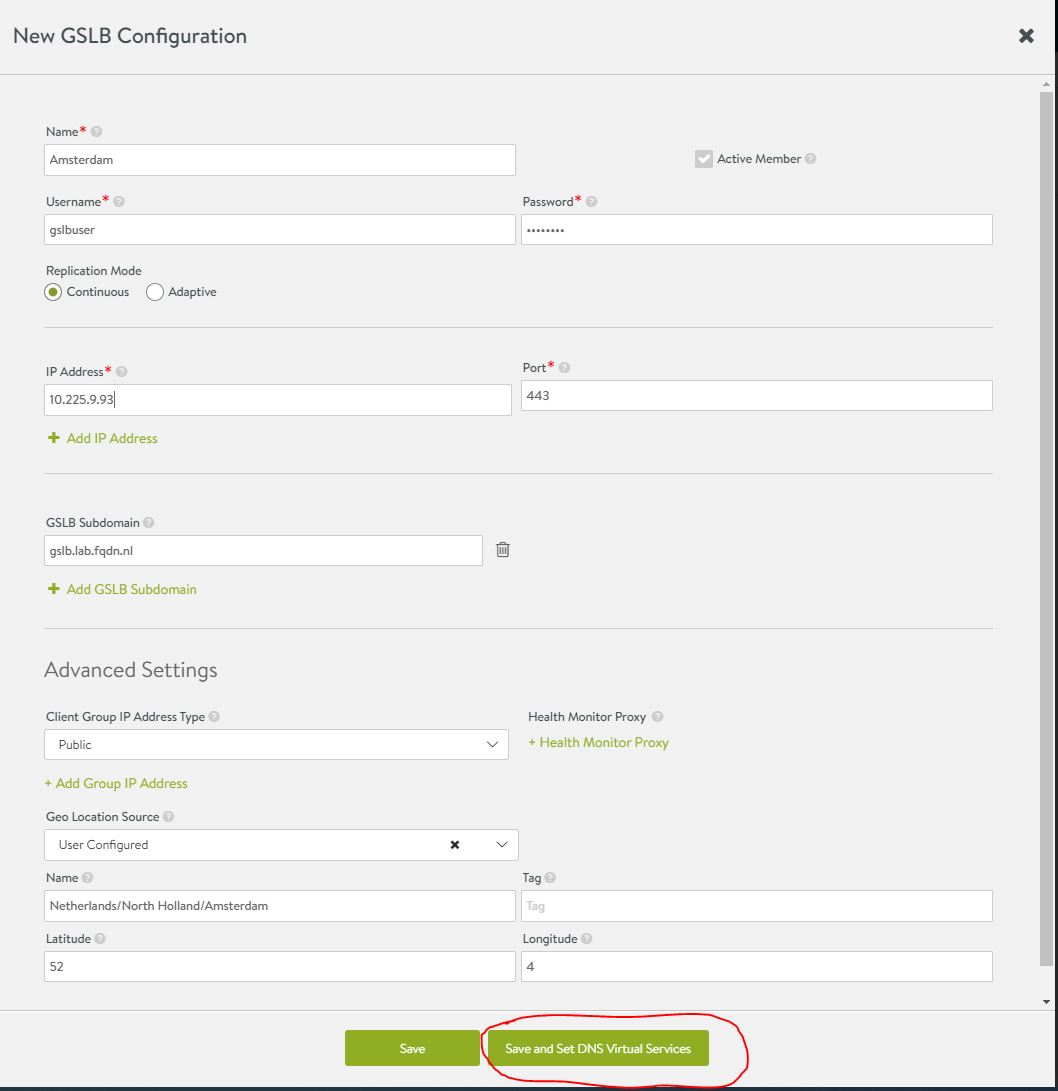
Amsterdam and New York are active members. Active member means it will also have a DNS VIP running to answer (in my case gslb.lab.fqdn.nl) DNS queries.
GSLB Subdomain is in my case gslb.lab.fqdn.nl. GSLB can handle multiple Subdomains.
Geo Location Source is on User Configured, so I can tell the system where it is located. In my case Amsterdam 52,4
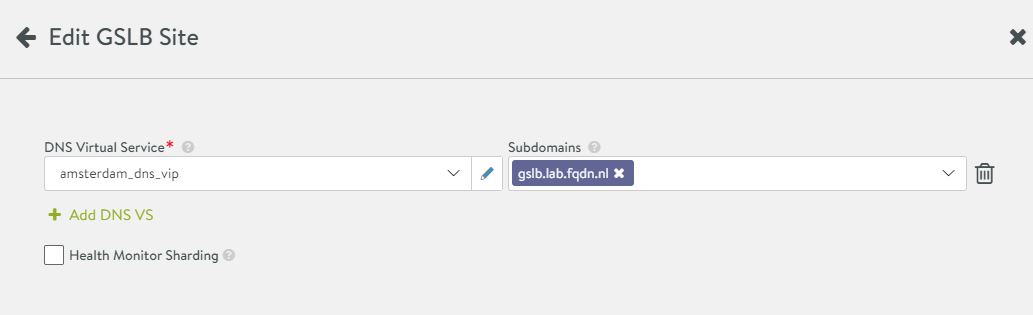
2. Set DNS VirtualService.
Health monitor sharding enables selective monitoring for SEs on Avi.
It is useful in deployments where SEs are deployed in huge numbers.
It helps reduce the load on the back-end system as selective monitoring is performed.
See here for more information about Health Monitor Sharding
Select an existing, or create a new DNS virtual service. In my case, I will create a new one.
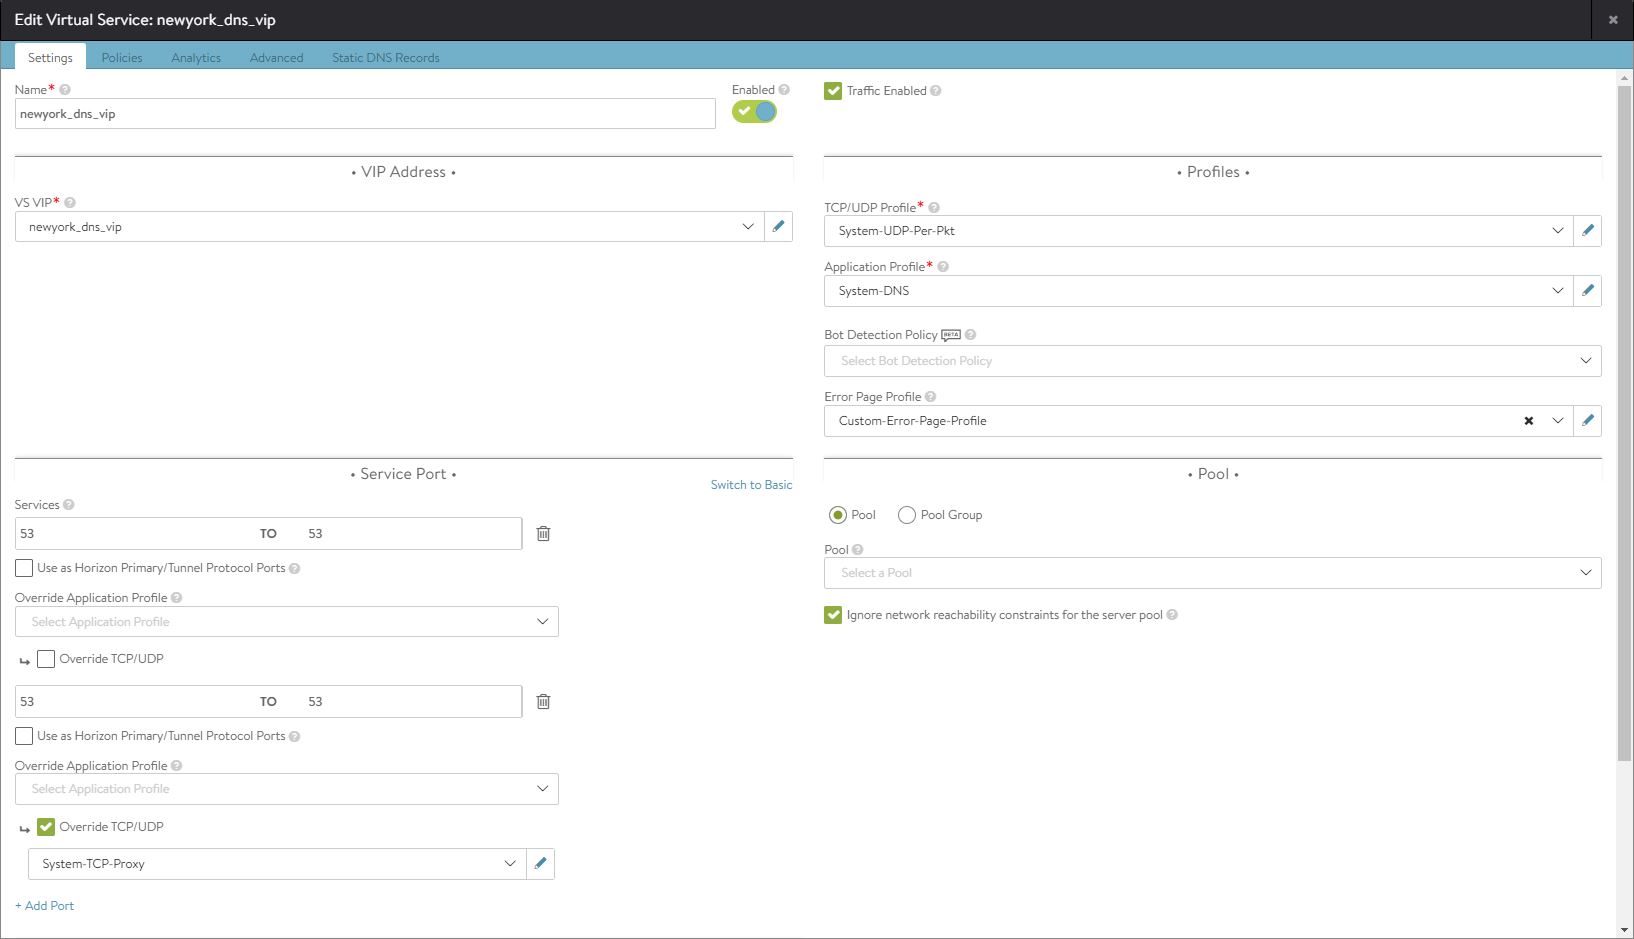
3. Create a new virtual service
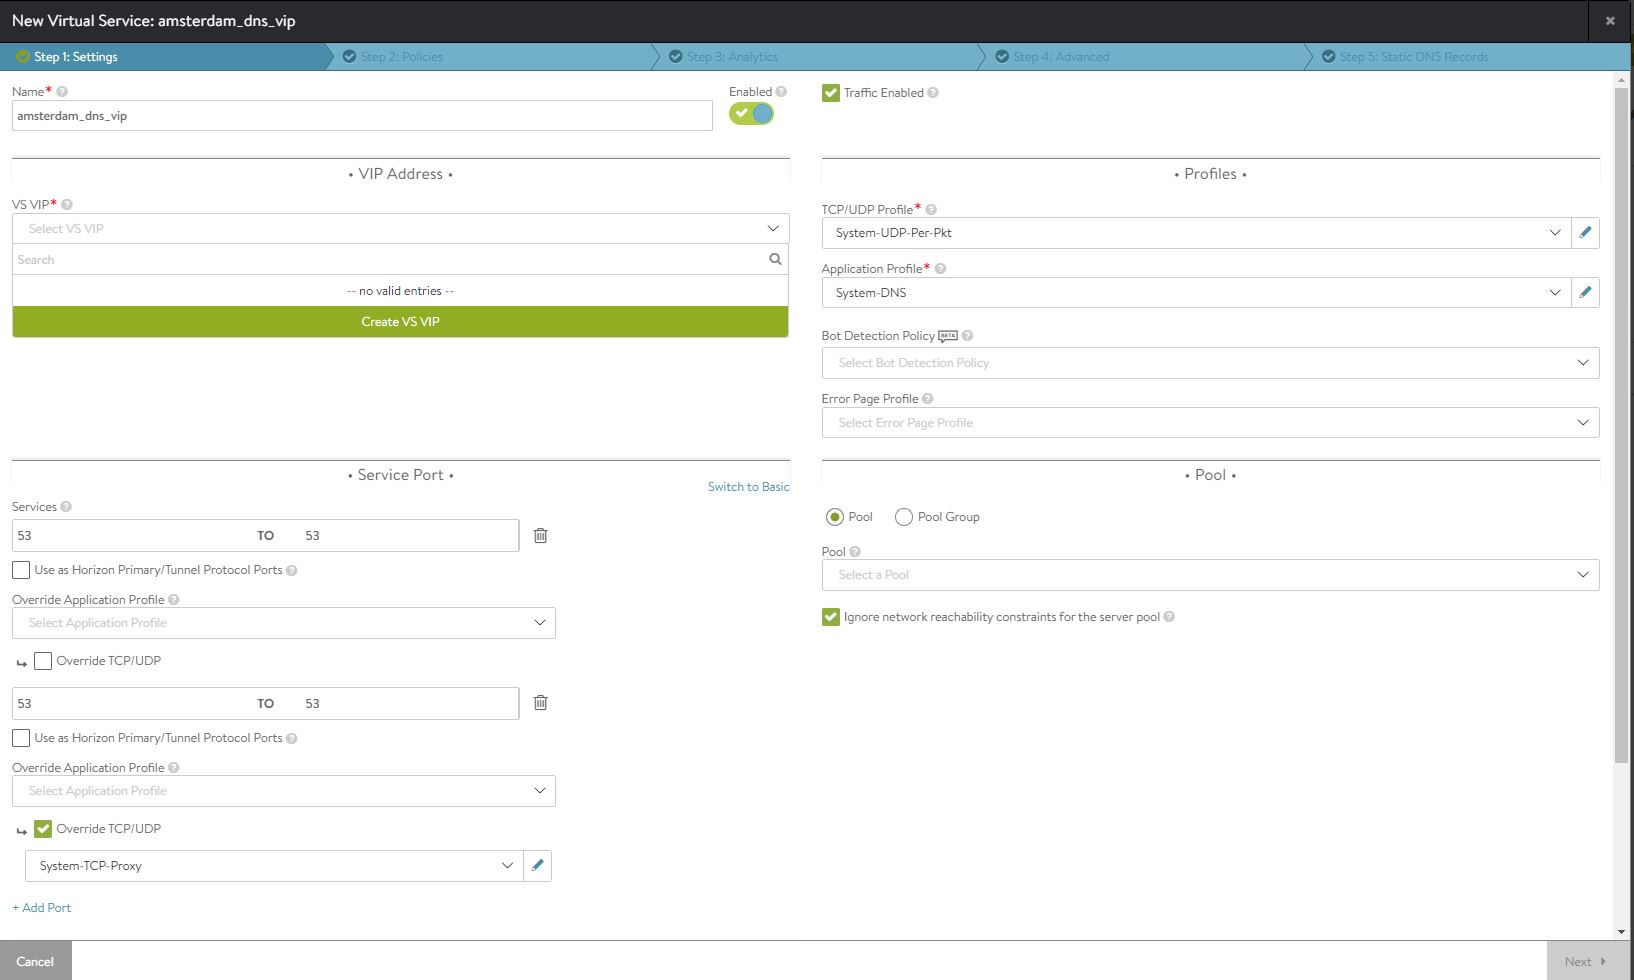
Select Application Profile ‘System DNS’
Under Service Ports press ‘Switch to Advanced’
Press ‘Add port’. Use 53 to 53
Tick ‘Override TCP/UDP’ and select ‘System-TCP-Proxy’
This option will enable the virtual service to listen on port 53 TCP and UDP.
With larger requests, DNS will use TCP.
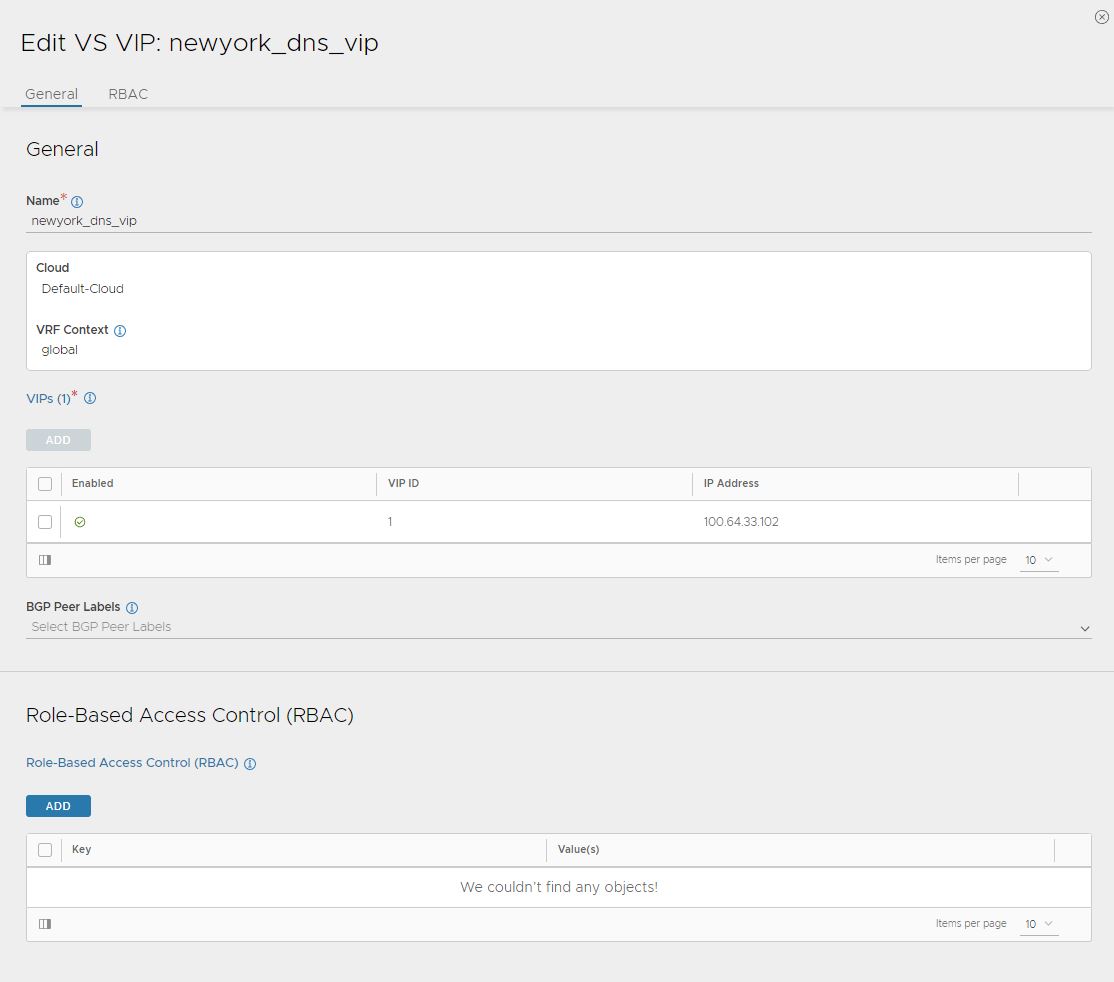
3a. Create VS VIP
Under VS VIP press ‘Create VS VIP’
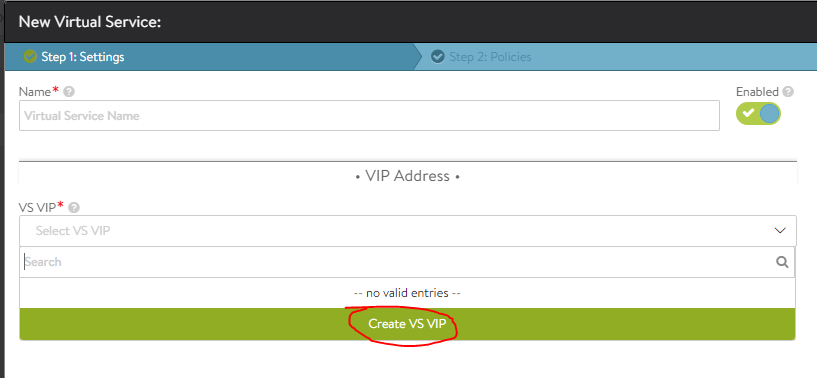


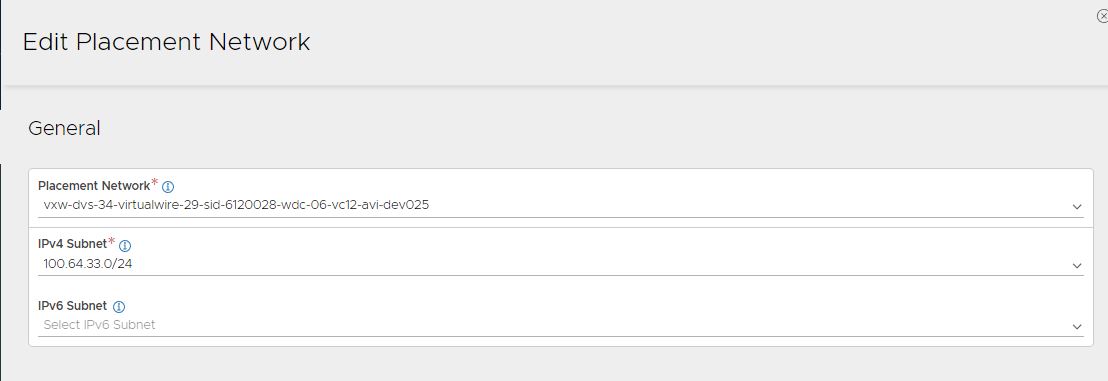
Fill in the information as it fits your network and IP plan.
In my case, I used 100.64.33.101 as DNS VIP IP. The placement network is the network where the network is configured on.
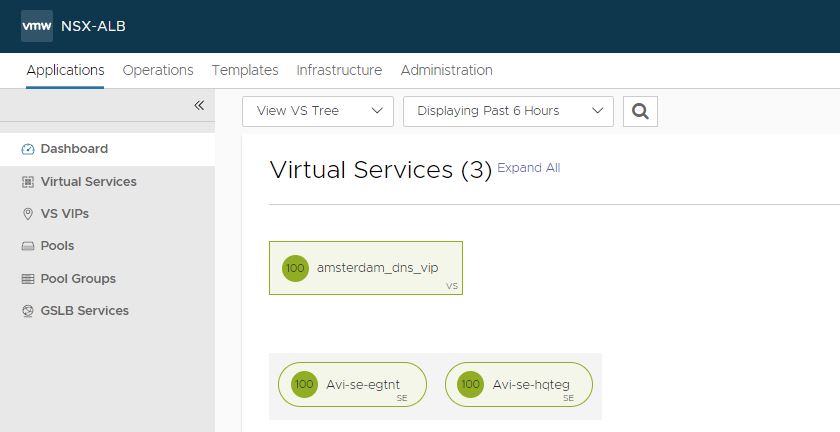
4. Check the Virtual Service
In the GUI Go to Applications, Dashboard.
You should see something similar.
5. Create DNS VIP on the secondary controller.
Before we can add the secondary controller to the GSLB Site, we need to create a DNS VIP on the secondary controller.
In the GUI go to Application, Dashboard, Create Virtual Service and select Advanced Setup


6. Add the second active site
From the primary controller add the secondary controller.
Note: Do not forget to create the user ‘gslbuser’ on the secondary controller.
In the GUI go to Infrastructure, GSLB, Site Configuration.
Press ‘Add New Site’
Fill in the information. Select ‘Active Member’
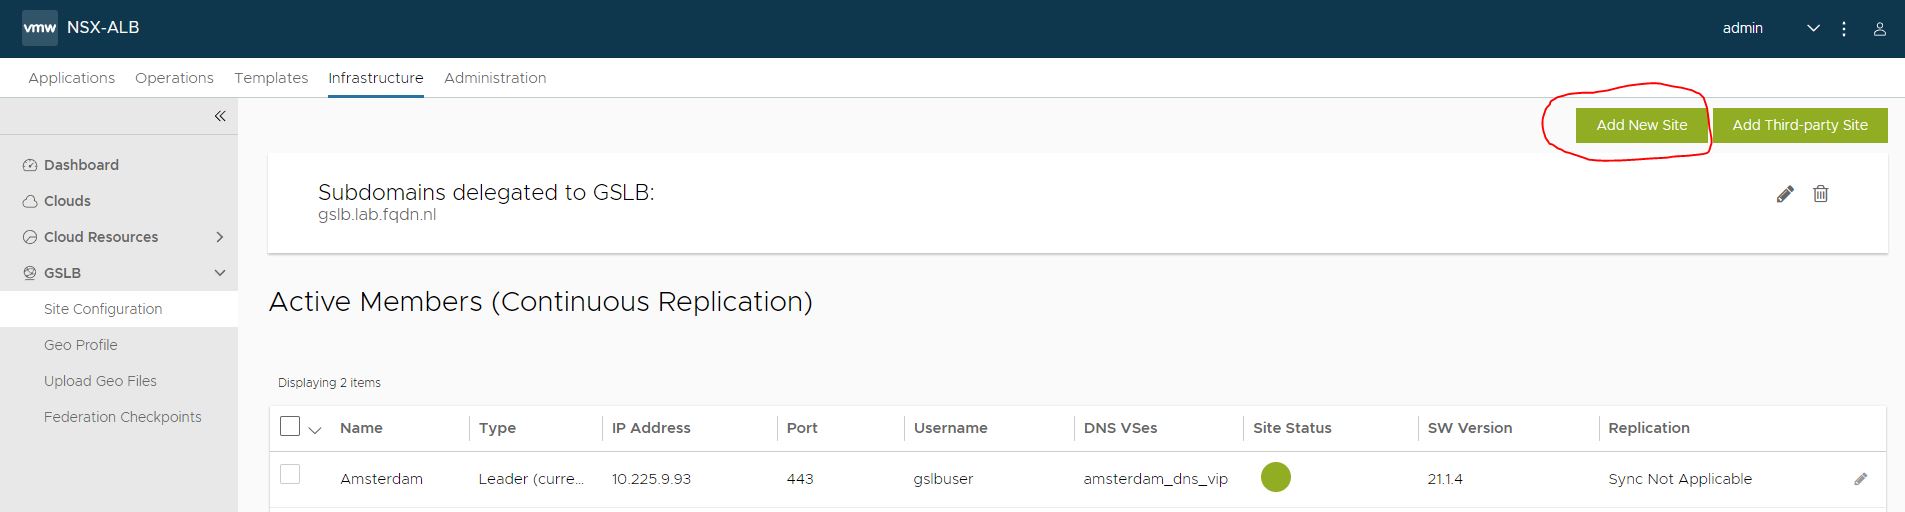
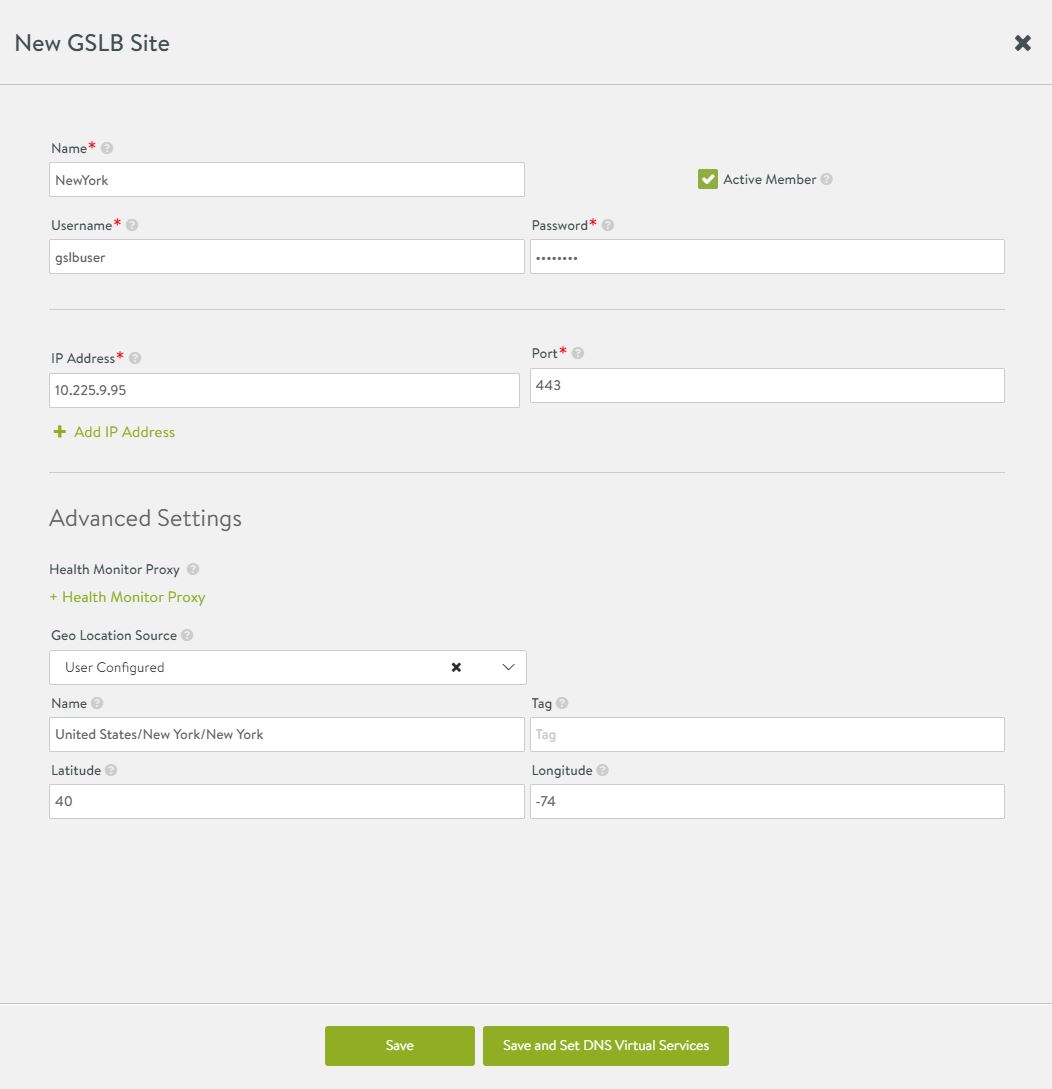
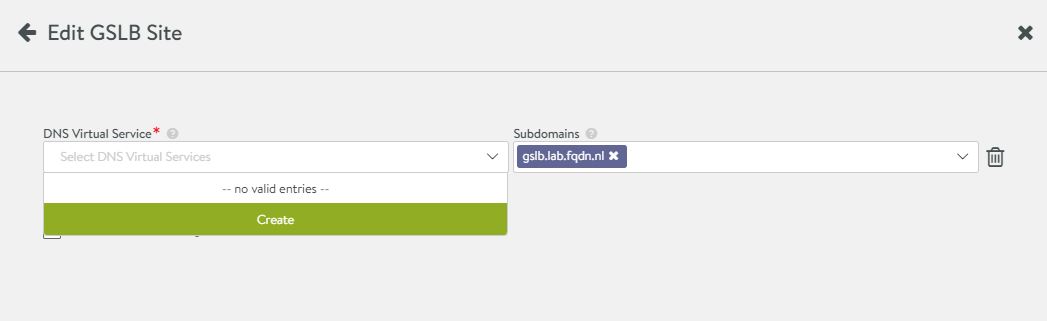
After completing press ‘Save and Set DNS Virtual Services‘
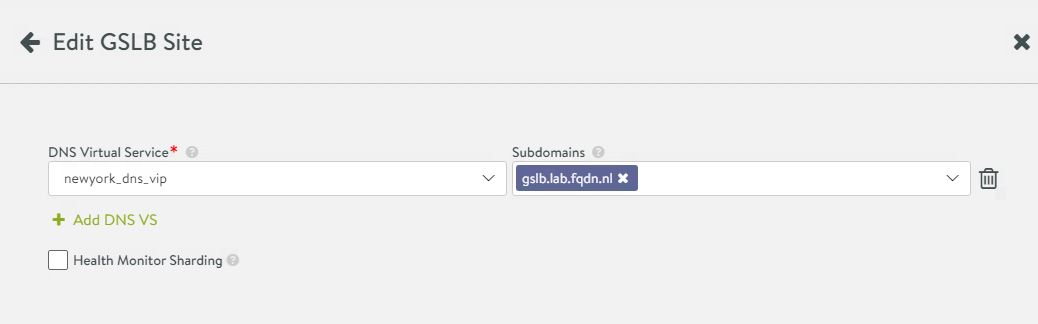
Select the created DNS VIP and add the subdomain.
As a result, you should see similar to my setup
DNS setup
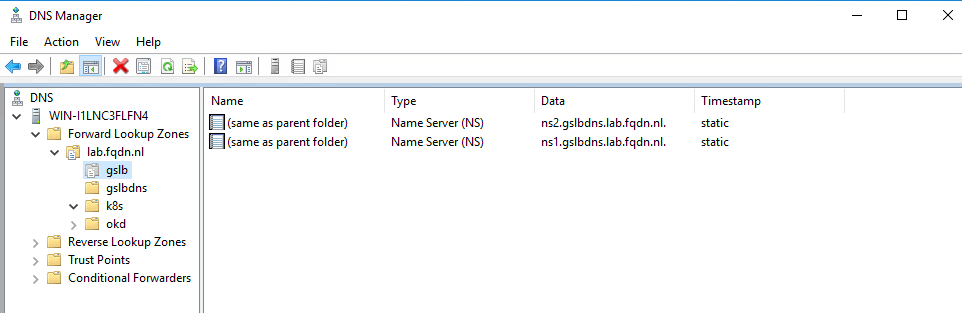
In my setup, I am using Windows DNS. You can use every nameserver you prefer.
gslb.lab.fqdn.nl is a delegation to ns1.gslbdns.lab.fqdn.nl and ns2.gslbdns.lab.fqdn.nl, which are pointing to my two DNS VIPs 100.64.33.101 and 100.64.33.102
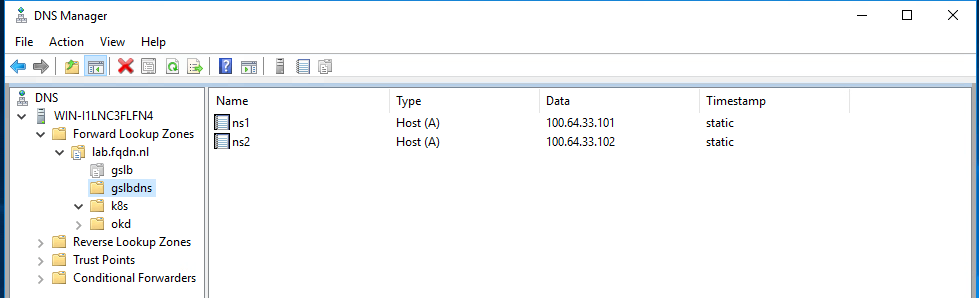
Doing a dig on type NS gslb.lab.fqdn.nl will show the two nameservers
root@cm-linux-jmp01:~# dig NS gslb.lab.fqdn.nl

; <<>> DiG 9.16.1-Ubuntu <<>> NS gslb.lab.fqdn.nl
;; global options: +cmd
;; Got answer:
;; ->>HEADER<<- opcode: QUERY, status: NOERROR, id: 65158
;; flags: qr rd ra; QUERY: 1, ANSWER: 2, AUTHORITY: 0, ADDITIONAL: 1

;; OPT PSEUDOSECTION:
; EDNS: version: 0, flags:; udp: 65494
;; QUESTION SECTION:
;gslb.lab.fqdn.nl.              IN      NS

;; ANSWER SECTION:
gslb.lab.fqdn.nl.       3600    IN      NS      ns1.gslbdns.lab.fqdn.nl.
gslb.lab.fqdn.nl.       3600    IN      NS      ns2.gslbdns.lab.fqdn.nl.
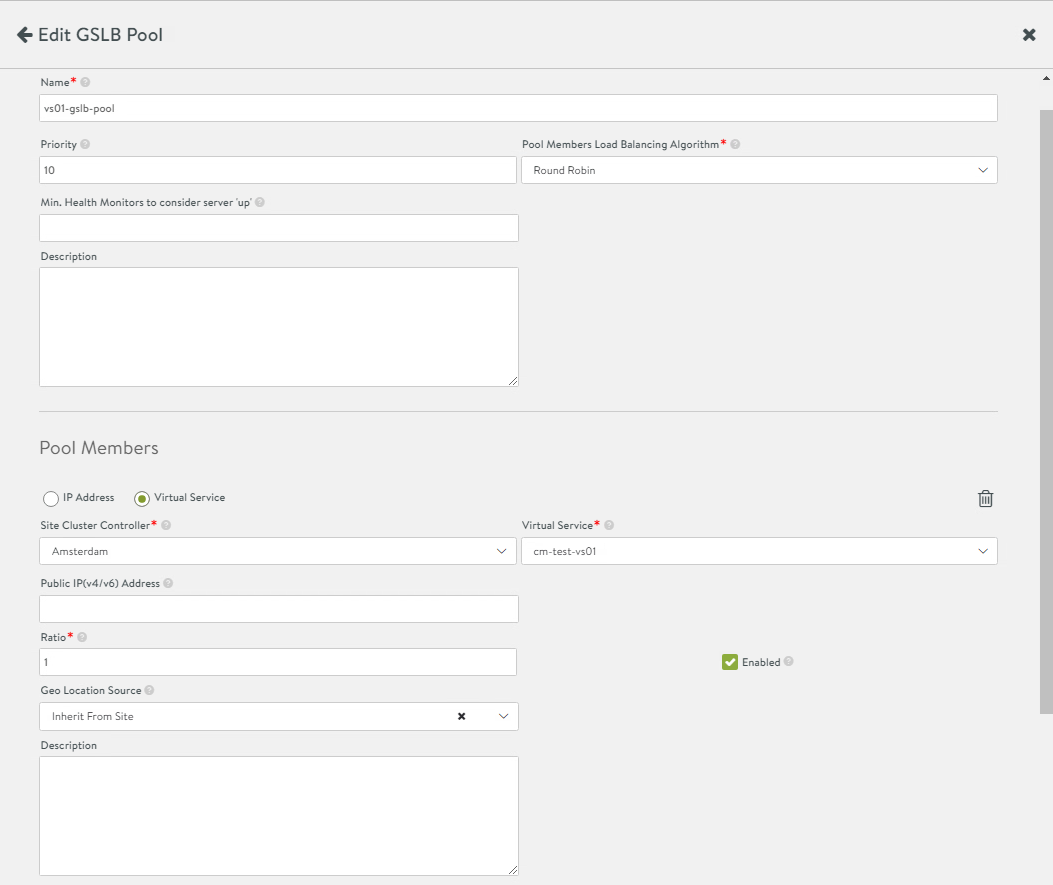
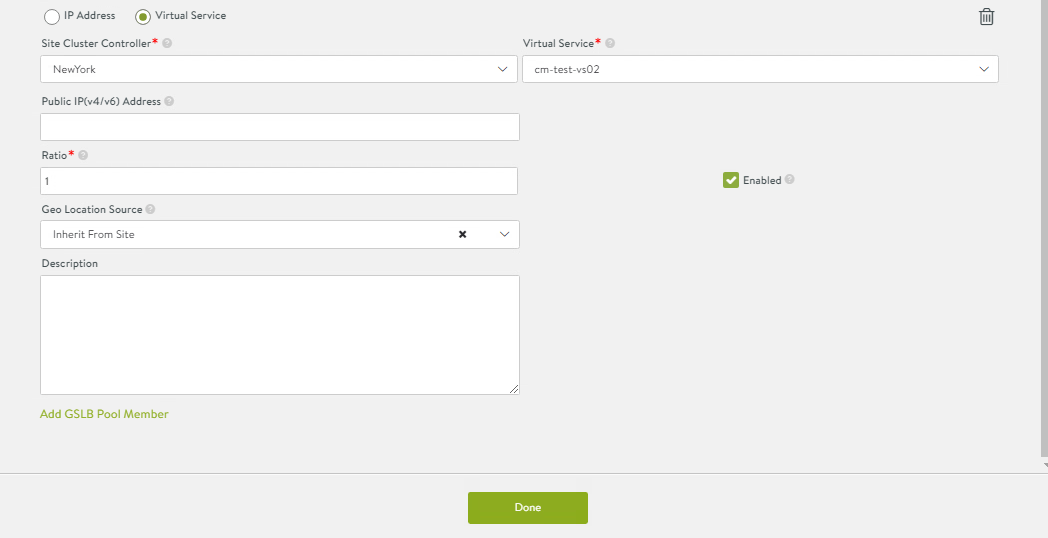
Setup a GSLB service
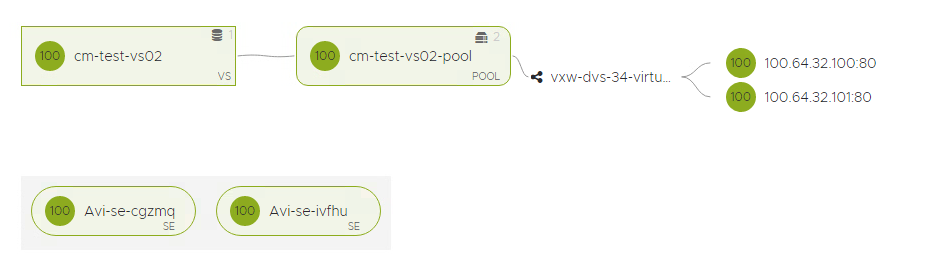
Before setting up GSLB Service, you need to create a local VIP on each site.
I have created two VIPS
Amsterdam vip (cm-test-vs01), ip 100.64.33.100
New-York vip, (cm-test-vs02) ip 100.64.33.103

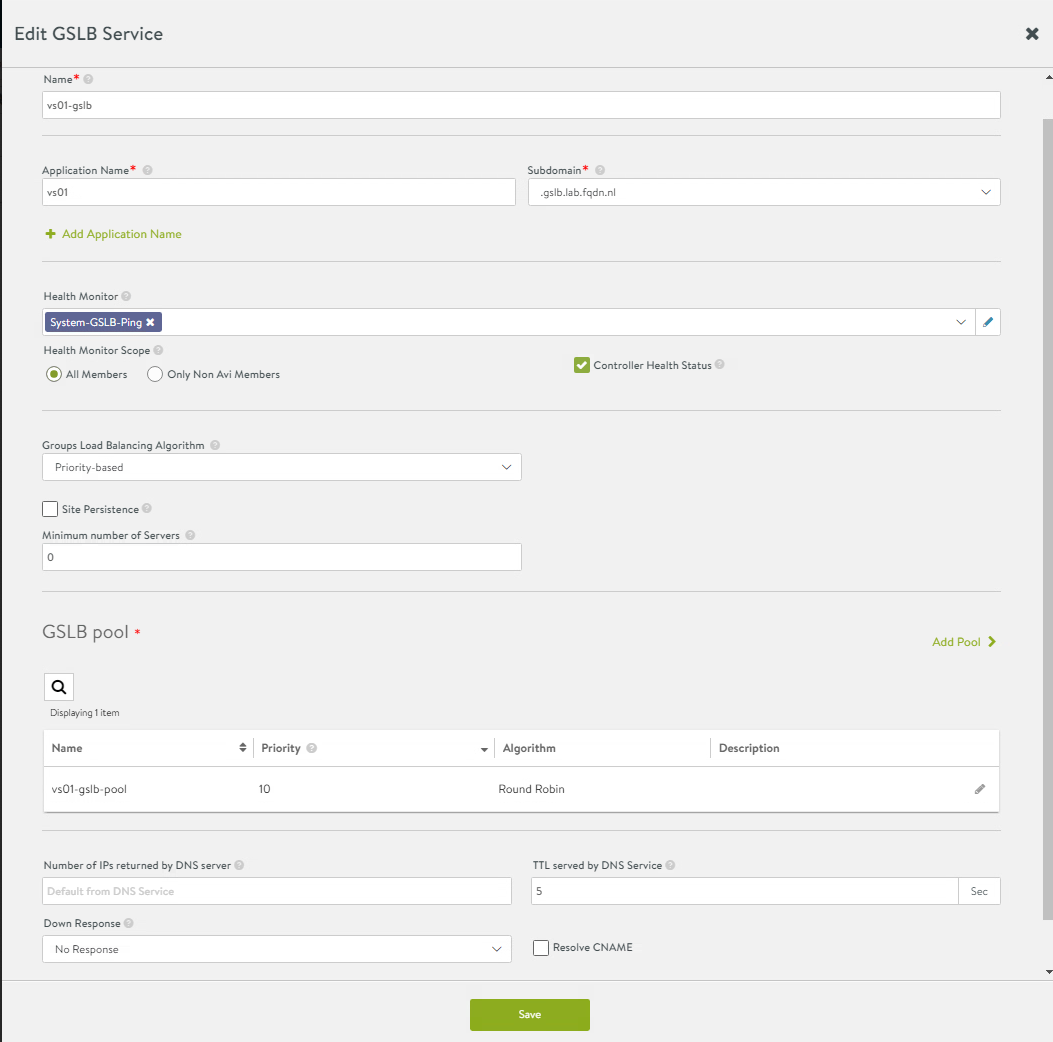
Checking the VIP and DNS. Note the 5 seconds TTL. This is most likely not something you want to do in production. 5 minutes would be a better TTL for the record. For testing this record, I have used 5 seconds.
root@cm-linux-jmp01:~# nslookup vs01.gslb.lab.fqdn.nl
Server:         10.225.9.92
Address:        10.225.9.92#53

Non-authoritative answer:
Name:   vs01.gslb.lab.fqdn.nl
Address: 100.64.33.103

root@cm-linux-jmp01:~# nslookup vs01.gslb.lab.fqdn.nl
Server:         10.225.9.92
Address:        10.225.9.92#53

Non-authoritative answer:
Name:   vs01.gslb.lab.fqdn.nl
Address: 100.64.33.100

root@cm-linux-jmp01:~# dig @ns1.gslbdns.lab.fqdn.nl A vs01.gslb.lab.fqdn.nl

; <<>> DiG 9.16.1-Ubuntu <<>> @ns1.gslbdns.lab.fqdn.nl A vs01.gslb.lab.fqdn.nl
; (1 server found)
;; global options: +cmd
;; Got answer:
;; ->>HEADER<<- opcode: QUERY, status: NOERROR, id: 17370
;; flags: qr aa rd; QUERY: 1, ANSWER: 1, AUTHORITY: 0, ADDITIONAL: 1
;; WARNING: recursion requested but not available

;; OPT PSEUDOSECTION:
; EDNS: version: 0, flags:; udp: 512
;; QUESTION SECTION:
;vs01.gslb.lab.fqdn.nl.         IN      A

;; ANSWER SECTION:
vs01.gslb.lab.fqdn.nl.  5       IN      A       100.64.33.103
Logging
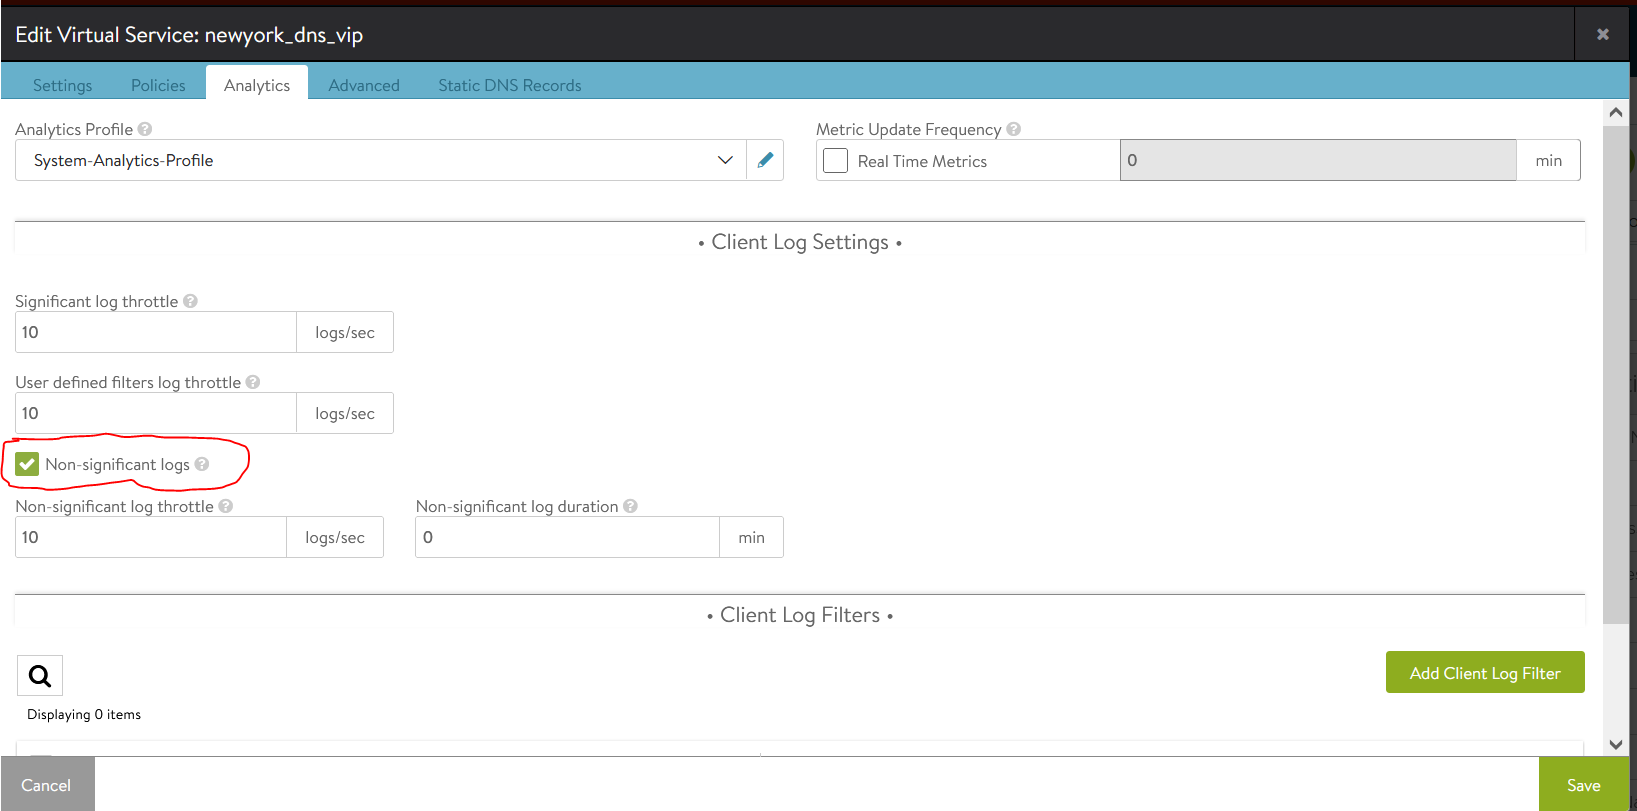
You can see logs about queries in the GUI. By default only significant logs are logged.
For the logs to show up, you need to enable non-significant logs on the Virtualservice.
Please note that in a very busy production environment, non-significant-log entries can grow pretty big in a short time.
Edit the Virtualservice and go to Analytics tab.
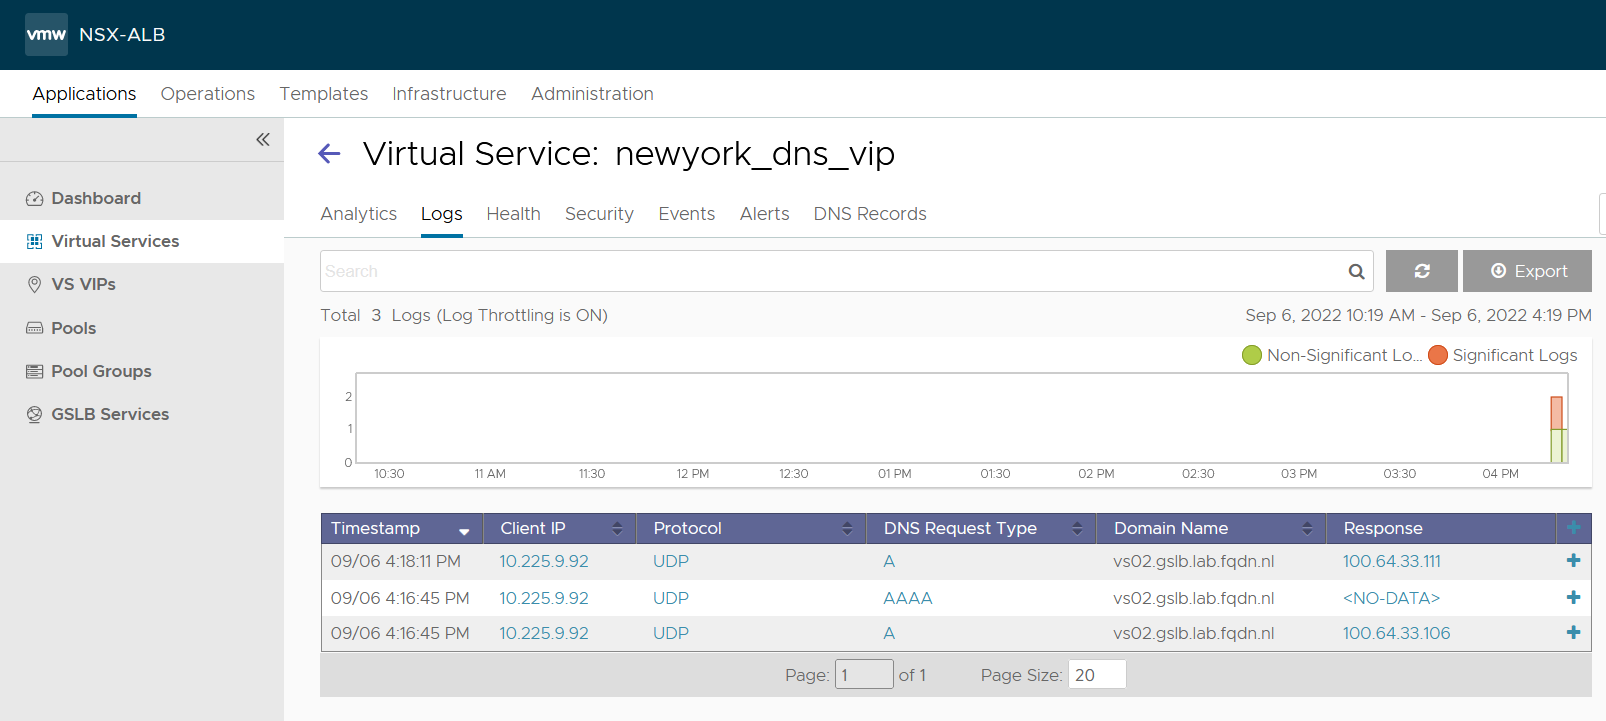
To see the logs, goto Virtual Service, <name of the virtual service>, Logs.
Press Non-Significant Logs on the right.
Upgrading controllers
Important note when upgrading controllers.
GSLB needs to work with the lowest-common-denominator set of features that are supported by all Controllers in the federation. This is determined by the version of the Leader, so that must never be on a newer version than any of the Followers. When upgrading the federation, the Leader Controller should be the one you upgrade last. Controllers should be on the same version to function properly.
Conclusion
That concludes this blog. I will make more blogs about GSLB. Like adding a passive site, Using different Algorithms and GSLB with ako/amko.
If you have question, comments or suggestions, let me know.