Introduction
VMware NSX-T 3.2 comes with NSX Application Plaform. This platform needs to run on a Kubernetes cluster.
So why not build a vSphere with Tanzu cluster. While I was building the platform and making notes, I ended up with a working Tanzu platform ready for the NSX Application platform. I deleted the whole setup to create a blog of all steps so you can also benefit from it.
vSphere with Tanzu is the new generation of vSphere for containerized applications. This single, streamlined solution bridges the gap between IT operations and developers with a new kind of infrastructure for modern, cloud-native applications both on-premises and in public clouds.
The goal of this blog
The goal of this blog is to get Harbor installed, which is needed to deploy the NSX Application Platform (NAPP)
This blog is part 3 of 4
You can find part 1 here and part 2 here
Harbor is an open-source registry that secures artifacts with policies and role-based access control, ensures images are scanned and free from vulnerabilities, and signs images as trusted. Harbor, a CNCF Graduated project, delivers compliance, performance, and interoperability to help you consistently and securely manage artifacts across cloud-native compute platforms like Kubernetes and Docker.
NSX documentation states clearly that a Harbor registry is needed. You can not use the internal Harbor registry that comes with the Supervisor Cluster.
Installing Harbor
For the installation, I am using an Ubuntu Server VM
- Ubuntu 20.04.2 LTS
- 2vCPU/8GB memory
- 2 disks, one for os (60GB) and one for data (100GB mounted on /data2)
- Install Docker. You can find the official steps here
 $ sudo apt-get update

 $ sudo apt-get install \
    ca-certificates \
    curl \
    gnupg \
    lsb-release

$ curl -fsSL https://download.docker.com/linux/ubuntu/gpg | sudo gpg --dearmor -o /usr/share/keyrings/docker-archive-keyring.gpg

$ echo \
  "deb [arch=$(dpkg --print-architecture) signed-by=/usr/share/keyrings/docker-archive-keyring.gpg] https://download.docker.com/linux/ubuntu \
  $(lsb_release -cs) stable" | sudo tee /etc/apt/sources.list.d/docker.list > /dev/null

$ sudo apt-get update

$ sudo apt-get install docker-ce docker-ce-cli containerd.io
2. Check if Docker is running
$ sudo systemctl status docker
 Docker.service - Docker Application Container Engine
     Loaded: loaded (/lib/systemd/system/docker.service; enabled; vendor preset: enabled)
     Active: active (running) since Sat 2021-12-25 16:24:18 UTC; 1 weeks 3 days ago
TriggeredBy: docker.socket
       Docs: https://docs.docker.com
   Main PID: 1901616 (dockerd)
      Tasks: 72
     Memory: 986.2M
3. Install docker-compose and helm
$ sudo curl -L "https://github.com/docker/compose/releases/download/1.27.4/docker-compose-$(uname -s)-$(uname -m)" -o /usr/local/bin/docker-compose

$ sudo chmod +x /usr/local/bin/docker-compose
$ docker-compose --version
docker-compose version 1.27.4, build 40524192

$ curl -fsSL -o get_helm.sh https://raw.githubusercontent.com/helm/helm/main/scripts/get-helm-3
$ chmod 700 get_helm.sh
$ sudo ./get_helm.sh
4. Download Harbor
I have downloaded the online installer, which will pull the images from Harbor. You can choose to use the offline installer (harbor-offline-installer-v2.4.1.tgz)
$ wget https://github.com/goharbor/harbor/releases/download/v2.4.1/harbor-online-installer-v2.4.1.tgz
$ tar xvfz harbor-online-installer-v2.4.1.tgz
$ cd harbor
$ cp harbor.yml.tmpl harbor.yml
5. edit harbor.yaml with your favorite editor
Important notes here. Use an official trusted certificate. i.e lets-encrypt. NAPP will fail to install when you use a self-signed certificate. You will get an error: ‘x509: certificate signed by unknown authority’
- hostname: harbor.fqdn.nl
Note on this hostname. I used lets-encrypt to get an certificate for it. - data_volume: /data2/harbor
- certificate: /data/cert/harbor.fqdn.nl.crt
This file contains Root, Intermediate and Cert - private_key: /data/cert/harbor.fqdn.nl.key
This file contains the certificate key - harbor_admin_password: Harbor12345
$ ls -1 /data/cert/
harbor.fqdn.nl.crt
harbor.fqdn.nl.key
# Configuration file of Harbor
# The IP address or hostname to access admin UI and registry service.
# DO NOT use localhost or 127.0.0.1, because Harbor needs to be accessed by external clients.
hostname: harbor.fqdn.nl
# http related config
http:
# port for http, default is 80. If https enabled, this port will redirect to https port
port: 80
# https related config
https:
# # https port for harbor, default is 443
port: 443
# # The path of cert and key files for nginx
certificate: /data/cert/harbor.fqdn.nl.crt
private_key: /data/cert/harbor.fqdn.nl.key
# Uncomment external_url if you want to enable external proxy
# And when it enabled the hostname will no longer used
# external_url: https://reg.mydomain.com:8433
# The initial password of Harbor admin
# It only works in first time to install harbor
# Remember Change the admin password from UI after launching Harbor.
harbor_admin_password: Harbor12345
# Harbor DB configuration
database:
# The password for the root user of Harbor DB. Change this before any production use.
password: root123
# The maximum number of connections in the idle connection pool. If it <=0, no idle connections are retained.
max_idle_conns: 50
# The maximum number of open connections to the database. If it <= 0, then there is no limit on the number of open connections.
# Note: the default number of connections is 100 for postgres.
max_open_conns: 100
# The default data volume
data_volume: /data2/harbor6. Install Harbor
You need to use the option ‘–with-chartmuseum’
This is needed for the Helm charts
$ sudo ./install.sh --with-chartmuseum

[Step 0]: checking if docker is installed ...

Note: docker version: 20.10.12

[Step 1]: checking docker-compose is installed ...

Note: docker-compose version: 1.27.4


[Step 2]: preparing environment ...

[Step 3]: preparing harbor configs ...
prepare base dir is set to /root/k8s/harbor/harbor-2.4.1
Clearing the configuration file: /config/registry/config.yml
Clearing the configuration file: /config/registry/passwd
Clearing the configuration file: /config/core/env
Clearing the configuration file: /config/core/app.conf
Clearing the configuration file: /config/nginx/nginx.conf
Clearing the configuration file: /config/log/rsyslog_docker.conf
Clearing the configuration file: /config/log/logrotate.conf
Clearing the configuration file: /config/registryctl/env
Clearing the configuration file: /config/registryctl/config.yml
Clearing the configuration file: /config/chartserver/env
Clearing the configuration file: /config/portal/nginx.conf
Clearing the configuration file: /config/jobservice/env
Clearing the configuration file: /config/jobservice/config.yml
Clearing the configuration file: /config/db/env
Generated configuration file: /config/portal/nginx.conf
Generated configuration file: /config/log/logrotate.conf
Generated configuration file: /config/log/rsyslog_docker.conf
Generated configuration file: /config/nginx/nginx.conf
Generated configuration file: /config/core/env
Generated configuration file: /config/core/app.conf
Generated configuration file: /config/registry/config.yml
Generated configuration file: /config/registryctl/env
Generated configuration file: /config/registryctl/config.yml
Generated configuration file: /config/db/env
Generated configuration file: /config/jobservice/env
Generated configuration file: /config/jobservice/config.yml
loaded secret from file: /data/secret/keys/secretkey
Generated configuration file: /config/chartserver/env
Generated configuration file: /compose_location/docker-compose.yml
Clean up the input dir


[Step 4]: starting Harbor ...
Creating network "harbor-241_harbor" with the default driver
Creating network "harbor-241_harbor-chartmuseum" with the default driver
Creating harbor-log ... done
Creating harbor-portal ... done
Creating harbor-db     ... done
Creating redis         ... done
Creating chartmuseum   ... done
Creating registryctl   ... done
Creating registry      ... done
Creating harbor-core   ... done
Creating nginx             ... done
Creating harbor-jobservice ... done
---Harbor has been installed and started successfully.---
7. Check if Harbor is running
Use the browser to go to your hostname. In my case it is https://harbor.fqdn.nl
Uploading NAPP files to Harbor
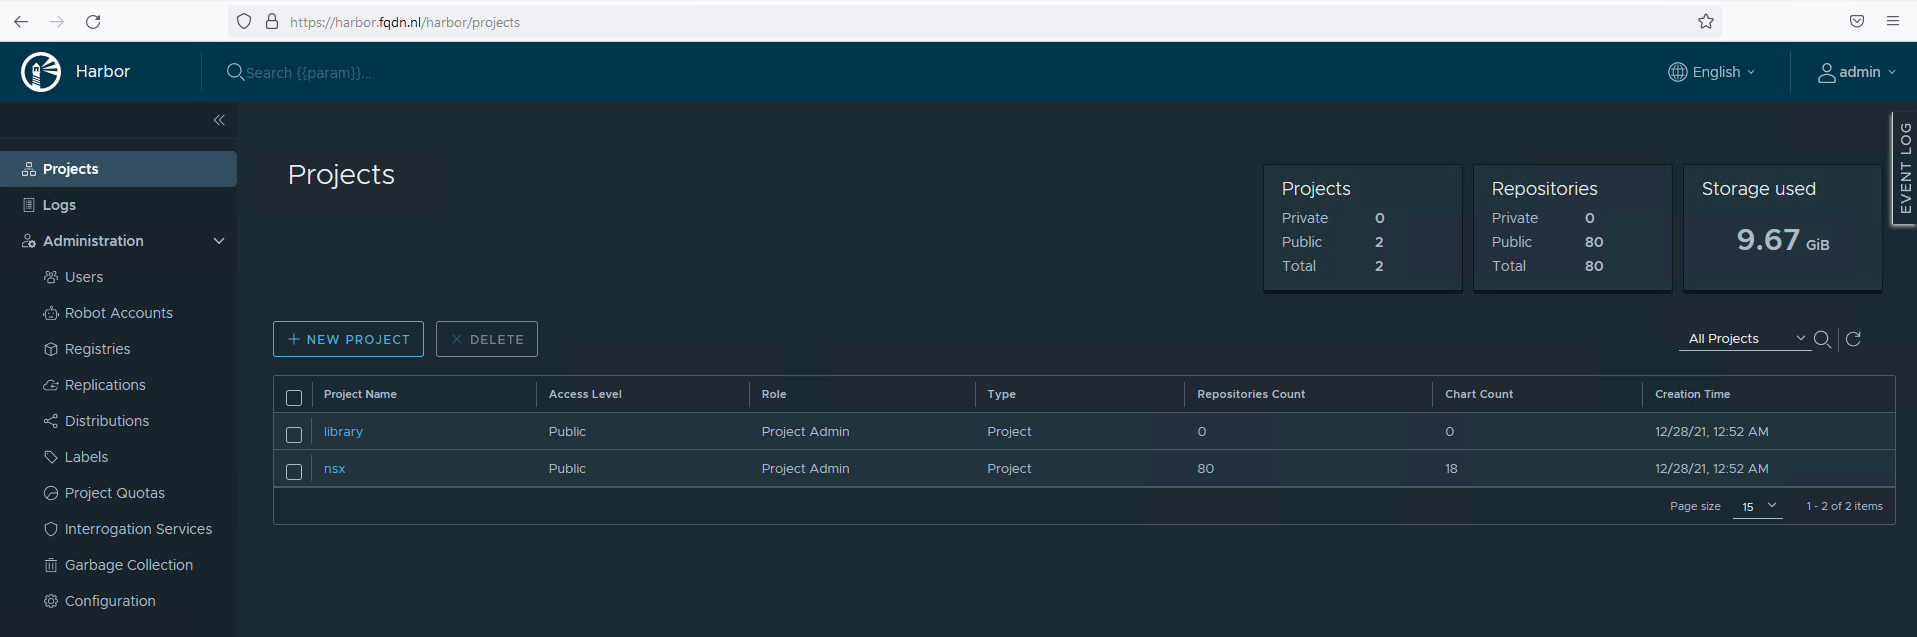
- Create a project in Harbor
I named the project nsx. Storage quota is -1, which will not apply a quota. Check the Public box
Making the registry Public, does not require to login.

2. Download NAPP files
Goto https://customerconnect.vmware.com/downloads/details?downloadGroup=NSX-INTLLG-320&productId=931&rPId=80577
and download NSX Application Platform (23GB in size)
3. Unpack the file on the VM where you installed Harbor on.
$ mkdir harbor
$ cd harbor
Download/upload Harbor to this directory
$ tar xvfz VMware-NSX-Application-Platform-3.2.0.0.0.19067744.tgz
4. Edit upload_artifacts_to_private_harbor.sh
Change the following lines.
DOCKER_REPO=harbor.fqdn.nl/nsx
DOCKER_USERNAME=admin
DOCKER_PASSWORD=Harbor12345
5. Upload the files
Uploading will take a while.
$ chmod +x upload_artifacts_to_private_harbor.sh
$ sudo ./upload_artifacts_to_private_harbor.sh
WARNING! Using --password via the CLI is insecure. Use --password-stdin.
WARNING! Your password will be stored unencrypted in /root/.docker/config.json.
Configure a credential helper to remove this warning. See
https://docs.docker.com/engine/reference/commandline/login/#credentials-store

Login Succeeded
"helm_repo" already exists with the same configuration, skipping
Hang tight while we grab the latest from your chart repositories...
...Successfully got an update from the "helm_repo" chart repository

Update Complete. Happy Helming!
The push refers to repository [harbor.fqdn.nl/nsx/clustering/authserver]
<SNIP>
6. Check if the upload completed correctly
It is important that the script show ‘saved’ at the end.
{"saved":true}{"saved":true}{"saved":true}{"saved":true}{"saved":true}{"saved":true}{"saved":true}{"saved":true}{"saved":true}{"saved":true}{"saved":true}{"saved":true}{"saved":true}{"saved":true}{"saved":true}{"saved":true}{"saved":true}{"saved":true}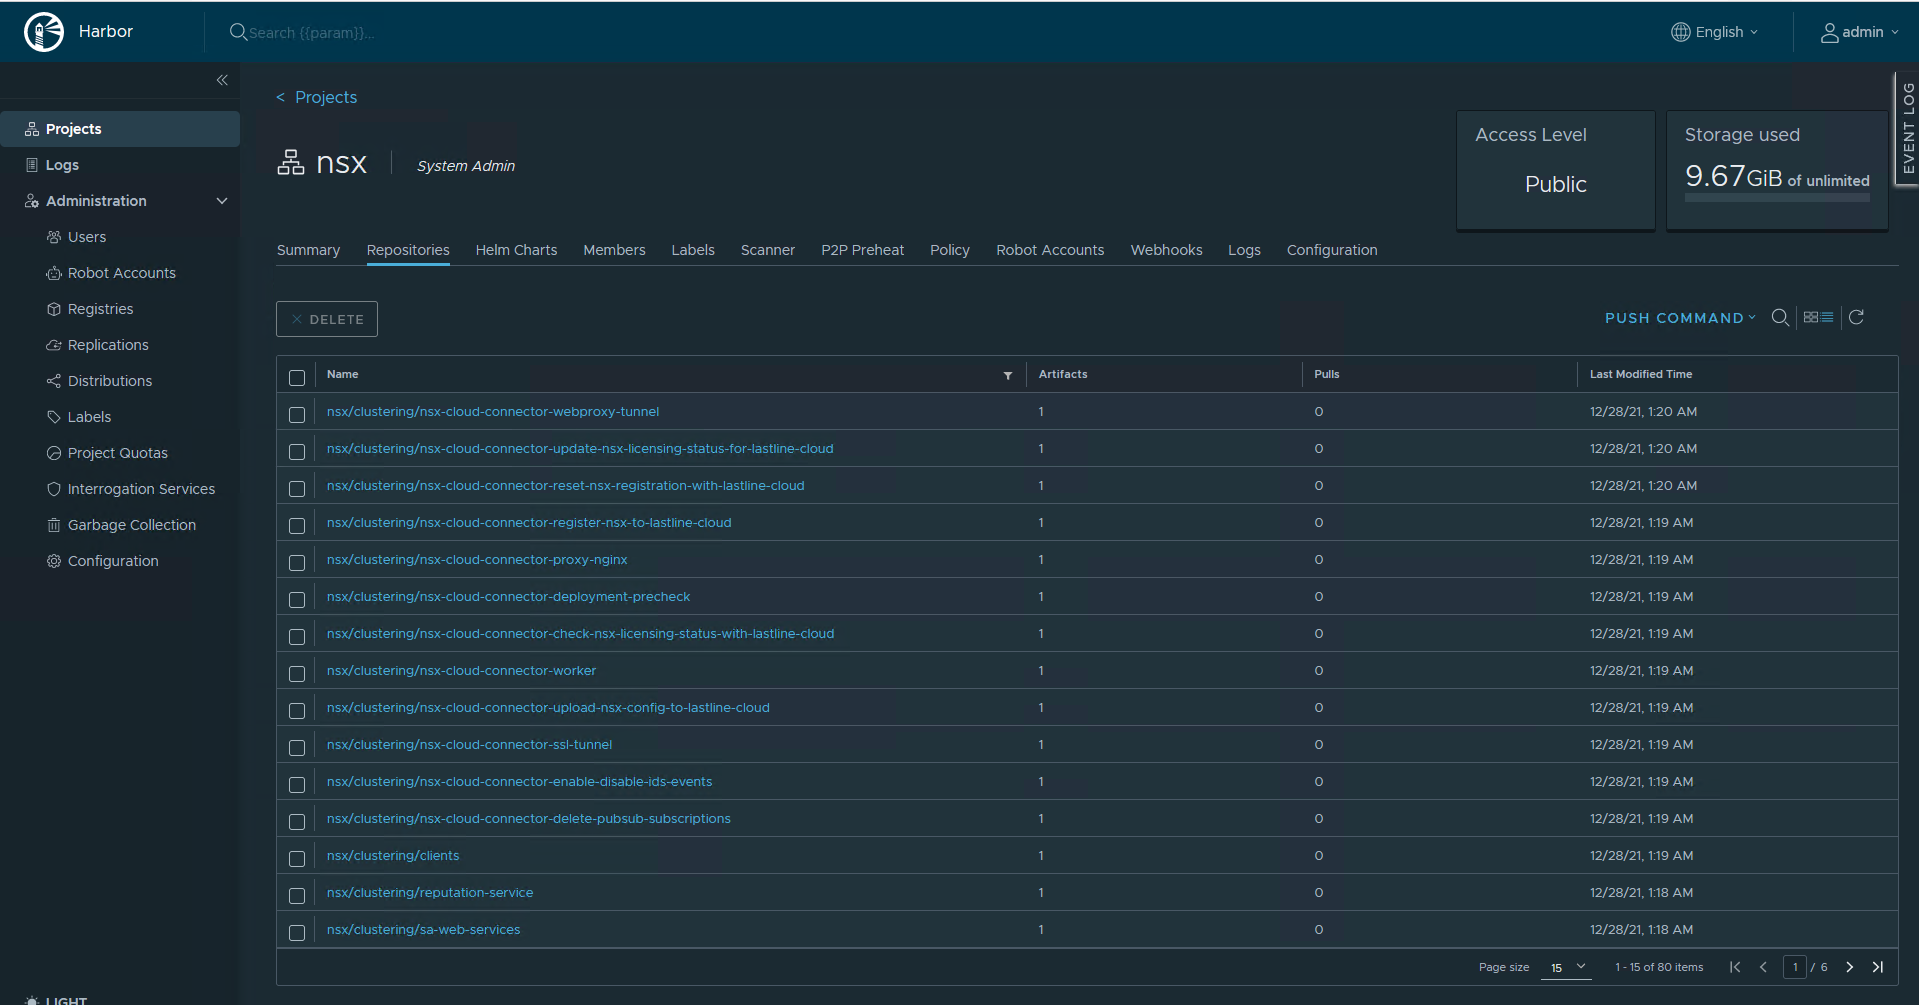
You can test if docker can pull an image from Harbor
$ docker pull harbor.fqdn.nl/nsx/clustering/third-party/cert-manager-webhook:19067763
19067763: Pulling from nsx/clustering/third-party/cert-manager-webhook
Digest: sha256:45c461bbf677c95776866b77d2789212ae31a384a65b37977ee1d24d8591ff33
Status: Image is up to date for harbor.fqdn.nl/nsx/clustering/third-party/cert-manager-webhook:19067763
harbor.fqdn.nl/nsx/clustering/third-party/cert-manager-webhook:19067763
Conclusion
That concludes part 3.
Harbor is installed.
Part 4 will cover the installation of the NSX Application Platform.
Shaffi
chris