
Introduction
NSX Advanced load balancer (AVI) is a 100% software-defined multi-cloud application services platform with Software Load Balancers, Intelligent WAF (iWAF), and Container Ingress.
All modern applications use load balancing nowadays. Load balancing is the process of distributing network traffic across multiple servers.
vSphere with Tanzu (TKGs) is the new generation of vSphere for containerized applications. This single, streamlined solution bridges the gap between IT operations and developers with a new kind of infrastructure for modern, cloud-native applications both on-premises and in public clouds.
Antrea is a Kubernetes-native project that implements the Container Network Interface (CNI) and Kubernetes NetworkPolicy, providing network connectivity and security for pod workloads.
Antrea extends the benefit of programmable networks from Open vSwitch (OVS) to Kubernetes.
The goal of this blog
The goal of this blog is to install AKO in the workload cluster using NodePortLocal.
NodePortLocal is a featuregate for Antrea.
AVI will be configured with NSX-T cloud.
I will not explain how to install vSphere 8, NSX-T, AVI, and vSphere with Tanzu.
Check vSphere with Tanzu series part 1 – Getting ready for NSX Application Platform – FQDN blog
and vSphere with Tanzu series part 2 – Create Tanzu cluster for NSX Application platform – FQDN blog
on how to install vSphere with Tanzu with NSX-T.
In vSphere 7, NodePortLocal was enabled by default (in later versions)
In vSphere 8, NodePortLocal is not enabled by default but can be enabled using AntreaConfig. (This might be changed in later releases. Anyway, you can use AntreaConfig to enable it)
What I am using
For my setup, I am using the following.
AVI 22.1.2-2p2
AKO 1.8.2
NSX-T 4.0.1.1
vSphere 8 GA
Officially AVI 22.1.2 is NOT (yet) supported with vSphere 8.
Getting AVI ready
Overview
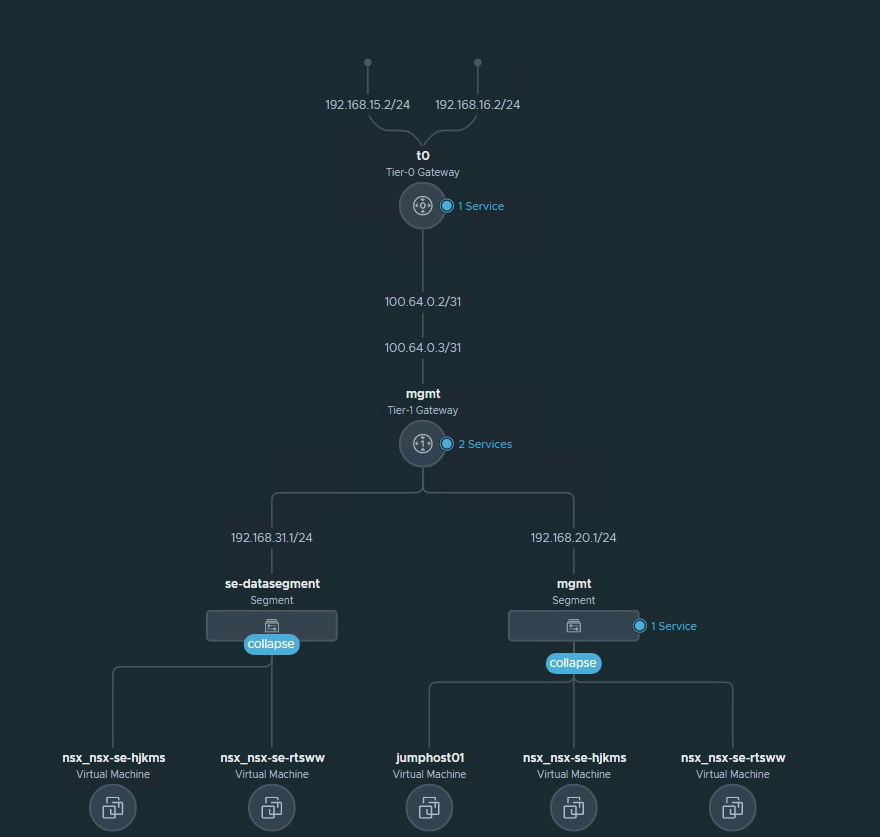
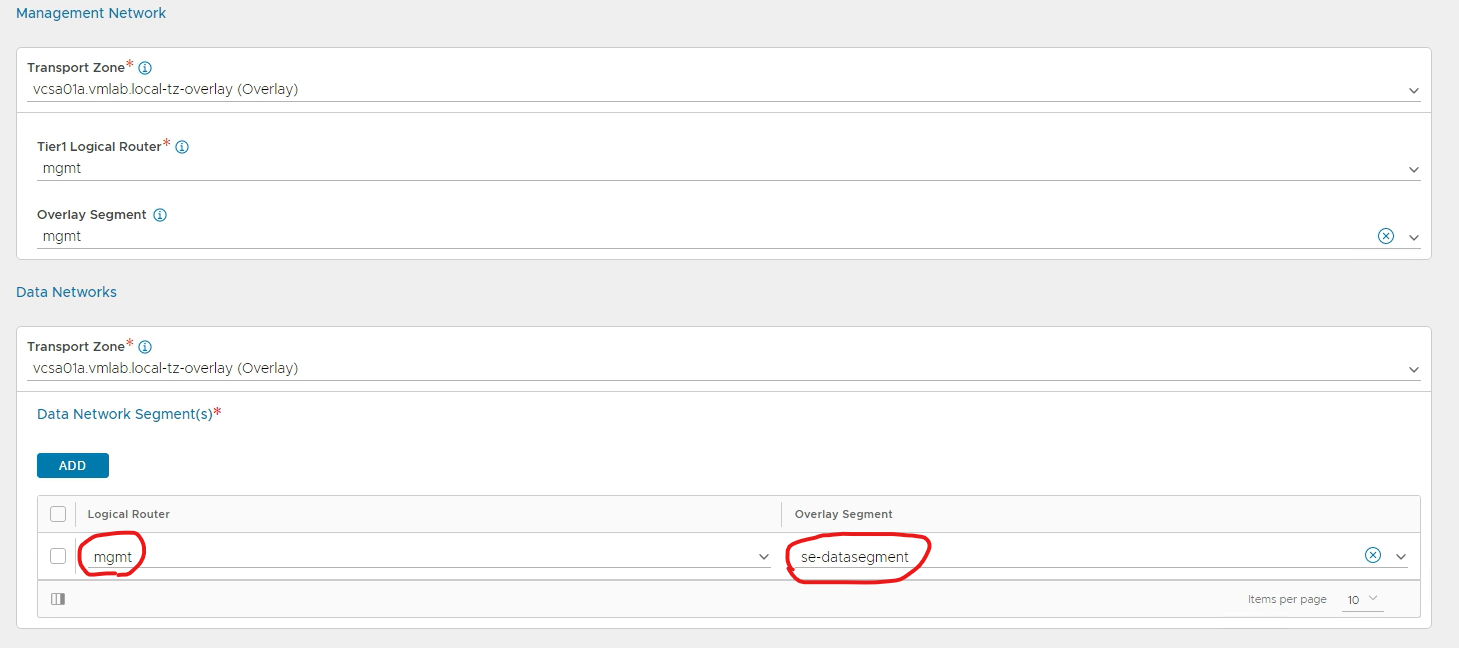
For the setup to work, the ServiceEngine Data Network Segment needs to be on its own T1.
My T1 is called ‘mgmt’
My Data Network Segment is called ‘se-datasegment’ (192.168.31.0/24)
The VIP network is called ‘vip-network’ (192.168.32.0/24). Avi will create a route on the T1 (mgmt) with next-hop the SEs IP.
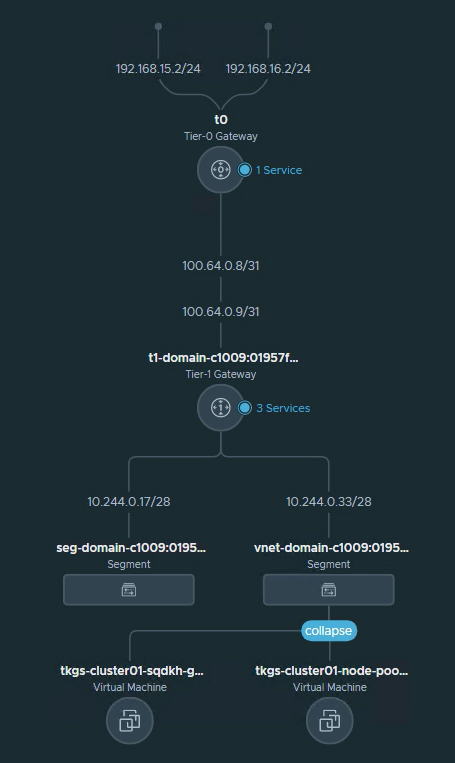
My workload clusters are in 10.244.x.x (This is the default when installing vSphere with Tanzu)
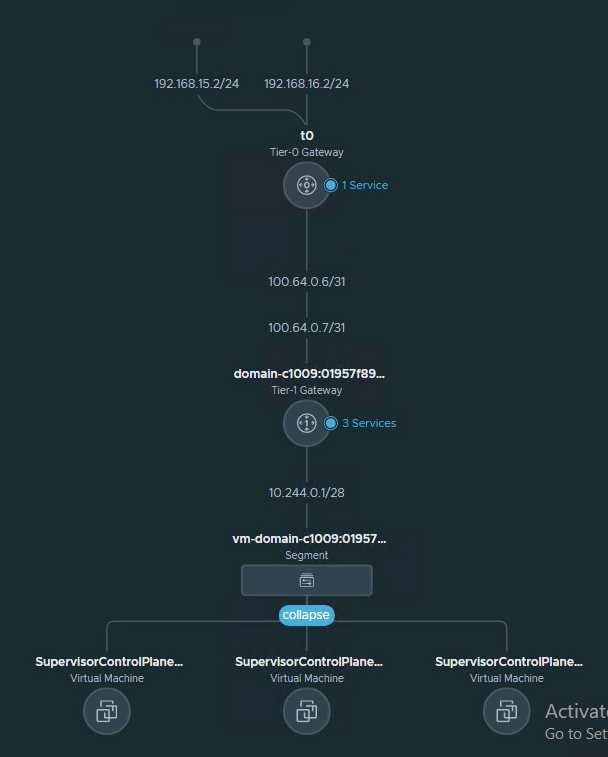
My setup will look like this.
This is how the supervisor cluster is connected.
This is how the workload cluster is connected
This is how AVI SE is connected.
se-datasegment (SE, datapath)
mgmt (SE, management)
1. Configure NSX-T cloud
Setup your NSX-T cloud (if you not already did)
Do not forget to set up IPAM and DNS profiles.
For DNS I am using ‘nordic.fqdn.nl’
Here you can see my T1 and Data Network Segment
I am using two static pools, one on ‘se-datasegment’ for SEs
and one on ‘vip-network’ for the VIPs


2. Opening NSX-T DFW
vSphere for Tanzu manages the NSX-T DFW.
For that reason we need to open up the DFW, to allow Service Engine traffic to the workload clusters.
AVI SE’s are added to the NSX-T exclude list by default, this is needed for native scaling.
I added the rule to the Emergency group, just to make it simple.
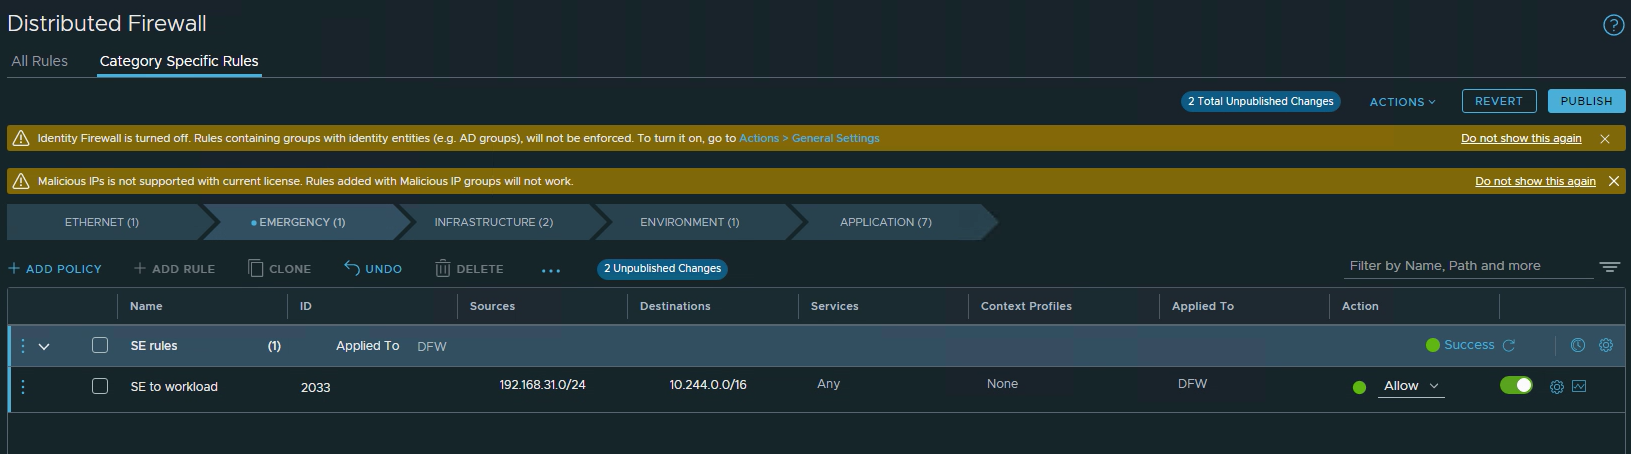
Important note: AVI AKO needs to talk to AVI controller. Ako will be running on the workload cluster. Check your firewall setting where needed.
Creating a workload cluster.
1. Create a new namespace.
Take a look at vSphere with Tanzu series part 2 – Create Tanzu cluster for NSX Application platform – FQDN blog on how to create a namespace in vSphere with Tanzu
In this blog, my namespace is called ‘chris’
My IP of the supervisor cluster is ‘192.168.51.2’
You can add your password to .bashrc, if you want.
I am using self-signed certificates and I use an IP address instead of a hostname. Because of this, I need ‘–insecure-skip-tls-verify’. In a production environment, you should use hostnames and proper certificates.
export KUBECTL_VSPHERE_PASSWORD=XXXXX#Login to tkgs
kubectl vsphere login --server=192.168.51.2 -u administrator@vsphere.local --insecure-skip-tls-verify
kubectl config use-context chris2. AntreaConfig
Please note the following.
My cluster name will be ‘tkgs-cluster01’
In AntreaConfig you need to add ‘-antrea-package’ to the name.
The name of the config will be ‘tkgs-cluster01-antrea-package’
I have enabled NodePortLocal. ‘NodePortLocal: true‘
#antreaconfig.yaml
apiVersion: cni.tanzu.vmware.com/v1alpha1
kind: AntreaConfig
metadata:
  name: tkgs-cluster01-antrea-package
  namespace: chris
spec:
  antrea:
    config:
      featureGates:
        AntreaProxy: true
        EndpointSlice: true
        NodePortLocal: true
        AntreaPolicy: true
        FlowExporter: false
        NetworkPolicyStats: false
        Egress: false
kubectl apply -f antreaconfig.yaml
kubectl get antreaconfig
kubectl describe antreaconfig
#check if Node Port Local is true

3. Creating a cluster
The name of my cluster is ‘tkgs-cluster01’
I will be using ‘kind: Cluster‘ to create the cluster (More info on ClusterClass here).
The workload cluster will have one master and one worker node, running tkg version ‘v1.23.8+vmware.2-tkg.2-zshippable’ (which can be downloaded from https://wp-content.vmware.com/v2/latest) (Release Notes)
vmClass and storageClass are defined when you create the namespace. You can use kubectl to get them from the cluster.

#cluster.yaml
apiVersion: cluster.x-k8s.io/v1beta1
kind: Cluster
metadata:
  name: tkgs-cluster01
  namespace: chris
spec:
  clusterNetwork:
    services:
      cidrBlocks: ["10.6.64.0/22"]
    pods:
      cidrBlocks: ["10.6.68.0/22"]
    serviceDomain: "cluster.local"
  topology:
    class: tanzukubernetescluster
    version: v1.23.8+vmware.2-tkg.2-zshippable
    controlPlane:
      replicas: 1
      metadata:
        annotations:
          run.tanzu.vmware.com/resolve-os-image: os-name=photon
    workers:
      machineDeployments:
        - class: node-pool
          name: node-pool-01
          replicas: 1
          metadata:
            annotations:
              run.tanzu.vmware.com/resolve-os-image: os-name=photon
    variables:
      - name: vmClass
        value: best-effort-small
      - name: storageClass
        value: vsan-default-storage-policy
kubectl apply -f cluster.yamlvSphere with Tanzu will create the cluster.
After a while you can login to the cluster.
kubectl vsphere login --server=192.168.51.2 -u administrator@vsphere.local --insecure-skip-tls-verify --tanzu-kubernetes-cluster-name tkgs-cluster01 --tanzu-kubernetes-cluster-namespace chris
kubectl config use-context tkgs-cluster01
4. Install AKO
For installing AKO, we need HELM. See here for installation.
# We need permissions in the cluster.
kubectl create clusterrolebinding default-tkg-admin-privileged-binding --clusterrole=psp:vmware-system-privileged --group=system:authenticated

# Create avi-system namespace
kubectl create ns avi-system

# Install AKO
helm install  oci://projects.registry.vmware.com/ako/helm-charts/ako --generate-name --version 1.8.2 -f values.yaml  --set ControllerSettings.controllerHost=192.168.11.71 --set avicredentials.username=admin --set avicredentials.password=VMware1\! --namespace=avi-system
This is the values.yaml file I use.
Please note the following. AKO will only do L7. L4 will be done by NSX.
Change the following settings to match yours.
cniPlugin: 'antrea'
clusterName: tkgs
layer7Only: true
nsxtT1LR: '/infra/tier-1s/mgmt'
vipNetworkList:
   - networkName: vip-network
     cidr: 192.168.32.0/24
serviceType: NodePortLocal
ControllerSettings:
  serviceEngineGroupName: Default-Group
  controllerVersion: '22.1.2'
  cloudName: nsx01aa
  controllerHost: '192.168.11.71'
  tenantName: admin
# values.yaml
# Default values for ako.
# This is a YAML-formatted file.
# Declare variables to be passed into your templates.
replicaCount: 1
image:
repository: projects.registry.vmware.com/ako/ako
pullPolicy: IfNotPresent
### This section outlines the generic AKO settings
AKOSettings:
primaryInstance: true # Defines AKO instance is primary or not. Value `true` indicates that AKO instance is primary. In a multiple AKO deployment in a cluster, only one AKO instance should be primary. Default value: true.
enableEvents: 'true' # Enables/disables Event broadcasting via AKO
logLevel: WARN # enum: INFO|DEBUG|WARN|ERROR
fullSyncFrequency: '1800' # This frequency controls how often AKO polls the Avi controller to update itself with cloud configurations.
apiServerPort: 8080 # Internal port for AKO's API server for the liveness probe of the AKO pod default=8080
deleteConfig: 'false' # Has to be set to true in configmap if user wants to delete AKO created objects from AVI
disableStaticRouteSync: 'false' # If the POD networks are reachable from the Avi SE, set this knob to true.
clusterName: tkgs # A unique identifier for the kubernetes cluster, that helps distinguish the objects for this cluster in the avi controller. // MUST-EDIT
cniPlugin: 'antrea' # Set the string if your CNI is calico or openshift. enum: calico|canal|flannel|openshift|antrea|ncp
enableEVH: false # This enables the Enhanced Virtual Hosting Model in Avi Controller for the Virtual Services
layer7Only: true # If this flag is switched on, then AKO will only do layer 7 loadbalancing.
# NamespaceSelector contains label key and value used for namespacemigration
# Same label has to be present on namespace/s which needs migration/sync to AKO
namespaceSelector:
labelKey: ''
labelValue: ''
servicesAPI: false # Flag that enables AKO in services API mode: https://kubernetes-sigs.github.io/service-apis/. Currently implemented only for L4. This flag uses the upstream GA APIs which are not backward compatible
# with the advancedL4 APIs which uses a fork and a version of v1alpha1pre1
vipPerNamespace: 'false' # Enabling this flag would tell AKO to create Parent VS per Namespace in EVH mode
istioEnabled: false # This flag needs to be enabled when AKO is be to brought up in an Istio environment
# This is the list of system namespaces from which AKO will not listen any Kubernetes or Openshift object event.
blockedNamespaceList: []
#blockedNamespaceList:
# - kube-system
# - kube-public
# - tanzu-system-registry
ipFamily: 'V4' # This flag can take values V4 or V6 (default V4)
### This section outlines the network settings for virtualservices.
NetworkSettings:
## This list of network and cidrs are used in pool placement network for vcenter cloud.
## Node Network details are not needed when in nodeport mode / static routes are disabled / non vcenter clouds.
nodeNetworkList: []
enableRHI: false # This is a cluster wide setting for BGP peering.
nsxtT1LR: '/infra/tier-1s/mgmt' # T1 Logical Segment mapping for backend network. Only applies to NSX-T cloud.
bgpPeerLabels: [] # Select BGP peers using bgpPeerLabels, for selective VsVip advertisement.
# bgpPeerLabels:
# - peer1
# - peer2
#vipNetworkList: [] # Network information of the VIP network. Multiple networks allowed only for AWS Cloud.
vipNetworkList:
- networkName: vip-network
cidr: 192.168.31.0/24
# v6cidr: 2002::1234:abcd:ffff:c0a8:101/64
### This section outlines all the knobs used to control Layer 7 loadbalancing settings in AKO.
L7Settings:
defaultIngController: 'false'
noPGForSNI: false # Switching this knob to true, will get rid of poolgroups from SNI VSes. Do not use this flag, if you don't want http caching. This will be deprecated once the controller support caching on PGs.
serviceType: NodePortLocal # enum NodePort|ClusterIP|NodePortLocal
shardVSSize: SMALL # Use this to control the layer 7 VS numbers. This applies to both secure/insecure VSes but does not apply for passthrough. ENUMs: LARGE, MEDIUM, SMALL, DEDICATED
passthroughShardSize: SMALL # Control the passthrough virtualservice numbers using this ENUM. ENUMs: LARGE, MEDIUM, SMALL
enableMCI: 'false' # Enabling this flag would tell AKO to start processing multi-cluster ingress objects.
### This section outlines all the knobs used to control Layer 4 loadbalancing settings in AKO.
L4Settings:
defaultDomain: '' # If multiple sub-domains are configured in the cloud, use this knob to set the default sub-domain to use for L4 VSes.
autoFQDN: default # ENUM: default(<svc>.<ns>.<subdomain>), flat (<svc>-<ns>.<subdomain>), "disabled" If the value is disabled then the FQDN generation is disabled.
### This section outlines settings on the Avi controller that affects AKO's functionality.
ControllerSettings:
serviceEngineGroupName: Default-Group # Name of the ServiceEngine Group.
controllerVersion: '22.1.2' # The controller API version
cloudName: nsx01aa # The configured cloud name on the Avi controller.
controllerHost: '192.168.11.71' # IP address or Hostname of Avi Controller
tenantName: admin # Name of the tenant where all the AKO objects will be created in AVI.
nodePortSelector: # Only applicable if serviceType is NodePort
key: ''
value: ''
resources:
limits:
cpu: 350m
memory: 400Mi
requests:
cpu: 200m
memory: 300Mi
podSecurityContext: {}
rbac:
# Creates the pod security policy if set to true
pspEnable: false
avicredentials:
username: 'admin'
password: 'VMware1!'
authtoken:
certificateAuthorityData:
persistentVolumeClaim: ''
mountPath: /log
logFile: avi.log5. Check AKO
You can look at the log file of AKO and check if everything is ok.
The most common error you might see is ‘IPAM or DNSprofile’
kubectl get logs ako-0 -n avi-system
Testing
Let the fun begin 🙂 Testing if everything works as intended.
Use these simple YAML files.
Important note:
nodeportlocal.antrea.io/enabled: “true”
kubectl create ns demo
kubectl apply -f k8sDeploymentBusyBoxFrontEndV1.yml -n demo
kubectl apply -f k8sSvcClusterIpBusyBoxFrontEndV1.yml -n demo
kubectl apply -f ingress.yaml -n demo
# k8sDeploymentBusyBoxFrontEndV1.yml
apiVersion: apps/v1
kind: Deployment
metadata:
name: web-front1
annotations:
nodeportlocal.antrea.io/enabled: "true"
spec:
replicas: 4
selector:
matchLabels:
app: web-front1
template:
metadata:
name: web-front1
labels:
app: web-front1
spec:
containers:
- name: web-front1
image: tacobayle/busybox-v1
command: [ "sh", "-c"]
args:
- while true; do
echo -e "HTTP/1.1 200 OK\n\n$(date)\nApp version is $(printenv AppVersion)\nNode is on nordiclab $(printenv MY_NODE_NAME)\nPod is $(printenv MY_POD_NAME)\nNamespace is $(printenv MY_POD_NAMESPACE)\nPod IP is $(printenv MY_POD_IP)\nPod Service account is $(printenv MY_POD_SERVICE_ACCOUNT)" | nc -l -p 8080;
done;
env:
- name: MY_NODE_NAME
valueFrom:
fieldRef:
fieldPath: spec.nodeName
- name: MY_POD_NAME
valueFrom:
fieldRef:
fieldPath: metadata.name
- name: MY_POD_NAMESPACE
valueFrom:
fieldRef:
fieldPath: metadata.namespace
- name: MY_POD_IP
valueFrom:
fieldRef:
fieldPath: status.podIP
- name: MY_POD_SERVICE_ACCOUNT
valueFrom:
fieldRef:
fieldPath: spec.serviceAccountName
restartPolicy: Always# k8sSvcClusterIpBusyBoxFrontEndV1.yml
apiVersion: v1
kind: Service
metadata:
name: web-front-1
annotations:
nodeportlocal.antrea.io/enabled: "true"
spec:
selector:
app: web-front1
ports:
- protocol: TCP
port: 80
targetPort: 8080# ingress.yaml
apiVersion: networking.k8s.io/v1
kind: Ingress
metadata:
name: ingress
spec:
ingressClassName: avi-lb
rules:
- host: ingress2.k8s.nordic.fqdn.nl #Provide Your Hostname here
http:
paths:
- pathType: Prefix
path: "/v1"
backend:
service:
name: web-front-1
port:
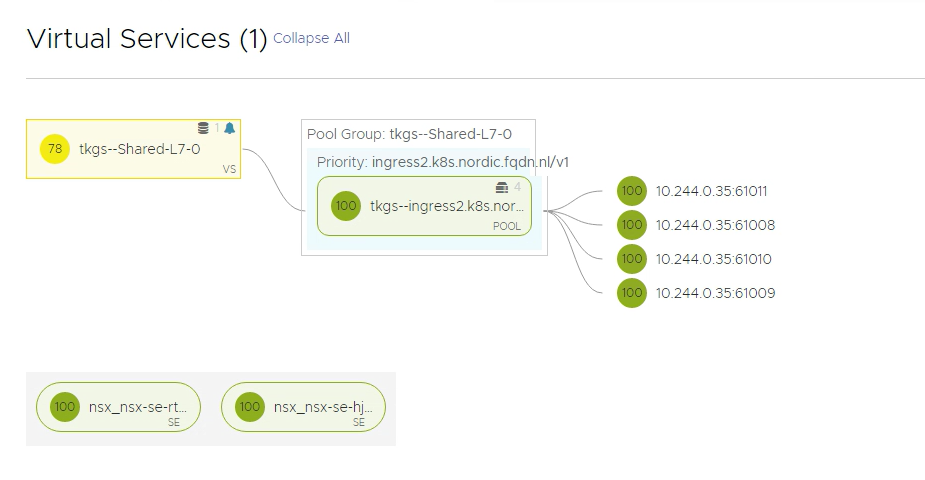
number: 8080In AVI, you should see something similar.
10.244.x.x are the IPs of the worker nodes. In my example, there is only one worker node

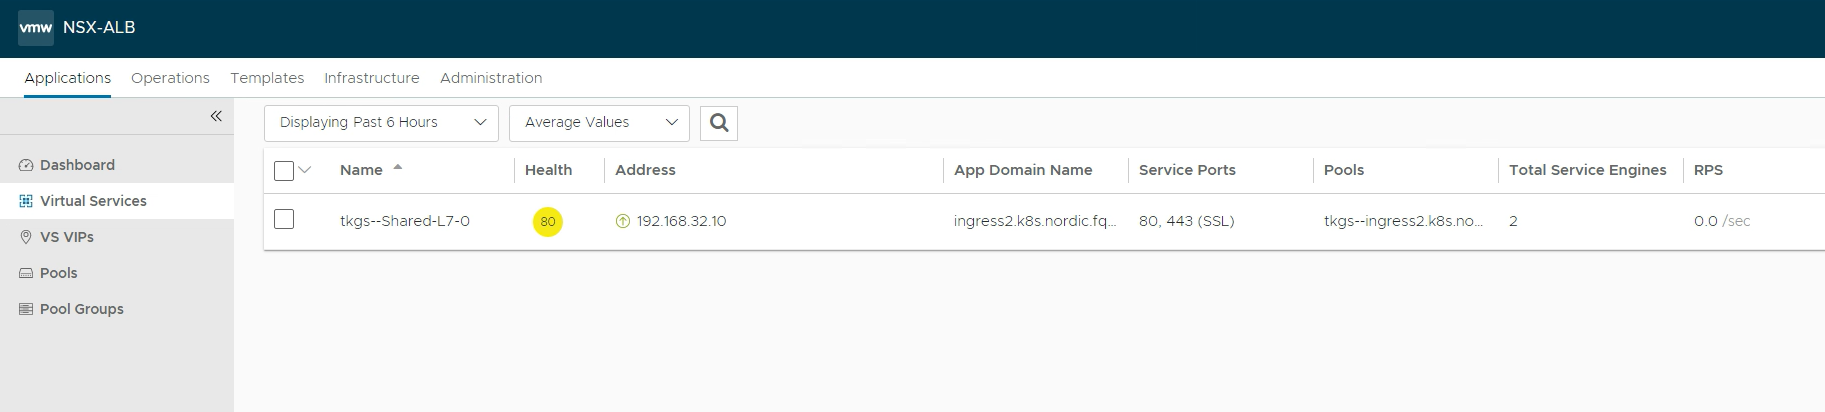
Testing the URL in the browser

Final words
vSphere with Tanzu has added more and more possibilities.
Very happy to see NodePortLocal available in that.